In addition to its use as a virtual meeting space, Zoom is a quick and reliable way to record instructional videos with accompanying visuals and slides. This method works well for short lecture recordings, course introductions, or assignment walkthroughs.
Use MediaSpace links instead of Zoom links
All videos recorded in Zoom are automatically saved to MediaSpace, where they are captioned for accessibility and easy to embed in your Canvas course. MediaSpace also stores videos for 2 years after the last view (while the original Zoom-hosted recordings are only saved for 90 days), making MediaSpace links the best option for sharing videos in courses.
To enable Zoom’s automatic backup to MediaSpace, you must log in to MediaSpace to activate your account at media.pdx.edu . If you’ve used MediaSpace previously, you can skip this step. If you’re unsure, log in to be safe.
The steps below outline the minimum recommended settings. You may need to adjust additional settings based on your specific needs or preferences.
- Sign in to pdx.zoom.us with your PSU Odin credentials.
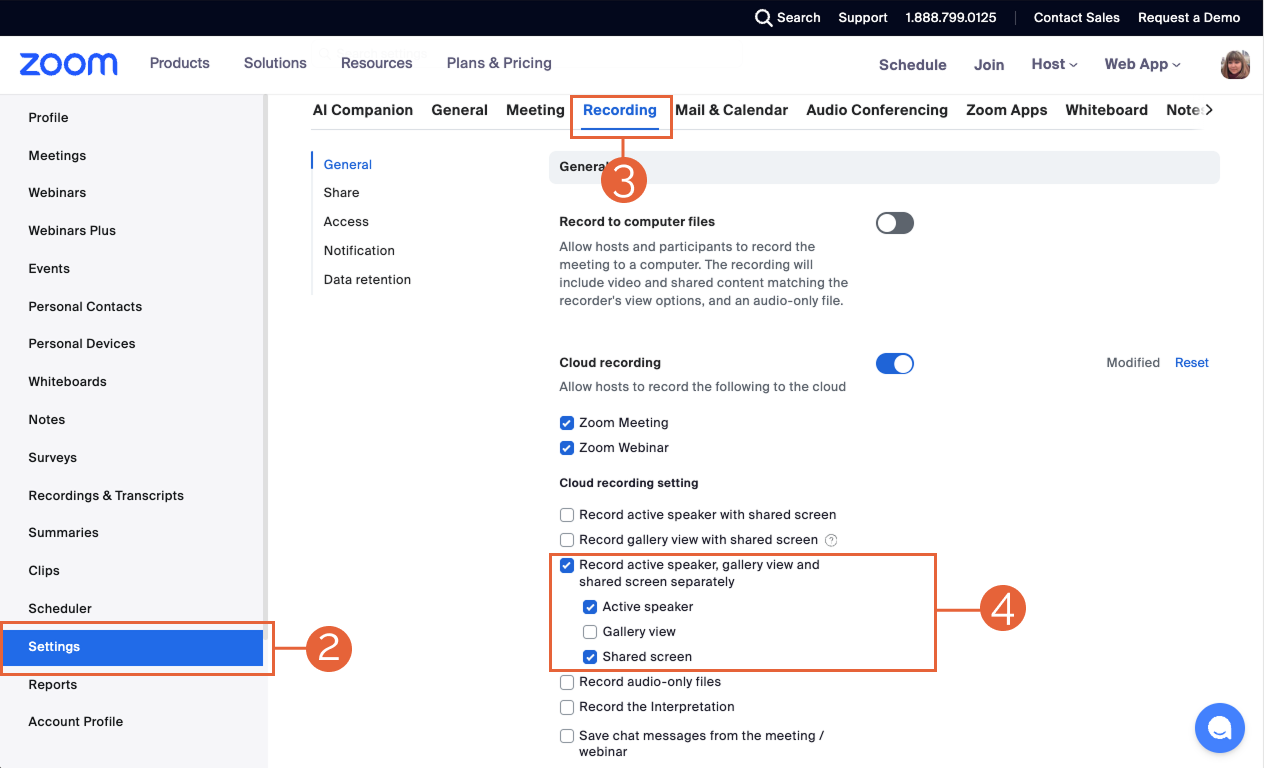
- From the left-hand menu, select Settings (2).
- At the top of the page, select Recording (3).
- Under Cloud Recording (4) options, check only the following three options:
- Check Record active speaker, gallery view and shared screen separately
- Check Active speaker
- Check Shared screen
- Check Record active speaker, gallery view and shared screen separately
Recording an instructional video in Zoom is just like recording any other Zoom meeting… the only difference is that you’ll be the only person in the meeting! Here are a couple of tips that will help make this process a little easier:
- Name your recording sessions: While you can record in your personal meeting room, scheduling a meeting allows you to give it a unique name, making it easier to find it later in MediaSpace. Consider using a consistent naming format, such as “Course# – Week# – Topic,” to stay organized.
- Record multiple videos: If you want to create several short clips as part of a larger topic, simply start and stop the recording as needed. Afterward, be sure to rename each recording in MediaSpace to reflect its content so you can easily identify it when sharing.
Don’t forget to plan ahead!
Because only minor edits are possible in this workflow, it helps to plan before you record.
- Draft a brief outline or script to guide your talking points.
- Note when you want to display specific visuals or slides.
A little preparation goes a long way toward making your recording session smoother and your final video feel clear, concise, and polished. For more information, visit Create engaging videos.
Your video(s) will automatically upload to MediaSpace after you stop recording in Zoom. Follow these steps to find your video and prepare it to share:
- Log in to PSU MediaSpace.
- Select your name in the upper right corner, and then choose My Media to access your Media library.
- Depending on the length of your recording, it may take a while to show up on your My Media page.
- If you made multiple recordings in the same Zoom meeting, they will share the same title and appear in reverse recording order (the most recent recording will be listed first).
- Once your video appears, review and update the following:
- Rename the video title from its default Zoom title for each recording. (Reminder: Using a consistent naming convention will help you locate videos in the future!)
- Review and edit captions for accuracy.
- Update your media permissions so it’s ready to share.
After you have reviewed your video and made all the necessary updates, you can share it with others via a direct link or embed it in your Canvas course.
This article was last updated .
You might also like


👋Need more help?
Submit a support request through our Faculty Support portal for assistance.