Back to Zoom Tutorials
When you set a Zoom Cloud recording settings to Share, it generates a link you can make public or restrict to PSU users.
- Sign in to your Zoom web portal at pdx.zoom.us
In the navigation menu on the left, click Recordings.
Click the Share button on the right of the recording you want to make available.

- This displays setting options:
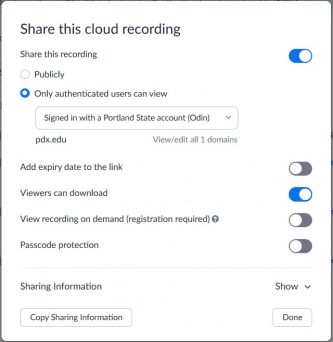
- Share this recording: Allows the recording to be shared publicly or internally. Switch the toggle off if you want the recording to be private. If you share the recording, Zoom will create a web page where visitors can view the cloud recording.
Add expiry date to the link: Allows you to set number of days or specific date when the link will expire for viewers.
Viewers can download: Allows viewers to download the video in addition to viewing it online.
Viewers can see transcript: Allows viewers to see the auto transcript if Zoom was able to process one.
On-demand(Registration Required): Requires users to enter their name and email address before viewing or downloading the recording. The host will be able to download a report with this information.
Password protection: Requires users to enter a password before viewing or downloading the recording. After toggling this to on, enter a custom password and click Save.
Copy sharing information to clipboard: Copies the link and password (if enabled) to your cloud recording. Share this information to allow others to view the cloud recording. - Click Done to save these settings.
This article was last updated on .


👋Need more help?
Submit a support request through our Faculty Support portal for assistance.