Back to MediaSpace Tutorials

The default recording in Kaltura Capture captures both your screen and a webcam recording of you. You can also create Screen only, Camera only, or Audio only recordings.

NOTE: Before you begin, you will need to Install Kaltura Capture, if you haven’t already.

  1. Log in to media.pdx.edu
  2. Click + Add New, then select Kaltura Capture.
  3. Read and confirm the Copyright policy notice.
  4. The Kaltura Capture Desktop Recorder will pop up.
  5. Click the word Screen to verify or select your Screen recording settings.
    Screen settings
  6. Repeat for Camera and Audio settings.
  7. Click the red button to start recording.
  8. A 3-second countdown will appear on screen.
  9. Once the countdown disappears, your recording will begin.
  10. Click the square button to stop the recording.
  11. Confirm that you want to stop the recording.
  12. The Kaltura Capture Menu will pop up.
  13. Optionally adjust the title, description, and tags for your video.
  14. Click Save and Upload to upload to MediaSpace.
  15. Wait for the upload to finish, and follow the link to view.

Create Screen Only, Camera Only, or Audio Only Recordings

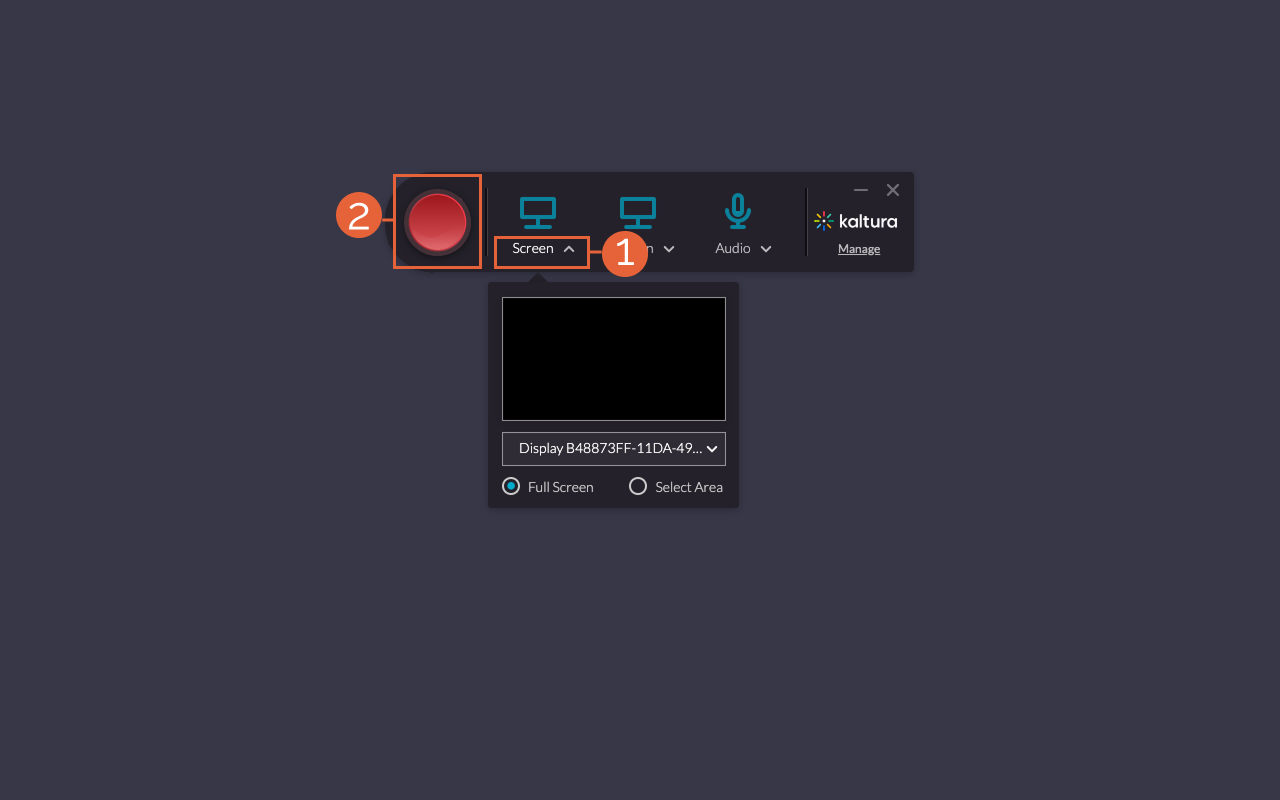
To create a recording other than the default screencast with webcam feed, disable the screen and/or camera feed in the Kaltura Capture Desktop Recorder.

  1. Log in to media.pdx.edu
  2. Click + Add New, then Kaltura Capture.
  3. Read and confirm the Copyright policy notice.
  4. The Kaltura Capture Desktop Recorder will pop up.
  5. Click the screen icon to disable screen recording, click the camera icon to disable webcam recording, and/or click the microphone to disable audio input.
    Kaltura Capture feed icons
    If you want to record video of just yourself, disable the screen recording by clicking the screen icon.
    If you want to record video of just your screen, disable the webcam by clicking the camera icon.
    If you want to record silent video, disable the microphone by clicking the microphone icon.
  6. Click the red button to start recording.
  7. A 3-second countdown will appear on screen.
  8. Once the countdown disappears, your recording will begin.
  9. Click the square button to stop the recording.
  10. Confirm that you want to stop the recording.
  11. The Kaltura Capture Menu will pop up.
  12. Optionally adjust the title, description, and tags for your video.
  13. Click Save and Upload to upload to MediaSpace.
  14. Wait for the upload to finish, and follow the link to view.

If you capture both your screen and your webcam, MediaSpace stores them as two separate files that can be configured to play only a single view, a side-by-side view, or a picture-in-picture view with either image large or small. Note: these options cannot be locked. Students will have the same options when viewing the video.

This article was last updated on Mar 8, 2024 @ 3:07 pm.