
Email all students in your course using Google Groups
Approximately two weeks before the start of each term, a Google Group is created for each course in Banner. These groups are maintained for 2 terms. You can use your class group to email all students enrolled in your course.
NOTE: Canvas mail forwards messages to and from PSU Gmail addresses, so you can now message your class (or selected students/groups) from the Canvas Inbox and get replies in both Canvas mail and PSU Gmail.
- Sign into your PSU Gmail account from mail.pdx.edu.
- Select the Google Groups icon from your Google Apps menu, or go directly to groups.google.com/ while logged into your PSU Google account.
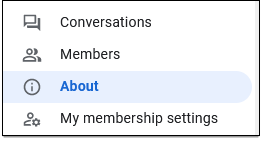
- Click the Group for your course to open it.
- On the left of that screen, select About.

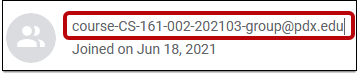
- At the top of the About screen, under the full course title, copy the group email address:
- Paste it into your Gmail message “to” address area.
The format for the group email address is: course-[department abbreviation]-[course number]-[course section number]-[course year and four digit term code]-group@pdx.edu
For more information, see the OIT article on Google Groups for Classes

Navigating Your New Canvas Course
Contributors:Misty Hamideh
Using any tool for the first time can be overwhelming. This guide can help focus your attention on what matters most when getting started with Canvas, and make it easier to follow more detailed tutorials.
By the end of this guide, you’ll be able to:
- Log in to Canvas at PSU.
- Navigate to your dashboard.
- Manage your user profile and settings.
- Find where to toggle tools on and off for students.
- Identify which Canvas tools may be most relevant to your teaching practice.
- Locate and explore further resources.
First Things First: Logging in
Canvas is a web application, so you’ll start by going to a specific URL in your browser. Every university that uses Canvas has a unique URL for it. At PSU, it’s canvas.pdx.edu.
Logging in to Canvas starts with the familiar “Single Sign On” page if you’re not currently logged in to the PSU system. Enter your Odin credentials just as you would for your PSU Gmail.
If you’re already signed into a PSU domain you may not get the “Single Sign On” page, and instead be automatically logged in.
Navigating and Understanding Your Dashboard
The Canvas Dashboard is your “home base.” You can do many things from the Dashboard, but its most important functions are:
- Viewing and editing the details of your account (such as notification settings, personal pronouns, and user avatar)
- Accessing your current courses
- Viewing the global calendar
- Submitting a support request to Canvas and/or access Canvas documentation
If you ever get lost, you can always come back to your Dashboard by selecting the Dashboard icon in the global navigation bar.
- To explore Dashboard features in detail, try the Canvas getting started guide.
- For more help, Canvas has a detailed list of support options in a step by step tutorial.
User Settings
Before getting started in Canvas, update your personal settings. You’ll need to do it only once (unless your preferences change), but it’s an important step to make sure you stay connected with your classes.
Here are the main settings to review. The links lead to detailed guides:
Designing Your Course
After exploring your dashboard, user preferences, and profile, think about course design options. Canvas is a collection of tools for creating materials and activities, but you can use them for teaching in many ways. More than one tool might help you reach a particular learning goal. Learning Canvas is primarily about discovering what each tool can do and then experimenting.
Navigation Options
By default, your Canvas courses will show links to the most commonly used tools in the main navigation bar. However, you can customize course navigation and remove the tools you’re not using. This will help students find activities and materials more easily.
Using Modules
Students may find it confusing to search through multiple links for the materials and activities they need. We’ve heard from students that it’s frustrating when instructors don’t organize course materials and activity links in modules.
Using modules to organize all your instructions, content, activities, and assignments gives students one central location to look for everything. The Modules list is your course’s “table of contents,” so place it at the beginning of your navigation list. What’s more:
- Using weekly modules is a practice most students find helpful.
- By using modules as your “table of contents,” you can hide Assignments, Quizzes, and Discussions from the navigation bar in the student view.

Flexible teaching strategies

Flexible teaching strategies offer ways to provide content, peer learning, and student inquiry activities that work for in-person, online, or blended learning contexts. In a traditional course classroom activities are synchronous. That includes lectures, discussions, labs, and small group work.Activities that are usually asynchronous include reading, media viewing, and homework.
With technology, teaching strategies that are usually synchronous can become asynchronous and vice-versa. For example, you can break lectures into short videos and have students view them online. Reading can become a peer activity using a shared annotation tool like Hypothes.is. Below are some strategies to help you stay flexible and explore new options.
Flexible teaching strategies for content
Sharing knowledge with students through written and media content is often the backbone of academic teaching. The challenge is to help them care about and question that material in productive ways. Students learn better when they feel your enthusiasm and insight. They’ll also learn more when you connect new ideas with their prior experience and knowledge.
Suggested guidelines
- Deliver or record your presentations in 15 minute “chapters” interspersed with activities. This is particularly important for challenging reading material or presentations. Some examples of what to record:
- Demonstrate a procedure, project, or method of reasoning.
- Show examples of the kind of work you want students to produce.
- Explain abstract content with practical examples or case studies.
- Show students a solved challenge and give them a new, partially-solved problem to complete individually or in groups.
- Present recorded field work, subject-expert interviews, or sample project work.
- Focus on introducing, roadmapping, sparking curiosity, and integrating new material with previous topics and course activities.
- Motivate students by displaying enthusiasm for and showing the relevance of the material to real-world applications and students’ current and future lives. Students learn and remember new material when it’s presented in relation to things they already know (or think they know) about.
- Introduce a new topic by walking through its sequenced components and methods. Build toward increasing complexity. Ideally, teach the steps in the same sequence that students must perform them.
- Give students the most help and rapid feedback early on, followed by prompts for independent inquiry instead of direct instruction.
Note: Explore the wide range of available media and Open Educational Resources. Don’t reinvent the wheel, but address any differences between your perspective or knowledge and those presented in the external media.
Activity ideas
- Use audio or video to record questions and interpretations, or to amplify the course material.
- Identify the theory or idea the material is advancing. Then identify an opposite theory and how that framework presents a different perspective.
- Create a concept map connecting the new material to topics already covered in class.
- List the three most interesting, controversial, or resonant ideas you found in the material and record/write a short rationale for the selection.
- List 10 key words from the material and write/record a summary based on these words.
- Write three substantive questions related to the content and share them with the class.
- Summarize the author’s or presenter’s position or objective. What are its assumptions or preconceptions?
- Identify the main point, and arguments or evidence for and against it.
- Choose three key words or concepts from the material and define them.
- Create a collage or video around the material’s themes, and briefly describe their choices.
Flexible teaching strategies for peer learning
Students create more personalized learning experiences by engaging with each other. They often feel more comfortable asking questions and can gain deeper knowledge by explaining concepts. Peer-to-peer learning is very flexible — it can take place both synchronously and asynchronously.
Suggested guidelines
- Give students a clear understanding of the purpose of paired or group work. It can make students anxious or irritated, but is very effective when students feel it’s relevant and useful.
- Interactions in class are often skewed toward more confident students. You can assign roles or have students change roles to make sure all voices are heard.
- Address grading anxiety by making peer work low-stakes or having each student produce an artifact for individual assessment (not just a group grade).
- Designate time within the weekly workload for students to discuss and collaborate on the group activity.
Activity ideas
- Have students pair up and peer review each step in a multi-step project for feedback and help (“workshop” each incremental step).
- Pair or group students and have each address a different question or challenge. Have them share answers in a Google Doc, a discussion thread, or in synchronous breakout rooms with a shared worksheet that all groups use. This allows groups to observe each other’s work.
- Use pairs or small groups in which each student peer teaches one concept, process, or method in their own words, and gets feedback from their peers. This can be done via Zoom or video recordings.
- Use problem-, case-, or project-based activities divided into clearly defined contribution roles and then workshopped or presented as a group. Grade each contribution individually to reduce anxiety. This can be done via Zoom or video recordings.
- Collaborative written reports in which each student in a group contributes one topic. This is an “authentic” exercise since workplace writing is often team-produced.
- Have students post “One thing I understood well” and “One thing that’s still unclear” in a discussion forum. Use one student’s post as help on a topic. This lets them peer teach and highlights any topics you need to review.
Flexible teaching strategies for student inquiry
Inquiry-based approaches let students discover knowledge rather than having it presented. Discovery generates better learning retention, particularly when assisted by timely guidance (Halpern & Hakel, 2003). Used across disciplines, this approach helps students learn to do scholarship rather than absorb it. Communicating findings is a key part of this process.
Suggested guidelines
- Inquiry learning is question-based rather than thesis-based. Spend time fostering good questions and projects. Help make them relevant to personal, social, or community issues along with course learning outcomes.
- Students formulate new knowledge by associating it with and refining existing knowledge. Make sure you have a good benchmark understanding of what your students know, so you can give them appropriate challenges.
- Give students inquiry or research projects before presenting a full explanatory framework. The students’ work will generate questions, making them want the explanations you present afterwards.
- Inquiry is particularly effective when students can share their plans with other students for discussion and feedback.
- Inquiry is most effective when students have a degree of control over their work. Try letting them choose the specific path or topic they pursue. Give them resources and guidelines instead of step-by-step directions.
Activity ideas
- Have students formulate a question that takes them into their environment to document evidence (social, environmental, aesthetic, political). Field-based experiential inquiry lets students connect their work to a community rather than abstract values.
- Create a media literacy challenge for your course subject. Have students find media examples and create a process to evaluate them.
- Have students write or revise interview questions for a subject matter expert in the community. The interview can be audio, a recorded video meeting, or an email exchange. This can also be an oral history interview.
- Structure a group project or experiment in which each student suggests strategies, and have the group vote on the approach(es) taken. This provides a realistic experience of workplace constraints and collaboration.
- Use a Design Thinking model to research a particular problem (physical, social, environmental), collect data, and create a prototype solution. Have students or groups present conclusions for whole-class discussion.
- Have students find a historical artifact relevant to your course topic and analyze it using a rubric.
Halpern, D. F., & Hakel, M. D. (2003). Applying the Science of Learning to the University and Beyond: Teaching for Long-Term Retention and Transfer. Change, 35(4), 36–41.
Learn more elsewhere
Websites
- OIT's Classroom Technology Guide (PSU)
- Collaborative Learning and Peer Learning (Penn State)
Resources
- Annenberg Classroom Resources
- Bozeman Science Resources (introductory science)
- Google Arts and Culture (includes maps of museums to digitally explore)
- MERLOT Collection of Teaching Materials
- NYPL Digital Collections
- Media History Digital Library
- Carleton University Cooperative Learning Activity Library

Manage Pre-Assigned Breakout Rooms
This article covers
- Breakout Room Basics
- Manually Pre-Assigning Rooms
- Pre-Assigning Rooms via CSV Upload
- Create a CSV file of Student Email Addresses
- Starting Pre-Assigned Breakout Rooms During a Meeting
- Recover to Pre-assigned Breakout Rooms
- Create Self-selected Breakout Rooms
Note: You can also assign rooms during a meeting.
Breakout room basics
- You must have breakout rooms enabled on your Zoom account settings to start breakout rooms. This setting is enabled by default for PSU users. You can adjust your personal account settings through the Zoom web portal at pdx.zoom.us
- Participants must join the meeting from the desktop client. Those who join the meeting through a web browser are not able to join breakout rooms. As a workaround, those participants can use the main meeting room as their breakout session space.
- Self-selected breakout rooms require the desktop client to be version 5.3.0 or higher, and this is not supported on ChromeOS.
- You must be the meeting host and use the Zoom client to start breakout rooms.
- You can have up to 50 breakout rooms per meeting and up to 200 participants total in breakout rooms.
- Hosts can move from breakout room to breakout room and send messages to all rooms.
- Participants can request help from a host while in a breakout room with the Ask for Help button.
Note: Pre-assigned participants should join the meeting logged into Zoom with the email address used for pre-assigning. For PSU users, restricting the meeting to authorized users logged in with Odins will ensure pre-assigned participants are correctly mapped to meeting participants.
Manually pre-assign rooms
- Sign in to the Zoom web portal at pdx.zoom.us.
- Click on Meetings from the left navigation menu.
- Schedule a new Meeting or select an existing Meeting to edit
- In the Meeting Options section, select Breakout Room pre-assign.
- Click Create Rooms.
- Click the plus icon beside Rooms to add breakout rooms.
- Hover over the default breakout room name and click the pencil icon to rename it.
- In the Add participants text box, search for participants by name or email address to add them to the breakout room. If the email address does not automatically populate through search, type the Odin email address and press enter to add the user to the breakout room.
- Click Save when done adding participants to break out rooms.
- Save the meeting settings.
Note: You can manually pre-assign internal Zoom users that are in the PSU Zoom account. To pre-assign participants that are external Zoom users, import a CSV file.
Pre-assign rooms via CSV upload
- Sign in to the Zoom web portal at pdx.zoom.us.
- Click on Meetings from the left navigation menu.
- Schedule a new meeting or select an existing meeting to edit.
- In the Meeting Options section, select Breakout Room pre-assign.
- Click Import from CSV.
- Download the template file.
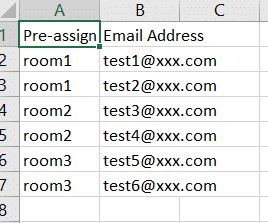
- Add users’ email addresses and assign them to rooms as desired in the template file:
- Save and upload the CSV when done.
- Verify your rooms and assignees and click Save.
- Save the meeting settings.
Create a CSV file of student email addresses
From Google Groups
- While signed in to your pdx.edu Google account, select Groups from the Apps menu.
- In the “Search my Groups” field, enter your course number and term.
- Select the Group for the current term.
- In the left navigation panel, select Members
- Above the list, select the download icon and export the email addresses as a CSV file.
- Format the addresses as in the Zoom template file.
Start pre-assigned breakout rooms during a meeting
- Start the meeting with participants pre-assigned to breakout rooms.
- Click Breakout Rooms in the meeting host controls to access the breakout rooms you created.
- Click Open All Rooms to start the breakout rooms.
- If you don’t see the rooms you pre-assigned, click Recreate then Recover to pre-assigned rooms. This can be necessary, depending on when participants joined the meeting.
Recover to pre-assigned breakout rooms
After starting the breakout rooms, you can recover to the breakout rooms assignment you previously specified. This can be useful if you changed your breakout rooms during the meeting, or pre-assigned participants have joined the meeting after you started breakout rooms.
Begin by selecting Close All Rooms to end the breakout rooms
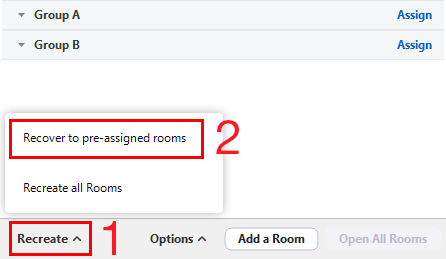
- Click Recreate.
- Click Recover to pre-assigned rooms.
Participants will be re-organized into the breakout rooms you specified when scheduling the meeting.
Create self-selected breakout rooms
The host can now create breakout rooms with the option for participants to self-select which breakout room they would like to join. If enabled, participants can move freely between breakout rooms, without needing the host’s help.
Both the meeting host and participants need to be on Client 5.3.0 or later to self-select Breakout Rooms, and this is not supported on ChromeOS. If students cannot see the breakout room options, have them leave the meeting, update and sign into their Zoom desktop client, and rejoin the meeting.
This article was last updated on .
Import a Scheduled Zoom Meeting into Canvas
Import a Scheduled Zoom Meeting into Canvas
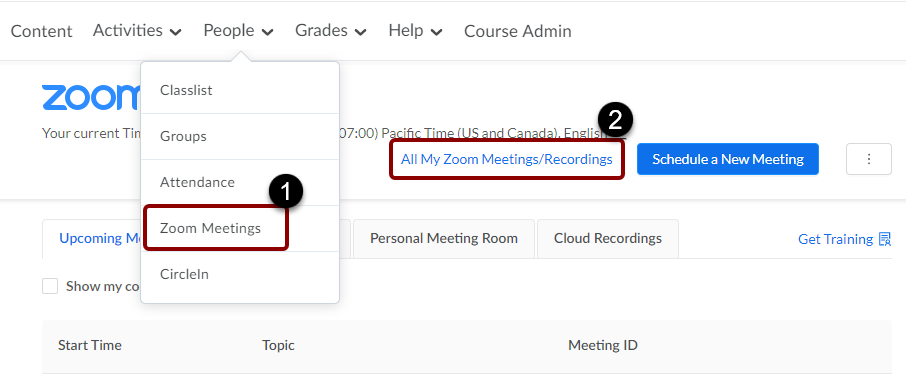
- On your Canvas Dashboard, select the course and then Zoom from the course navigation.
- Select the blue All My Zoom Meetings/Recordings link in the upper right corner.
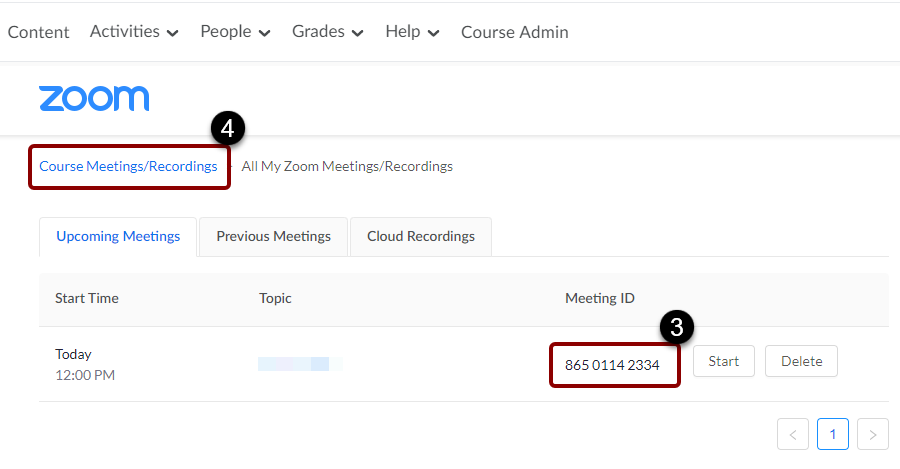
- Find the meeting you want to share with students and copy the meeting ID number.
- Above your meeting list, select the blue Course Meetings/Recordings link.
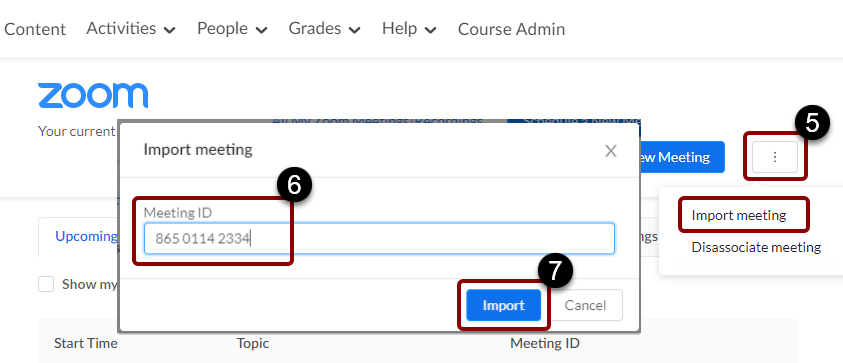
- In the upper right corner of this screen, to the right of the blue Schedule a New Meeting button, there is a small square with three vertical dots. Select that and then choose Import Meeting.
- In the small pop-up window, paste in the meeting ID.
- Select the Import button. The meeting link will now be visible to students in the course.
Note: this method can only be used to share a meeting with one Canvas course. If you want to share a meeting with multiple courses, the meeting invitation link must be posted elsewhere in Canvas, such as in an Announcement.
This article was last updated .

Zoom Webinars at PSU
Zoom Webinars at PSU
Zoom Webinars are available at PSU by purchasing event support services from OIT’s AV Events for a fee. Due to the complexity of supporting and running a webinar, PSU does not currently have webinar licenses available for DIY use. If you would like to pay for a Zoom Webinar Event, please visit Campus Event AV.
Zoom Webinars are available at PSU by purchasing event support services from OIT’s AV Events for a fee. Due to the complexity of supporting and running a webinar, PSU does not currently have webinar licenses available for DIY use. If you would like to pay for a Zoom Webinar Event, please visit Campus Event AV.
Will a Zoom Meeting meet my needs?
We have found that many of the needs described in webinar requests can be met by a Zoom Meeting. All active PSU users have access to a Zoom Pro/ Licensed account, which allows them to host Zoom Meetings of any duration and with up to 300 participants. Up to 200 participants can be in up to 50 breakout rooms in a Zoom Meeting. 100 other participants can be in the main room while 200 are in breakout rooms.
Participation in Zoom Meetings vs. Webinars
Meetings
Meetings are designed to be a collaborative event with all participants being able to screen share, turn on their video and audio, and see who else is in attendance. Control of a meeting offers many options in the host’s Zoom settings, as well as facilitation techniques.
Zoom meetings are ideal for hosting more interactive sessions where you’ll want to have lots of audience participation or break your session into smaller groups.
Webinars
Webinars are designed so that the host and any designated panelists can share their video, audio and screen. Webinars allow view-only attendees. They have the ability to interact via Q&A, Chat, and answering polling questions. The host can also unmute the attendees. Attendees in webinars, can not rename themselves as well.
Think of webinars like a virtual lecture hall or auditorium. Webinars are ideal for large audiences or events that are open to the public. Typically, webinar attendees do not interact with one another. Though Zoom provides options for you to get more social with your attendees, your average webinar has one or a few people speaking to an audience.
If you think you’d like a webinar, please review this Zoom Meeting and Webinar Comparison article.
Size-based indicators for Zoom modality
How many people will be attending your event? If less than 300, what features are you interested in that indicate webinar use rather than a Zoom Meeting?
What style of participation is needed? If 300-500, a Zoom Webinar may be needed. Not all features of a Zoom Meeting are available in a Zoom Webinar.
What style of participation is needed? If a Zoom Webinar is needed, it is available by purchasing Event AV Services from OIT for a fee. If 500+, a Zoom Webinar for 500 participants plus streaming of the webinar for the overflow audience may meet your needs.
What style of participation is needed? If a Zoom Webinar is needed, it is available by purchasing Event AV Services from OIT for a fee.
Nearly all academic use cases can be met using Zoom Meetings and a standard PDX Zoom pro license — the account you access at pdx.zoom.us.
Frequently Asked Questions about Zoom Webinars at PSU
How long can meetings be?
PDX Zoom meetings can be as long as you need. If you’re running into a time limit, check to make sure you’re logged in to your account with your PSU Odin information at pdx.zoom.us. Contact OAI Faculty Support if you continue to see a limit.
How many people can join a meeting?
Up to 300 participants can join PDX Zoom meetings. If you’re using breakout rooms, you can have 200 participants across 50 different breakout rooms. If you see a lower participant limit, check to make sure you’re logged in to your account with your PSU Odin information at pdx.zoom.us. Contact OAI Faculty Support if you continue to see a lower limit.
How can I manage invitations?
You can use the meeting registration function to set up a landing page with customized questions and the ability to send a customized registration email to your guests ahead of the meeting. This is not a recommended setting for classroom Zoom use, as it can add a barrier for students to join meetings. However it can be a valuable feature for non-class meetings.
How can I manage participants during the meeting?
Zoom has a number of features designed to help you manage meeting participants including chat, the ability mute all participants, and remove individual users. The short video below outlines how to use these features.
How can I use advanced interactive features (polling, hand raising, screen sharing, etc.)?
You can create meeting polls in advance, which you can launch during a meeting to add interactivity or ask participants questions. Participants can signal a hand raise, yes, no, or give other feedback with the nonverbal feedback feature in meetings. You can share and annotate your screen or a virtual whiteboard.
How can I know who came to my meeting?
Use the participant reports function to see details about who joined your meeting and how long they stayed.
This article was last updated .

View Zoom Meeting Attendance
You can view Zoom meeting attendance in participant reports for meetings you have hosted. Reports are available starting 30 minutes after the meeting concludes. The report includes a log of all participants in the meeting, including timestamps of when they entered and left the meeting.
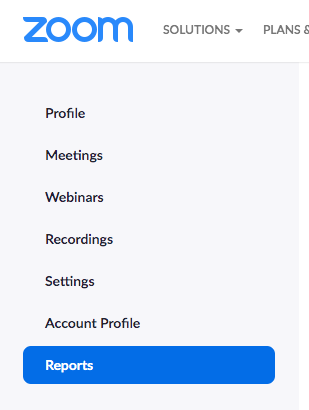
- Login to your full Zoom account with your PSU Odin at pdx.zoom.us
- Select Reports from the left navigation menu.
- Click Usage from the available options.
- Find your meeting from the list of prior meetings. You may need to adjust the time period searched.
- Click the participant number corresponding to your meeting. If you do not see the participant column, try scrolling right or use the Toggle Columns option to ensure Participants is available.
- This will open a Meeting Participants report. Note that a participant will be counted multiple times if they left the meeting and re-entered.
- Optionally export the report to CSV for easy sorting, filtering, and reference.


This article was last updated on .

Videoconferencing, Recording, and FERPA
Videoconferencing, Recording, and FERPA
The Family Educational Right and Privacy Act (FERPA) of 1974 (Public Law 93-380), affords students certain rights with respect to their educational records and requires Portland State University to assure that those students’ rights are not abridged. FERPA protects the privacy of all “education records,” in any medium, maintained by Portland State University.
Class recording FERPA guidance for faculty
FERPA restricts the sharing of student records information, including student class-activities. To maintain FERPA compliance with classroom recording, it’s imperative that any class recordings which include any student activity are shared only with students, TAs, and instructors who are in the same class as the recording. Class recordings may not be reused across classes or sections.
Any recordings of students engaged in any class activities is subject to FERPA prohibitions and should not be shared beyond the class. Student class activities can include student names, voices, photo or video, and chat activities. Class recording content can not be shared outside of the class without a FERPA release from all parties.
For more information about FERPA, see the FERPA Tutorial and FERPA FAQs maintained by the Office of the Registrar.
Syllabus statement for class recordings
We will use technology for virtual meetings and recordings in this course. Our use of such technology is governed by FERPA, the Acceptable Use Policy and PSU’s Student Code of Conduct. A record of all meetings and recordings is kept and stored by PSU, in accordance with the Acceptable Use Policy and FERPA. Your instructor will not share recordings of your class activities outside of course participants, which include your fellow students, TAs/GAs/Mentors, and any guest faculty or community based learning partners that we may engage with. You may not share recordings outside of this course. Doing so may result in disciplinary action.
What about recorded lectures?
Faculty recordings of themselves which do not contain any student information or activities are not governed by FERPA and can be shared across classes and sections. Instructors may wish to record lectures for multiple sections or terms and share those recordings across sections. This is acceptable so long as recordings do not include any students. For tips on recording your Zoom meetings without capturing students, see Zoom Recording and Student Privacy.
This article was last updated .
Set media permissions and share via URL
- Log into media.pdx.edu
- Click the button with your name on it in the upper right corner, and click My Media.
- Find your video in the list, and click on it.
- Find the Actions button in the lower right.
- Click the + Publish option in the list. See permissions options below.
- To share media, make sure it’s set to Unlisted.
- Click Save.
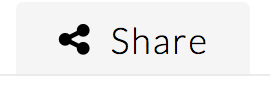
- Click the Share button below the video.
- On the Link to Media Page tab, copy the web address.
Media Permission Levels
- Private: Private media is viewable in your account only. No other account can see a private video.
- Unlisted: An unlisted video is viewable by anyone with the direct link. This is the recommended setting for sharing videos with your students.
- Published: If you have a situation where you need to set very specific access to a video, you can create a channel, and publish a video to that channel. If, for example, you want to share a video with a select group of students, but don’t want any one else to see it, you can use a channel.
To share media access with others, you need to change the default Private setting to Unlisted. Instructions are in this Share Media Via URL tutorial.
Channel Membership Roles
- Channel Owner: The channel owner is the person who created the channel. Only the owner can delete the channel.
- Channel Manager: A channel manager can view channel content, add media to the channel, moderate channel content, and manage users.
- Channel Moderator: A channel moderator can view channel content, add media to the channel, and moderate channel content.
- Channel Contributor: A channel contributor can view channel content and add media to the channel.
- Channel Member: A member can view the channel content.
Channel Types
- Private Channel: media in a Private channel can only be viewed or modified by by channel members.
- Restricted Channel: media in a Restricted channel is viewable by any PSU user. The channel can be accessed via URL or by searching in MediaSpace. Only users who are invited to join a Restricted channel can add to or edit its media.
This article was last updated on .
Download Media from MediaSpace
By default, media uploaded to MediaSpace is not available for download. However, the media owner can enable downloading. Once enabled, anyone who can view the media file can also download it. If you don’t want that, after downloading the file you can repeat steps 1-4 below to disable downloading again.
Begin by logging into media.pdx.edu. Then select your name in the upper right corner and select My Media from the menu. Find the media file you wish to download from your list. Select the small pencil icon to the far right of that file. This opens its Edit Media Page, where you enable downloading.
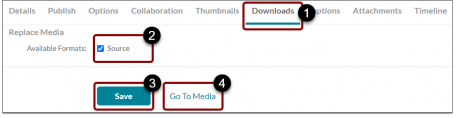
- Select the Downloads tab.
- Select the Source checkbox to enable downloading for this file.
- Select Save.
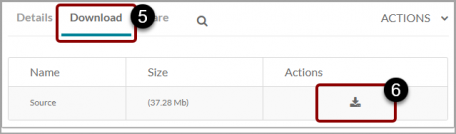
- Select Go to Media. This opens the Media Entry page, where you download the file.
- Select the Downloads tab.
- Select the download icon.
This article was last updated on .