
Add audio descriptions to your MediaSpace videos
In addition to captions, audio descriptions are a required component of accessible video content. When visual information is necessary to understand the content, videos must include audio descriptions in order to be considered accessible. MediaSpace has built-in support for audio descriptions, and you can use the Caption Editor to add them to your videos.
Different types of audio descriptions
There are two different types of audio descriptions: Standard Audio Descriptions (SAD) and Extended Audio Descriptions (EAD).
Standard audio descriptions narrate important visual information during natural breaks in the audio. Extended audio descriptions pause the video at specified points to describe what is happening.
This tutorial focuses on Extended Audio Descriptions and does not cover how to create Standard Audio Descriptions, which are commonly used in television and movies.
Extended Audio Descriptions are added in the same way as manual captions, and an artificial voice reads each description at the time you specify. You do not have to record the descriptions yourself! This makes them easier to create, edit, and update.
How do I add Extended Audio Descriptions to my MediaSpace videos?
- Download the blank EAD Template file and save it somewhere you can easily access, such as your Desktop or Downloads folder.
- Log in to MediaSpace at media.pdx.edu. (To use audio descriptions, your video must already be uploaded to MediaSpace.)
- From your My Media page, select the video to which you want to add audio descriptions.
- On the main video page, select Actions (1), followed by Edit (2).

- Select the heading marked Captions (3), then the button labeled Add extended audio description (4).

- Select the Browse button and choose the file you downloaded in Step 1 called EAD_Template.vtt.
- Select the primary language of the video and enter a label to match (e.g., “English Audio Description”).
- Select Save.
Your video now has a blank audio description file attached. To make your video accessible, you must now edit the file to add the audio descriptions.
Tip: Because editing audio descriptions can be a time-consuming process, consider watching your entire video first and noting timestamps and descriptions in a separate document. Then you can add them all at once.
- From the main page of the video you want to edit, select Actions, then Edit.
- Select the heading marked Captions, then the button labeled Edit captions.
- This will take you to the Closed Captions Editor. From the first drop-down menu (5), select the label you assigned to your audio description file. You should see one entry that says “Start of description (6).”
- Identify the scenes in the video where audio descriptions should be added. Use the mini video player (7) on the Closed Captions Editor page to find these points, and note the timestamp (8) where each description should begin.

- Replace the default entry with your first description. Select the text provided on the first line to open the editing box, then enter your description. Follow the same steps to update the second timestamp.
- Now, add the rest of the descriptions. To do this, hover over the right side of the page where the transcript is listed and select the + Add audio description button (9) that appears. For each entry, enter the start time, end time, and a brief description. Be sure to include essential visual details.
- When you have finished adding your descriptions, select Save in the top corner. You should be saving multiple times throughout this process to prevent losing your changes.
How do I play a video with audio descriptions in MediaSpace?
Audio Descriptions are not enabled in the video player by default. To enable them, select the “AD” icon (10) and then select the audio description (11) you wish to use. Once enabled, the video will pause at the timestamps you selected and play your audio descriptions.

This article was last updated .
This is the H1 title
Introduction text goes here.
Note: this is an important message you need to pay attention to!
Note: this is a helpful callout that isn't urgent.
This is an H2 title written as a guiding question?
Lorem ipsum dolor sit amet consectetur adipiscing elit. Quisque faucibus ex sapien vitae pellentesque sem placerat. In id cursus mi pretium tellus duis convallis. Tempus leo eu aenean sed diam urna tempor. Pulvinar vivamus fringilla lacus nec metus bibendum egestas. Iaculis massa nisl malesuada lacinia integer nunc posuere. Ut hendrerit semper vel class aptent taciti sociosqu. Ad litora torquent per conubia nostra inceptos himenaeos.
H2 title for set of steps written as question?
Content may be written as a set of ordered and unordered lists:
1. Select the course you want to edit from your Canvas dashboard
2. Navigate to Course Setting
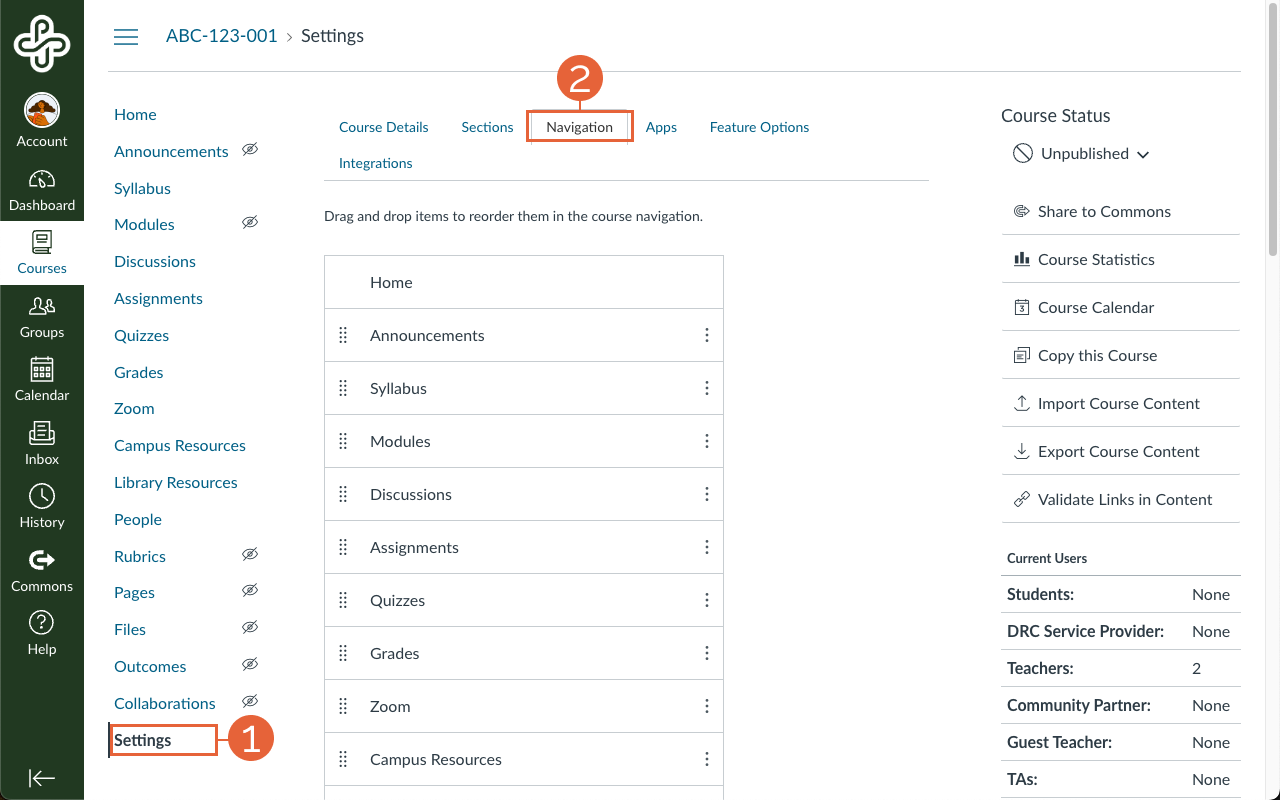
- Scroll down the course navigation menu on the left side and click on Settings (1) and select the Course Details (2) tab.
Best Practices Callout Section
- Communicate with Students: If you set custom dates, let your students know when the course will open and close. You can email all students registered in your course using Google Groups beginning approximately two weeks before the start of the term!
- Allow Review Time: Consider extending the course end date by a few days to let students review their grades and course materials.
When the steps are long, make it an accordion?
When the steps or screenshot are long, collapse content into an accordion with an introductory sentence here for context an and guidance.
This article was last updated .
You might also like


























👋Need more help?
Submit a support request through our Faculty Support portal for assistance.