Permissions overview and sharing media
Permissions overview and sharing media
To share media access with others, you need to change the default Private setting to Unlisted. Follow the instructions below to adjust the permissions and copy the correct share link.
Media permission levels
- Private: Private media is viewable in your account only. No other account can see a private video.
- Unlisted: An unlisted video is viewable by anyone with the direct link. This is the recommended setting for sharing videos with your students.
- Published: If you have a situation where you need to set highly specific access to a video, you can create a channel and publish a video to that channel. For example, if you want to share a video with a select group of students, but don’t want anyone else to see it, you can use a channel. Find more information about channel permissions below.
If you need to collaborate on media with others, review the options outlined in Add a Collaborator in MediaSpace.
- Log in to MediaSpace at media.pdx.edu
- Select the button with your name on it in the upper right corner, and select My Media.
- Find your video in the list, and click on it.
- Find the Actions (1) button in the lower right, below your video.

- Select the Publish (2) option in the list. See permissions options above.
- To share media, make sure it’s set to Unlisted.
- Select Save.
- Select the Share (3) button below the video.

- On the Link to Media Page tab, copy the web address (URL).
- Share the web address as you prefer. For example, you may add a video to Canvas with URL to share with a class.
MediaSpace channel permissions
In Kaltura MediaSpace, a channel is a collection of videos, images and/or audio files that is created by an owner and managed by the owner and any delegated managers.
Channel types
- Private Channel: media in a Private channel can only be viewed or modified by channel members.
- Restricted Channel: media in a Restricted channel is viewable by any PSU user. The channel can be accessed via URL or by searching in MediaSpace. Only users who are invited to join a Restricted channel can add to or edit its media.
Channel membership roles
- Channel Owner: The channel owner is the person who created the channel. Only the owner can delete the channel.
- Channel Manager: A channel manager can view channel content, add media to the channel, moderate channel content, and manage users.
- Channel Moderator: A channel moderator can view channel content, add media to the channel, and moderate channel content.
- Channel Contributor: A channel contributor can view channel content and add media to the channel.
- Channel Member: A member can view the channel content.
This article was last updated .

Zoom Whiteboard in Canvas
Zoom Whiteboard in Canvas
This article was last updated .
Why would I use Zoom Whiteboard?
Zoom Whiteboard is a virtual tool for visual collaboration. It enhances meetings by allowing instructors and students to brainstorm, annotate, and organize ideas together. It’s useful for interactive discussions, problem-solving, and concept mapping. Zoom Whiteboards also support asynchronous engagement, enabling ongoing collaboration, group work, or reflection outside of class time.
We recommend creating Zoom Whiteboards for classes through the Zoom LTI (the Zoom tab in Canvas) in your course. This ensures that they are automatically linked to your course, making them easier for students to access. This can also create better organization, helping you find whiteboards you’ve created in the past more easily.
If you're creating a Zoom Whiteboard that is not affiliated with a class, you may use the Zoom web portal to create and share your whiteboard.
Use Zoom Whiteboards for synchronous collaboration
- Start a Zoom meeting.
- In the meeting controls toolbar, select the Whiteboards button.
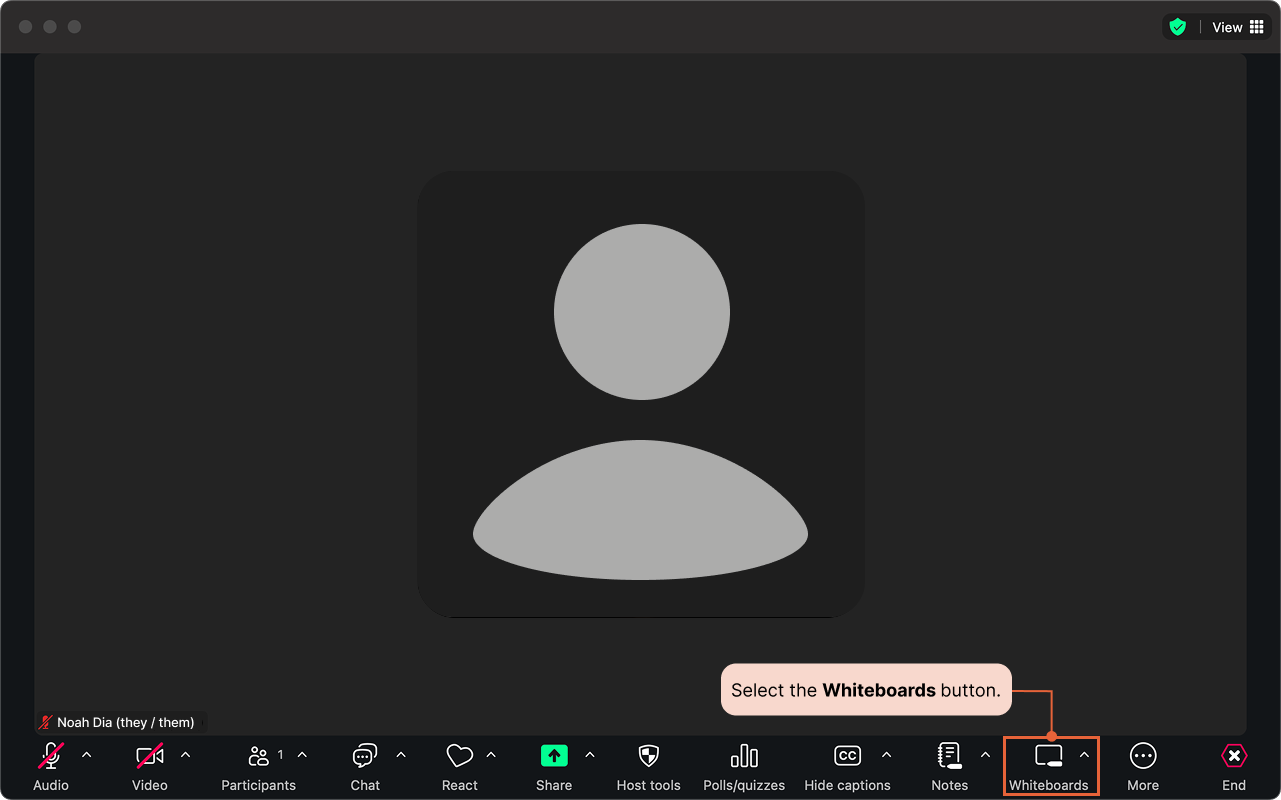
- Select New Whiteboard or Existing Whiteboards. The new whiteboard will open in the meeting window.
- If it appears, close the welcome dialogue window after selecting New Whiteboard. (Don’t open a new classic whiteboard.)
- If you selected Existing Whiteboards, you will be asked to select from the following:
- How do you want to open the board?
- Collaborating: Users are granted edit access.
- Presenting: The board opens in presentation mode, and users are granted view access.
- How do you want to open the board?
Allow persistent access: Allows verified meeting participants to access the whiteboard after the whiteboard is closed and after the meeting ends.
If your Zoom meeting was scheduled through the Zoom LTI, your students will have access to whiteboards shared during the meeting through the whiteboards tab in the Zoom LTI area.
Use Zoom Whiteboards for asynchronous collaboration
When the steps or screenshot are long, collapse content into an accordion with an introductory sentence here for context an and guidance.
Step 1: Create or choose the whiteboard you want to use
- Open the Zoom page (1) in your Course Navigation Menu.
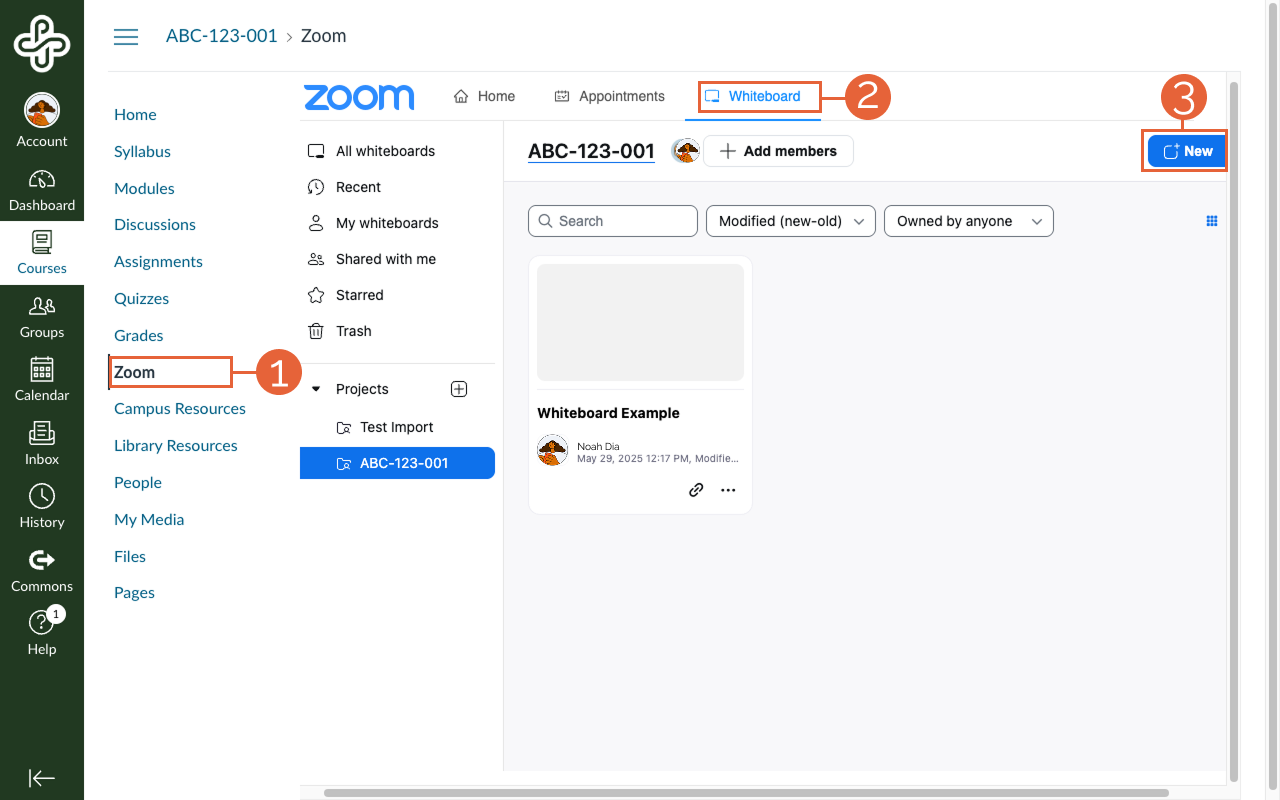
- On the top navigation menu, select Whiteboard (2). The page will open a view of your whiteboards within the current Canvas course.
- Select + New (3) to create a new whiteboard. Once your whiteboard is created, you can move to the next step of sharing it.
- Open the Zoom page (1) in your Canvas Course Navigation Menu.
- On the top navigation menu, select Whiteboard (2). The page will open a view of your whiteboards within the Canvas course.
- If the whiteboard you want to use is already in the course, you can move to the next step. However, if you don’t see the whiteboard you want to use, you may need to move it from another course/project:
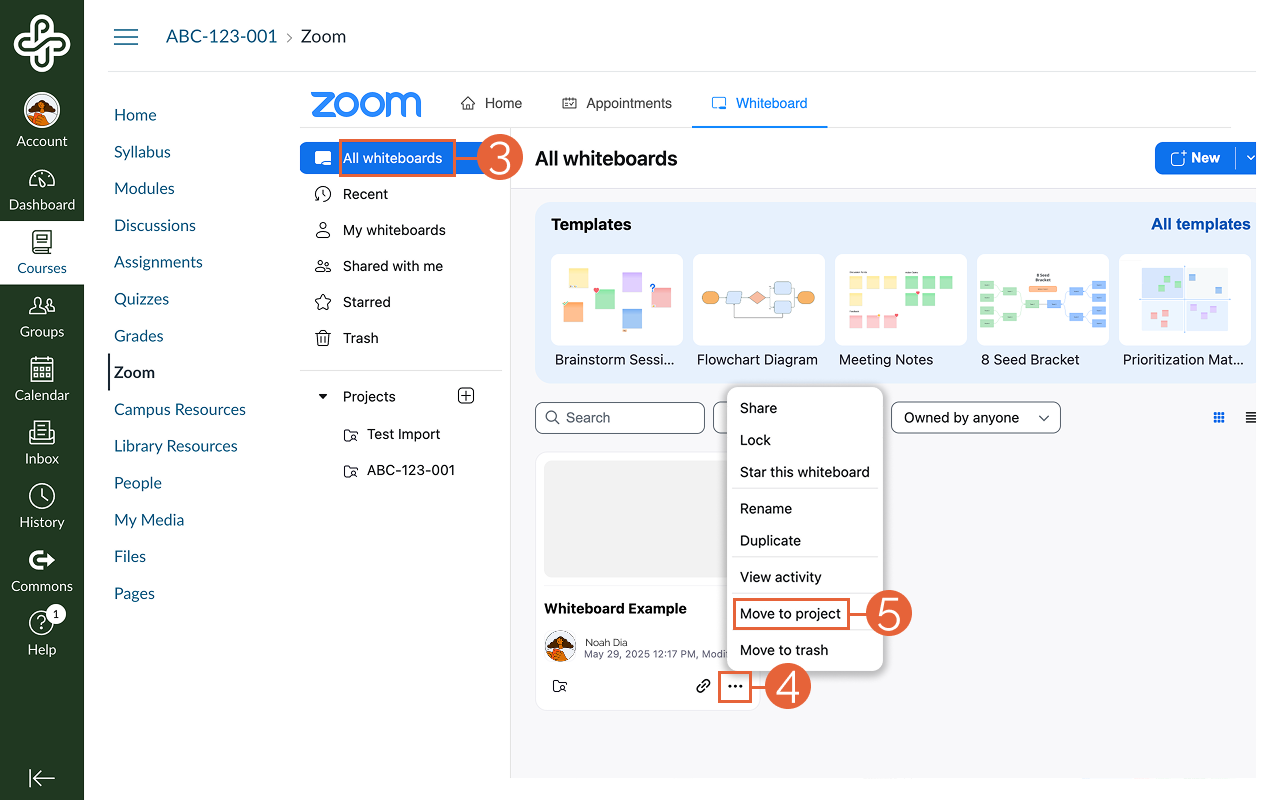
- Select All whiteboards (3).
-
- Find the whiteboard you want and select the options icon (4) on the whiteboard or right-click on the whiteboard.
- Select Move to project (5) from the dropdown menu. This will open the Move board to project popup window.
- Select the desired course from the New project (6) dropdown menu.
- Select Move (7) to finalize your changes.
Step 2: Adjust your Zoom LTI share settings
By default, when a Zoom Whiteboard is created in a Canvas course, all students in the course will have Viewer access. If you would like your students to add to or edit the board for asynchronous collaboration, you’ll need to add them as Editors by doing the following:
1. Open the Zoom page (1) in your Course Navigation Menu
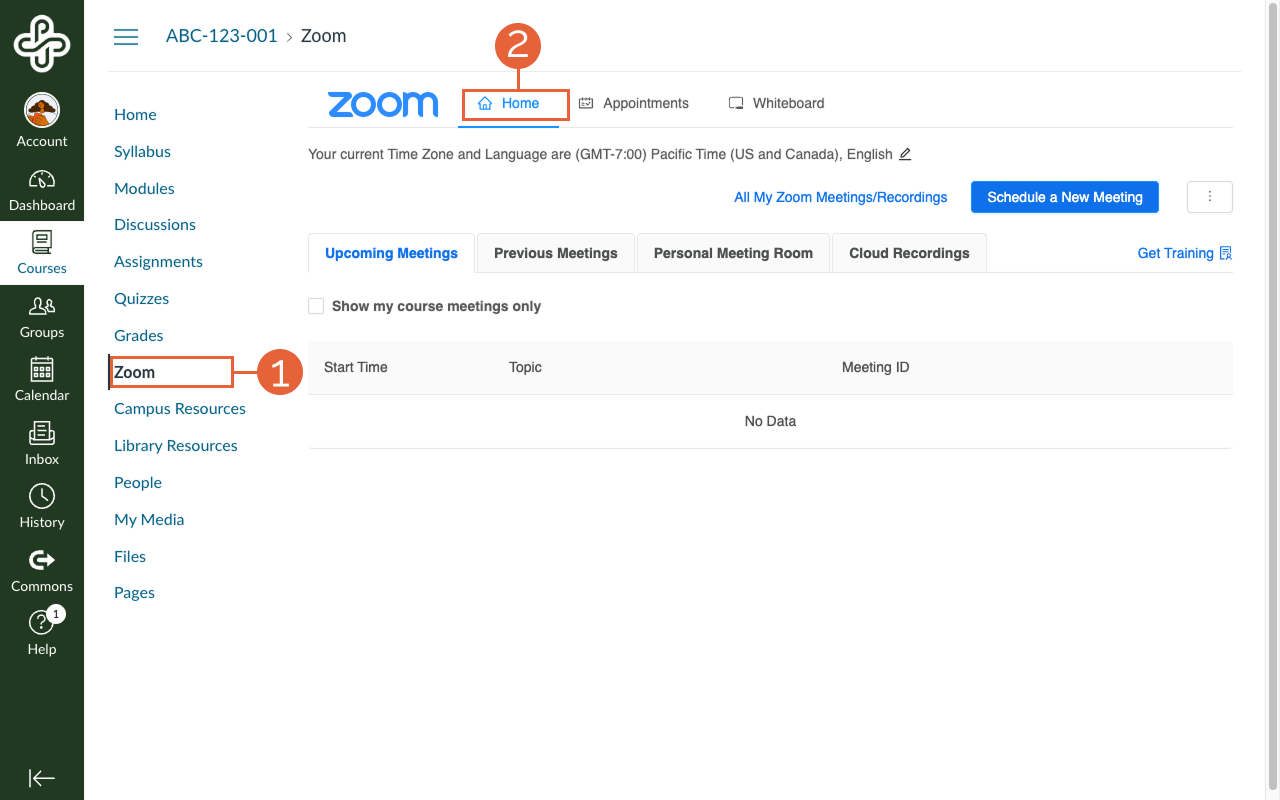
- Ensure you are under the Home page (2) while in the Zoom LTI.
- Select the options icon (3) to the right of the Schedule a New Meeting button.
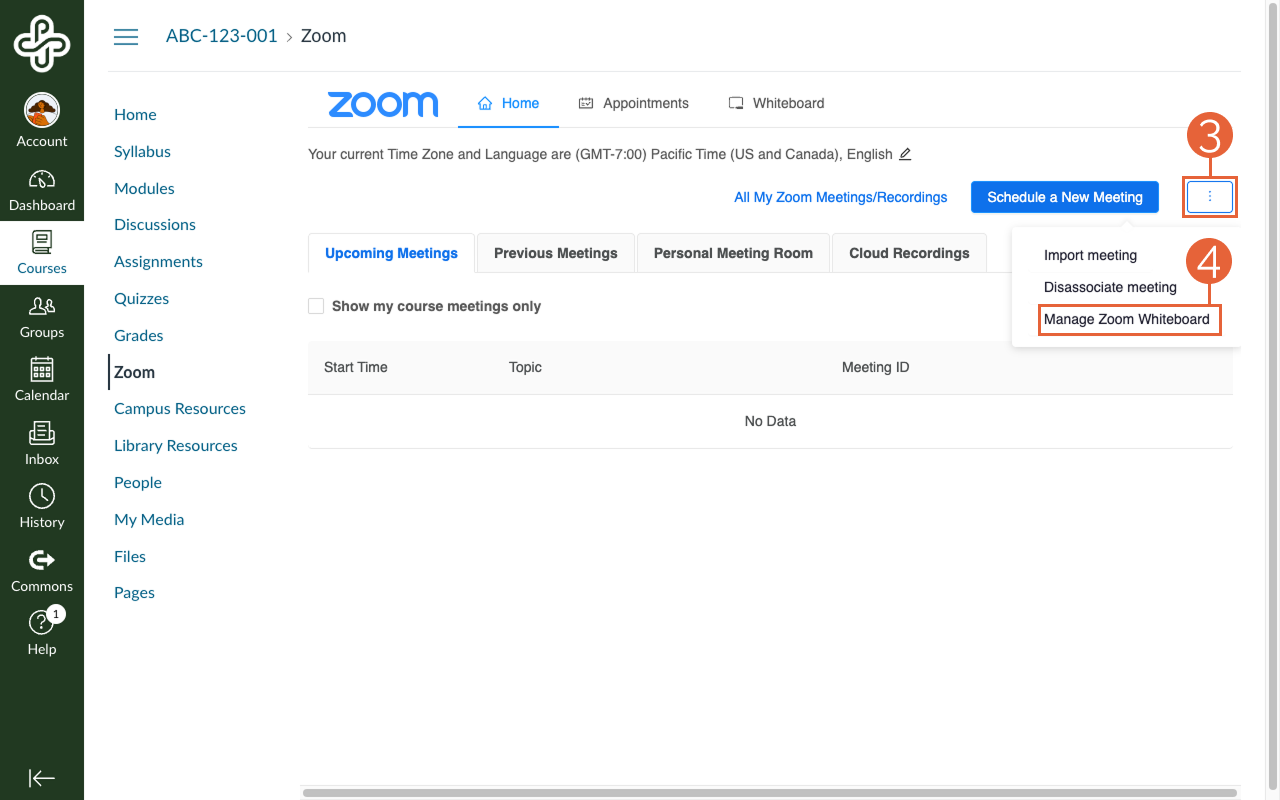
- A dropdown menu will appear. Select Manage Zoom Whiteboard (4) from this menu.
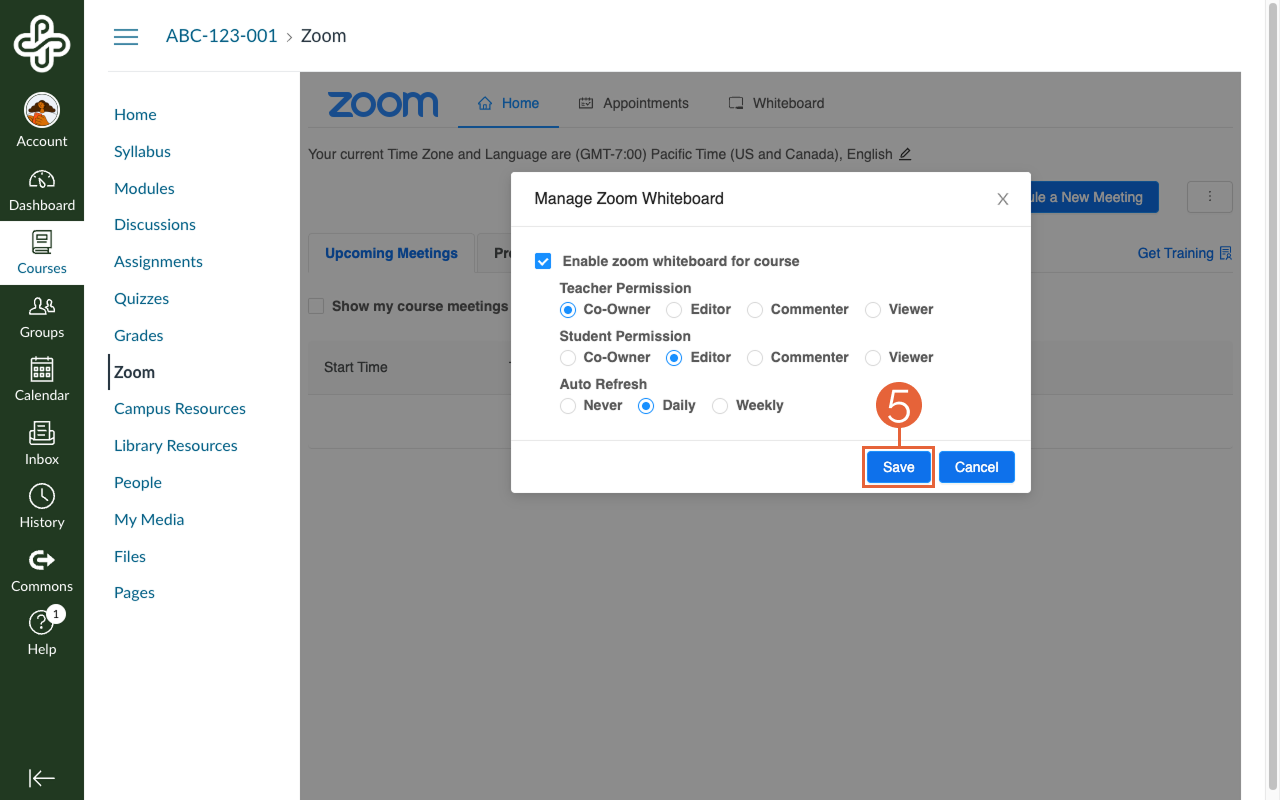
- The pop-up window Manage Zoom Whiteboard will appear. The recommended settings are listed below:
- Enable Zoom whiteboard for course
- Teacher Permission: Co-Owner
- Student Permission: Editor
- Auto Refresh: Daily
- Select Save (5) to finalize your changes.
Step 3: Manually share the whiteboard with students (optional)
Once you have either created a new whiteboard or moved an existing one to your course and you have adjusted the Zoom LTI settings to grant students editing access, students will be able to access the whiteboard via the Zoom page in their course. However, you can share a link directly to the whiteboard from another part of the course, like an announcement or within modules, to make it easier to find.
- Open the Zoom page (1) in your Course Navigation Menu.
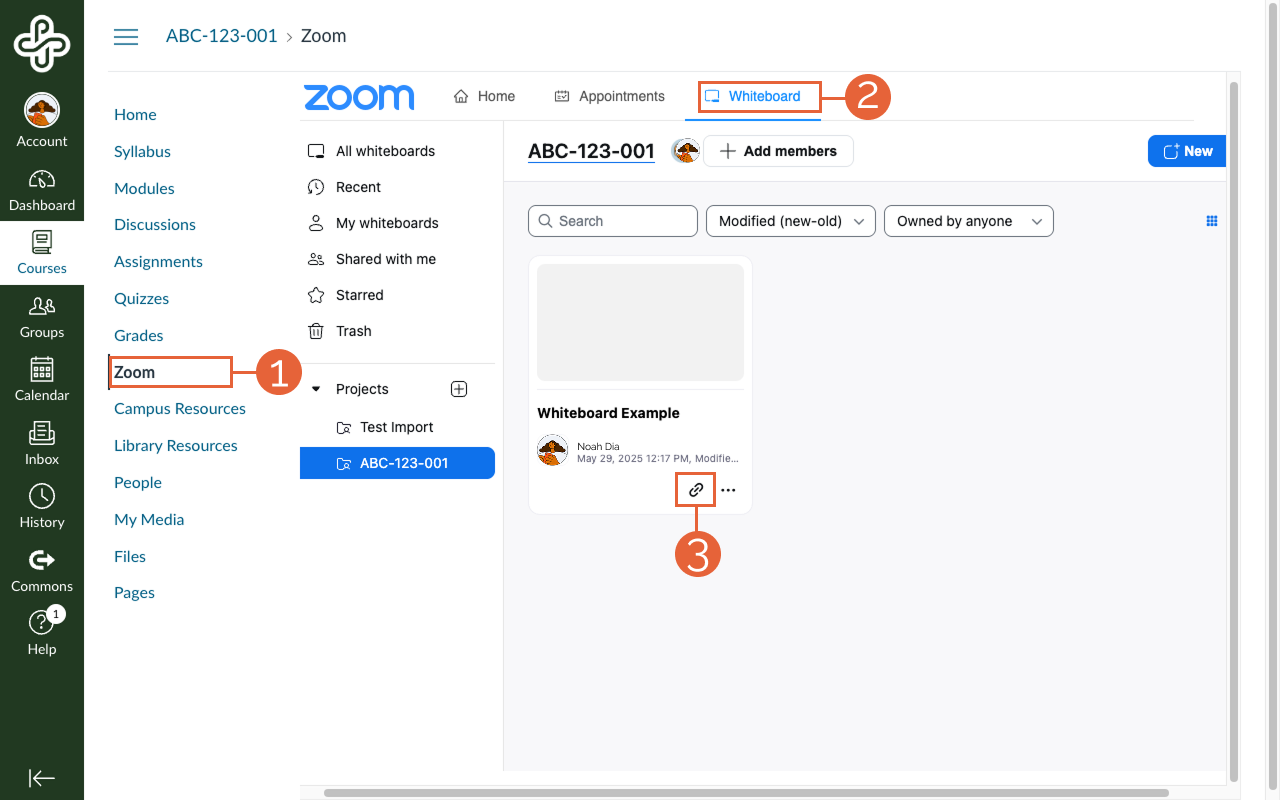
- On the top navigation menu, select Whiteboard (2). The page will open to a view of your whiteboards within the current Canvas course. (To confirm you are in the correct course, make sure the correct project is highlighted in the menu.)
- Find the whiteboard you want and select the link (3) icon. This will automatically copy the link for that whiteboard, allowing you to paste it into other parts of your course.
Whiteboard tips and tricks
- You can add instructions directly to a whiteboard to help contributors know how to contribute.
- You can create multiple pages within a single whiteboard. This is one way to set up collaboration spaces for breakout groups to contribute during class meetings.
- Zoom includes many whiteboard templates that you can use as is or modify to fit your needs.
- Canvas courses with associated Zoom Whiteboards will appear as Whiteboard Projects. These projects help organize your boards into shared spaces for specific projects or groups of people.
Need more support? View more Zoom Whiteboard help documentation and tutorials.

Accessible Teaching Resource Hub
Accessible Teaching Resource Hub
Resource type: self-paced Canvas course
Intended for: New faculty, emerging practioners, seasoned educators, staff

The Accessible Teaching Resource Hub was co-created with digital inclusion specialists and people with disabilities as an introduction to digital accessibility in higher education. Course content includes topics on cognitive accessibility and universal design for learning (UDL) and information about how to make course materials accessible.
Includes suggestions on how to:
- Apply WCAG guidelines to your content.
- Integrate cognitive accessibility principles for diverse learners.
- Identify accessibility barriers in learning content.
- Conduct self-evaluations of digital content.
- Remediate inaccessible content based on best practices.
- Plan for accessible content creation in the future.
What's in the Accessible Teaching Resource Hub?
In this module, you’ll learn more about the motivation for creating this resource as well as other opportunities to advance your accessibility knowledge.
You will explore:
- Cognitive accessibility and UDL
- Students’ perspective on accessible course materials
- The PSU Digital Accessibility microcredential requirements
This module focuses on accessibility in documents.
In this module, you will explore these topics:
- Key design considerations such as document settings, heading structures, font choices, and reading order
- Examples of accessible documents
- Accessible document templates
- Document accessibility checklist
This module focuses on accessibility in slide presentations.
In this module, you will explore these topics:
- Slide titles, reading order, color contrast, and other design considerations
- Examples of accessible presentations
- Slideshow accessibility checklist
This module focuses on accessibility in spreadsheets.
In this module, you will explore these topics:
- Data organization and formatting considerations
- Examples of accessible spreadsheets
- Spreadsheet accessibility checklist for faculty
This module focuses on applying accessibility standards to multimedia content.
In this module you will explore these topics:
- Captions, transcripts, and alternative text
- Examples of accessible media
- Multimedia accessibility checklist
This module focuses on creating accessible PDFs.
In this module you will explore:
- Optical character recognition, PDF tagging, and assistive technology
- Examples of accessible documents
- Information about resources available at PSU to help create accessible PDFs
- PDF accessibility checklist
This module highlights the considerations for teaching with accessibility in mind.
In this module you will explore:
- Creating an accessible syllabus
- Teaching accessibly in Canvas
- Teaching accessibly in non-Canvas courses
This module includes topics related to accessibility that don’t fit in the other categories!
In this module you will explore:
- Accessibility definitions
- Frequently asked questions
- Mobile design and accessibility
Tools You'll Use
In this Canvas course you will use Canvas, Google Workspace for Education, Microsoft tools, and Mediaspace.
About the creators
This resource was created by many teaching and learning staff at the Office of Academic Innovation:
Kari Goin Kono, Misty Hamideh, Lio Jones, Andrew Lawrence, Megan McFarland, Lindsay Murphy, Ashlie Sarsgard, and Vincent Schreck.
Sharing Canvas course materials
Sharing Canvas course materials
This article was last updated .
Sharing course materials through Canvas can be a meaningful way to foster collaboration, ensure continuity, and support both colleagues and students. Whether you’re preparing to co-teach a course or helping a colleague transition into a new teaching assignment, it’s important to share responsibly and effectively. This guide outlines what to consider when sharing materials in Canvas, how to prepare your content, and the best methods for sharing with others.
Practices around sharing course content may be governed by several laws and PSU policies, including Family Educational Rights and Privacy Act (FERPA), Copyright Ownership Policy, and Oregon University System Records policy. Read further to learn recommendations for appropriate sharing.
Preparing materials for sharing
Before sharing course materials, it is important to review the course and make sure the materials are ready for others to use. This helps preserve your original course’s structure and allows you to customize your materials without affecting past versions of the course.
As you prepare your course for sharing, keep the following in mind:
- Only include materials relevant to the course. Remove any personal notes, drafts of content, or term/student-specific information that may be inappropriate to share or unhelpful to another teacher. If you’re using links to Google Docs, double-check that sharing settings are open to “Anyone with the link” so that access isn’t restricted.
- Keep confidential information private. If your course includes recorded lectures where students can be seen or heard, such videos should be edited to remove or mask students’ participation before being shared. Student course data, such as enrollment, grades, discussion posts, or assignment submissions, as well as Zoom recordings automatically uploaded through the Canvas integration, will not be included in a course copy. Review the PSU Registrar’s page FERPA and Student Records Privacy FAQs for more information about FERPA and confidential student information.
Do you have permission to share? OAI and all university employees are governed by the university Copyright Ownership Policy. PSU faculty members generally retain ownership of their instructional materials, and you can share your course materials with colleagues directly. Accordingly, the Office of Academic Innovation needs written permission from the course content owner in order to share course content with another instructor unless the situation meets the exception criteria in the policy that covers an unforeseen event that circumstances require that another person teach the course on short notice. OAI will consult with the Department Chair in these cases.
When you’re sharing course materials with a colleague or other instructor, we recommend against adding a colleague to the live or completed Canvas shell with student data. Instead, choose one of the following sharing methods depending on your needs.
Share level
Entire course
Best For
Sharing an entire course with a PSU colleague
You can create a “sandbox” copy of the course to share with one or more colleagues. This will enable your colleague(s) to interact with your course without affecting the “live” Canvas shell or seeing confidential student course information.
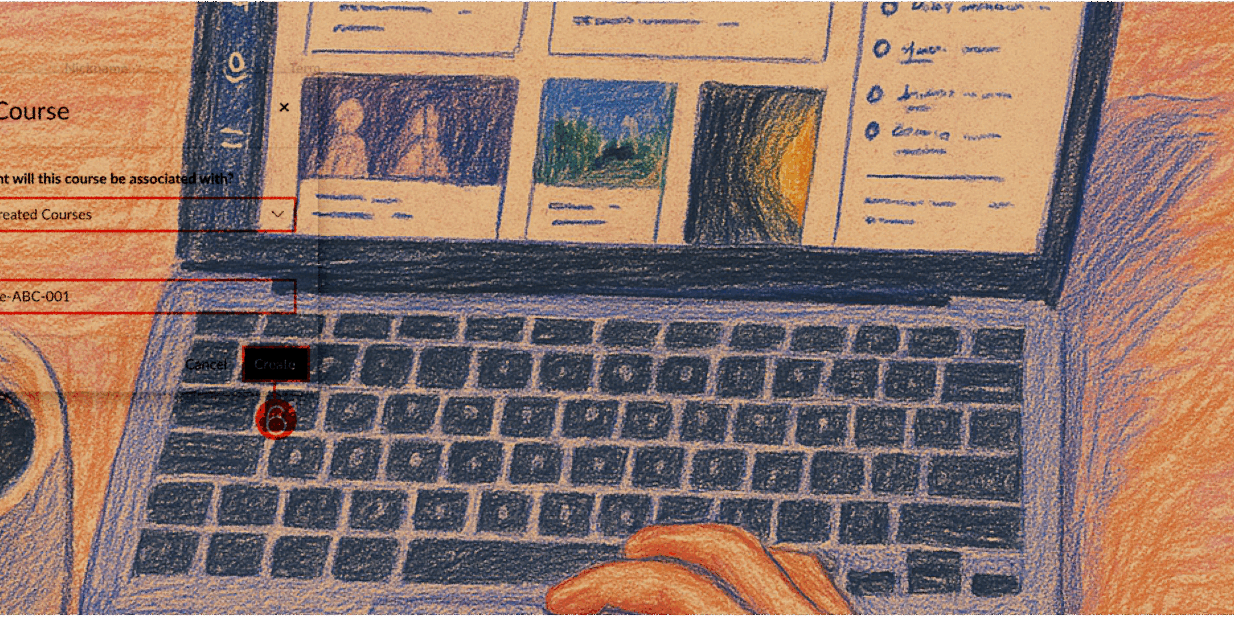
- Create a new Canvas course (a “sandbox”)
- Import the course you want to share into the sandbox
- Add a user to a PSU Canvas course
In order for the person you add to be able to copy elements of your course, you will need to assign them the role of Teacher, Guest Teacher, or Designer. Keep in mind that all of these roles will give them editing access and the ability to change content in the sandbox.
Create a course export file
Share level
Entire course
Best For
Sharing with colleagues outside of PSU; archiving course content for your own needs
You can also export your course as a package file and share it via Google Drive. This is also a great way to archive content for your own purposes.
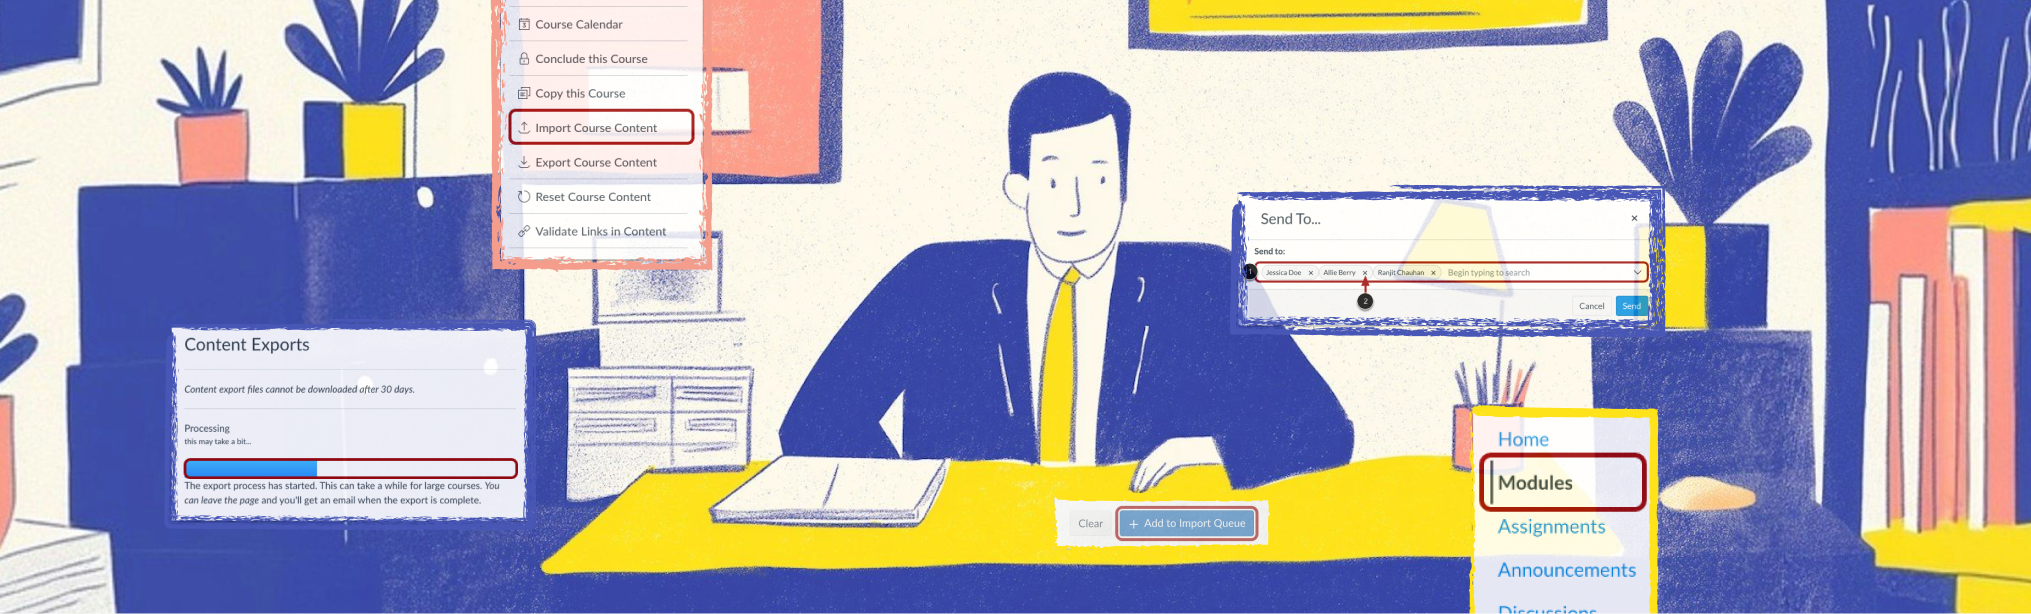
- How do I export a Canvas course?
- How do I import a Canvas course export package?
- How do I select specific content as part of a course import?
Share level
Entire course, parts of a course
Best For
Sharing course materials broadly with the PSU campus or all Canvas users
You can also share your entire course or just parts of it through Canvas Commons. This tool allows you to make your content available either to everyone at PSU or to the broader Canvas community. If you prefer a more controlled environment, you can reach out to the Office of Academic Innovation (OAI) to help you set up a private departmental or team space within Commons to limit access.
Share level
Parts of a course
Best For
Sharing discrete course components with specific individuals
If you only want to share selected items—like a quiz, module, or assignment—you can use the “Send To…” feature in Canvas. This allows you to send individual course components directly to another instructor without sharing the entire course.
- How do I send an assignment to another instructor?
- How do I send a page to another instructor?
- How do I send a quiz to another instructor?
- How do I send a module to another instructor?
- How do I manage content shared to me from other users?

Design your course
What is course design?
Course design, sometimes called curriculum design or course development, is a structured process of planning and organizing the elements of a course to achieve specific learning outcomes. A course design process typically includes setting clear objectives, structuring content, selecting appropriate teaching methods, aligning assessments, and ensuring that the course meets the needs of diverse learners. Whether for in-person, online, or hybrid environments, course design aims to create a cohesive, student-centered learning journey that facilitates understanding and application of knowledge.
From a Student’s View
A student shares what it felt like to navigate a well-organized course — and why it mattered:
“Organization of courses can be the ultimate decider if a student with ADHD/Autism passes. In a school year, I like to do a combination of online and in-person learning. I’ve seen the issue of course organization cross to both of these settings. [In one course,] the writing was in a small, smashed-together font with as much information as possible. There were also large amounts of abbreviations that weren’t intuitive. I found myself falling behind quickly before having to develop my own system to decipher the calendar. This led me to putting more energy on this then setting myself up for success in the course.”
- Lio, Portland State undergraduate student
Why is good course design important?
Thoughtful course design is critical for effective teaching and meaningful student learning. Just as an instruction manual guides someone through assembling a complex item, a well-designed course with clear course goals will guide students through the learning process, ensuring that each step builds toward a comprehensive understanding of the topic. A well-designed course fosters engagement, accommodates diverse learning styles, and removes unnecessary barriers to understanding. It also improves instructor effectiveness by providing a clear roadmap for teaching and assessment.
Effective course design contributes to:
- Clarity and Accessibility: Students can easily understand course expectations, objectives, and how to navigate materials.
- Engagement: Thoughtful design encourages active participation, fostering a deeper connection to the subject matter.
- Equity: By considering diverse learner needs, good design ensures inclusivity, making content accessible to everyone.
- Alignment: Ensuring that learning objectives, activities, and assessments are in harmony increases the likelihood of achieving desired educational goals.
- Efficiency: A structured course reduces redundancies, saving time for both instructors and students.
How do I design an effective course?
Designing a course that engages students and supports meaningful learning requires more than just assembling materials. It involves intentional planning—starting with clear goals, building aligned assessments, designing active learning experiences, and maintaining a consistent structure. These strategies will help you build a thoughtful, student-centered course that meets your instructional goals and fosters student success.
1. Identify course goals
You may be familiar with student learning outcomes, also sometimes called learning objectives or course goals. Your course may have preset outcomes, or you might need to identify outcomes. In either case, you need to have observable and measurable, so you can clearly communicate how you will observe student work and measure whether it meets the goals of the course. Outcomes might address content knowledge, skills, or even dispositions that you intend students to acquire and should help them focus their learning and attention and connect the dots between course content, learning activities, and assessments.
Imagine that a large box arrives at your house. It’s full of parts to assemble but has no instructions and no pictures of the final object. This is how students often feel when they enter a course without student learning outcomes or clear goals.
Once you’ve identified the outcomes for your course, they form the foundation, blueprint, or roadmap that everyone in the course is working toward. As you design or revise your course, keep coming back to these outcomes to ensure your planned assessments, assignments, learning activities, and teaching strategies align with your intended learning outcomes.
2. Build assessments around course goals
Think back to that mysterious box that arrived at your house. What if the box had instructions, but they didn’t match the parts? What if parts were missing or the instructions skipped big steps? This is analogous to what happens when assigned work doesn’t align with the course goals or when assessments don’t match what has been taught in the class. It’s difficult for students to understand why the work is necessary or relevant or how their assessments reflect what they are learning.
Consider the purpose of each of your assessments.
- Do they help you and your students perceive how much progress you’ve all made toward the course goals?
- Are they being used to measure whether students are ready to move onto the next stage?
- Should they be graded or used for practice to help students focus on specific topics?
It can also be helpful to give students opportunities for peer review, self-reflection, and suggestions rather than a letter or number grade. Research shows that grades are often demotivating for students and can be confusing when students try to improve their grade in future assessments. While we often look at grades as inevitable and ubiquitous, they are relatively new as a standard practice in higher education (Schinske & Tanner, 2014).
More about assessment design
For a more in-depth discussion of assessments and guidance on building assessments around course goals, please review the How to design effective assessments article.
Nothing found.
3. Design learning experiences and plan teaching strategies
One of the most common mistakes in course design is assuming the material is the course. Rather, the material is merely one tool of the course. The learning experiences, relationships, and teaching strategies you plan should align with your course goals and students’ needs. “Those who do the work do the learning” (Doyle, 2011) — so the more students have opportunities to interact with the course materials, their peers, and you, the better. When considering what activities to design for your course, ask yourself what students can do to connect with the course skills, dispositions, and concepts.
There is a wide range of teaching and learning approaches to consider:
- Active learning provides experiences that give students more active involvement in learning about and evaluating perspectives.
- Flexible teaching strategies emphasize teaching and learning across course modalities (online, in-person, or blended)
- Community-engaged learning invites students and community members to participate in mutually beneficial goals and projects in well-planned and structured partnerships
- Open education focuses on using free learning materials that allow students to co-create alongside their instructors, building non-disposable assignments, and encouraging agency
- Universal Design for Learning emphasizes student choice, access, and agency in assignment and course design to reduce/eliminate barriers to learning
More about teaching strategies
More about online course design
4. Build a clear course structure
Once you have identified your course goals and designed your assessments and learning experiences to align with these goals, you’ll need to consider how to present this information to your students. Regardless of the modality of the course, a clear and consistent structure will help reduce students’ anxiety, enhance focus on learning, and promote better engagement with course materials, ultimately supporting academic success.
Using Canvas, even for a fully in-person course, can help enhance communication and organization by providing a centralized hub for your course. Canvas can help you:
- distribute materials
- track assignments and student progress
- streamline grading and feedback
- provide a structured learning cycle students can follow.
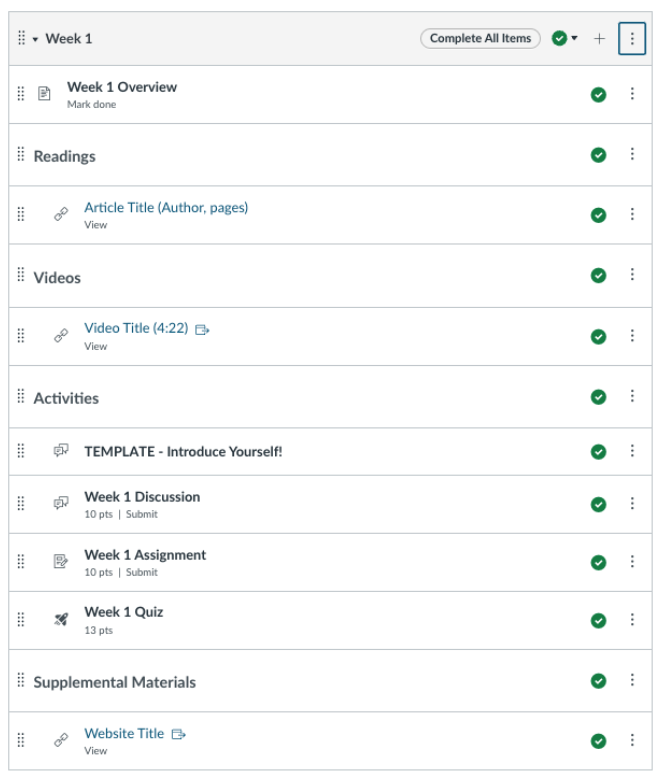
Example Canvas module
This is an example of how you might organize a module. Note that each type of activity is organized in the module with text headers to separate content.
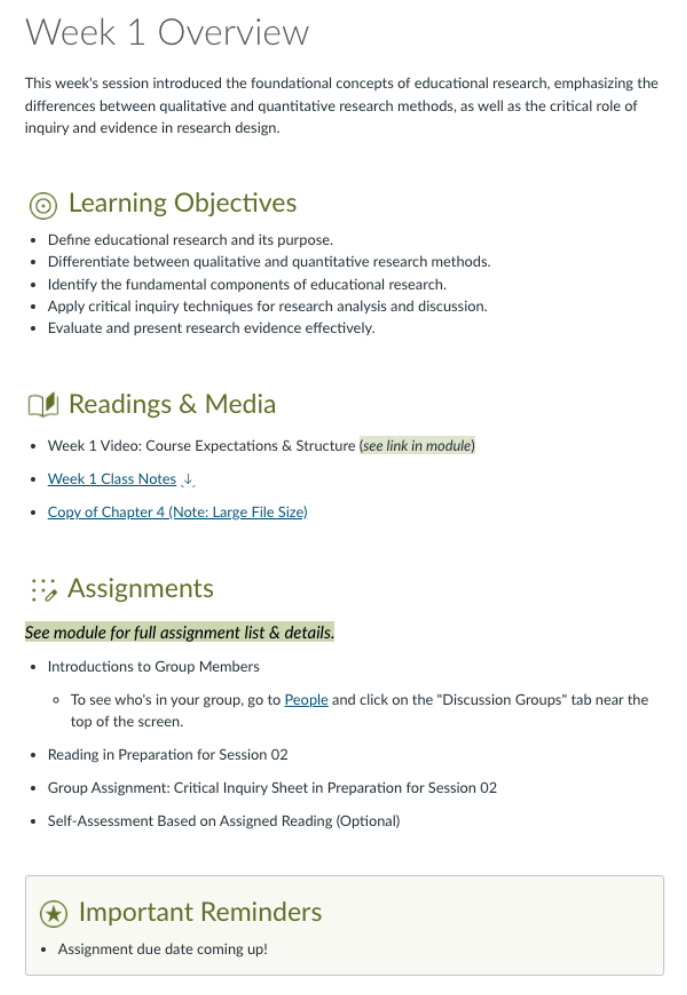
Example Canvas overview page
This is an example of an overview page. It includes a brief introductory paragraph to orient students to the week’s topic(s) as well as the learning objectives
An effective syllabus can also provide a clear course roadmap, outlining learning outcomes, assessments, policies, and support resources, which helps set clear expectations for students. A well-designed syllabus can promote better time management, improve student performance, and create a more organized learning environment.
More about course structure
5. Get student input on your course design
Whether you use feedback from last term’s students or suggestions from this term’s students, inviting your students to give design input will do a lot to help the course run smoothly. Working in partnership with students to make curricular decisions can help to:
- Encourages student motivation, participation, and agency
- Meet student needs by encouraging a diversity of ideas and choices.
- Increase student confidence and self-determination
Ways to encourage student input as you plan the course
Ask: Send out a poll about a week before the course begins to ask about technology access, communication mode preferences, and assignment type feedback. Students might be most interested in devoting some class time to asking questions while working on video projects rather than term papers, but as instructors, we won’t know that unless we ask.
Brainstorm: Give students three or four learning outcomes on the first day, and ask the class to brainstorm other outcomes they would like to include on the list. Work to include one or two of their suggestions on the final list of student learning outcomes.
Offer: Offer choice in how students complete some assignments. This might mean a choice of assignment formats, collaborations, or due dates.
Negotiate: Create a negotiated syllabus with your students during the first week of class. Give them a say in the course goals, assessments, assignments, and activities. You don’t have to make everything negotiable. A critical part of planning is to identify the scope of choice. This is a great way to build community and get student buy-in around course requirements. “The Negotiated model is totally different from other syllabi in that it allows full learner participation in selection of content, mode of working, route of working, assessment, and so on. It should by this means embody the central principle that the learner’s needs are of paramount importance” (Clarke, 1991).
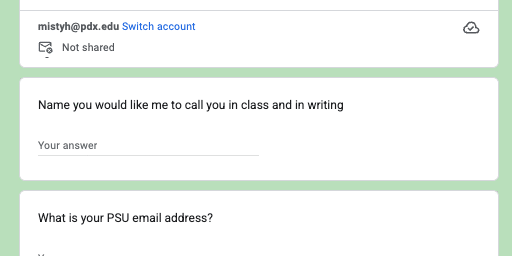
Want to try a pre-term survey?
Check out this sample pre-term survey to get ideas for the kind of questions you may want to ask your students. Then, use the link at the top of the form to make your own copy and modify it to fit your class needs!
Never used Google Forms before (or need a refresher)? Visit the Google Forms Support page for help getting started!
Resources on getting student input on course design
Clarke, D. F. (1991). The negotiated syllabus: What is it and how is it likely to work? Applied Linguistics, 12(1), 13–28.
Doyle, T. (2011). Learner-centered teaching: Putting the research on learning into practice. Stylus.
Schinske, J., & Tanner, K. (2014). Teaching more by grading less (or differently). CBE—Life Sciences Education, 13(2), 159–166.
Wiggins, G., & McTighe, J. (2005). Understanding by design (2nd ed.). ASCD.
You might also like


👋Need more help?
Submit a support request through our Faculty Support portal for assistance.

Faculty field notes for AI
Faculty field notes for AI
Example course policies, guidelines, and assignments to support student learning in the AI era

Explore PSU faculty examples of how fellow instructors are approaching artificial intelligence (AI) in their courses. The examples include assignment guidelines to help students know what is and isn’t acceptable on given assignments, syllabus statements to set course-wide expectations, and AI-infused assignments where students are expected to use AI to complete some part of their coursework.
A note from the PSU Student Academic Support Services team
“We hear from students that they are eager to use AI to support their learning, but they’re often unsure what’s allowed. Clear, specific guidance from instructors helps students use these tools responsibly and confidently. When AI expectations are transparent, through customized syllabus statements and assignment guidelines, students can focus on learning rather than guessing the rules.”
SASS comprises tutoring, academic coaching, academic testing services, college success and the disability resource center, empowering PSU students to achieve their academic and personal goals.
Portland State faculty and departments make their own decisions around AI use in their courses, including what is and is not acceptable for coursework. Learn more about PSU’s overall approach to AI, including guiding principles on how to make decisions around AI use in your class at Artificial Intelligence at Portland State University.
Use the following examples to spark ideas and develop your own AI assignment guidelines, syllabi statements, and assignments that fit your discipline, teaching philosophy, and course context.
AI syllabus statement examples from PSU faculty
Sample language from PSU faculty that articulates how students may or may not use AI in their class, overall. Strong AI syllabus statements speak to what’s unique about your students, your class, your teaching philosophy, and the kind of assignments your students complete. Review more sample language in our syllabus template.
- Please note that the examples below reference a range of AI tools. Gemini and Notebook LM are two AI tools available to the PSU community with enhanced security and privacy features.
- Dr. Lynn Santelmann, Ph.D.
- College of Liberal Arts and Sciences
- Used in several different Linguistics courses
Students are allowed to use generative AI tools such as ChatGPT or Canva’s AI apps, on specific assignments in this course. If you use AI in any part of your work, you must note it in the paper and cite it appropriately. When permitted, students must document and credit the AI tool using APA Style. (See the PSU Library’s guide to citations, link here: Citing Generative AI). Learning to use AI appropriately is becoming an important skill. That being noted, you should be aware of some of the limits of AI:
- AI is a tool. Learning to use a new tool takes time. If you put in little effort to the AI prompt, you’ll get low-quality results. The more thought you put in, the better your results.
- When you’re asked to write in this course, it’s because I’m asking you to think about the course content. Writing is a way to organize thoughts and make them clearer. Can AI do this for you?
- Don’t trust anything AI says. It makes shit up.
- Using AI without citing it is academic dishonesty.
Submitted November 2025
- Anonymous faculty
- College of Liberal Arts and Sciences
Generative AI tools are generally allowed with attribution: In this course, those students who wish to utilize generative AI tools, such as ChatGPT, Gemini, etc., are encouraged to do so. AI tools may be employed to brainstorm assignments or projects or to refine pre-existing work. However, to uphold scholarly standards, students are required to cite any AI-generated material that contributes to their work, including in-text citations, quotations, and references. The generation of content through AI without appropriate attribution constitutes academic misconduct.
Submitted November 2025
AI-infused assignments
PSU faculty examples of assignments that integrate AI in how students complete them.
- Dr. Lynn Santelmann, Ph.D., College of Liberal Arts and Sciences
- Ling 480/580 Bilingualism
- 20 students
- Roy Kravitz
- Maseeh College of Engineering and Computer Science
- Used in several ECE courses
“I used ChatGPT to help me design the project assignments and to provide starting code for the programming portion of the assignments. Both courses assumed that the students were competent in their programming skills. I would not have allowed students who were learning how to program use the tools.
Students were given permission, and in the case of generating Android code, encouraged to use auto-code generators to provide starter code. For the midterm exam for the Android programming course, I made it open book/Internet. One of the problems on the exam asked the students to provide the prompt(s) they used to generate portions of an Android program. Student feedback was positive, and most students had success in completing the assignments. Many students commented on my willingness to use, and let the students use, the technology that they will likely have to use once they start working.
As for the capabilities of the technology. I was impressed by the code generated and the scope of the help I could get from ChatGPT and Gemini, however…and it’s a big however. Pretty much everything auto-generated required extensive dialog w/ the tool, and more often than not, the solution did not work, and I had to troubleshoot and modify the auto-generated code.”
Submitted April 2025
- Rachel Noorda, College of Liberal Arts and Sciences
- WR 579: Researching Book Publishing
- 15 students
“I have used AI in the classroom in the graduate research methods course WR 579 Researching Book Publishing. Many students are very nervous for the oral exam where they have to defend their research to graduate. To alleviate this nervousness and help them practice, I gave them an AI prompt to help generate practice questions that they could try responding to aloud.”
Submitted March 2025
- William "Ike" Eisenhauer, MEng, Maseeh College of Engineering and Computer Science
- ME 314: Machine Component Design
- 45 students
“In my course, I use AI to enhance both engineering problem-solving and digital literacy. One specific assignment involves designing a steampunk-inspired robotic knee joint for “The Iron Voyager”, an automaton built to traverse harsh environments. Students use AI as a brainstorming tool to generate ideas for mechanical configurations, material selection, and aesthetic integration. After generating initial concepts, students must fact-check all AI-generated suggestions using engineering calculations, CAD simulations, and industry standards (such as AGMA for gears or ASME for welds). This process teaches them to critically evaluate AI outputs, distinguishing between creative inspiration and technically feasible solutions. Additionally, students document where AI provided useful insights and where it failed, fostering discussions on AI’s limitations in engineering design. By the end of the assignment, students not only refine their technical skills but also develop a nuanced understanding of how AI can aid—but not replace—rigorous engineering analysis.”
Submitted February 2025
- Prof. Kathi Inman Berens, Ph.D., College of Liberal Arts and Sciences
- WR 466/566: Digital Skills
- 15 students
“Students arrive in WR 466/566 Digital Skills presenting a huge range of experience with HTML and CSS. Some have never looked at source code. Others have passing familiarity; a few have built websites for years. The assignment is to build a webpoem using HTML and CSS (and JavaScript, for those with pre-existing expertise). The challenge: each student must create learning goals that push them beyond their existing level, including a “stretch” learning goal. Students reflect on how they pursue those goals in a structured learning reflection they submit with the webpoem. GenAI is a tool that students triangulate with traditional resources such as W3Schools, sample exemplary webpoems that we study and annotate, and code snippets found on fora such as StackOverflow and GitHub. Students find GenAI performs variably. Sometimes its suggestions work well. But, especially for the least experienced learners, GenAI doesn’t provide the conceptual framework with the same coherence as class discussion or tutorials on LinkedIn Learning. Students identify workshops of their webpoem-in-progress as a valuable learning tool. Workshops are dynamic, improvisational discussions of how other students approach aesthetic goals and problem solving. Workshops build camaraderie. They are both fun and efficient. This affective reinforcement supports the intellectual and experiential learning.”
Submitted February 2025
- Andrew F. Lawrence, School of Business
- BA 325: Information Literacy
- 40 students
“Rather than rely solely on the textbook/course materials, I used ChatGPT to help scaffold the input phase of an assignment. Specifically, students read a chapter that included some content about Moore’s Law. The textbook chapter did not cover the topic very cohesively, and so on a quiz question about this topic, I instructed students to ask ChatGPT about it in addition to reading the chapter. Students then shared the output of that conversation.”
Submitted February 2025
- Kam Moi Lee, Ed.D., School of Business
- BA 336U: Essentials of Information Technology for Non Majors
- 45 students
“BA 336U is a minor course for the School of Business that covers (among many other things) data analytics and spreadsheet management. A variety of majors enroll in the course, and students can vary in data literacy. Within the course, there is a list of critical terms that students need to be aware of by the end of the term. To assess their knowledge of the critical term, students can pick a term for the week and then use a Generative AI tool to define it. Then, students are asked to compare and contrast the answer against the textbook and explain any similarities or differences. I also require them to cite their sources using APA. Many students responded that they appreciated the exposure to Generative AI and that I allowed it to be used within my classroom.”
Submitted February 2025
Share your AI example!
We invite you to share your ideas on how you use (or don’t use) AI in your teaching practice. By crowd-sourcing this resource, we hope to invite a range of perspectives and examples across the varied teaching styles and disciplines of PSU.
Note, you must be logged into your PSU gmail account to access this form.

Community-Engaged Learning at Portland State University

Contributors:Harold McNaron
Community-engaged learning (CEL), also known as community-based learning or service-learning, is central to how Portland State embodies its motto, “Let Knowledge Serve the City.” As a public university founded in Vanport, OR and now located in the heart of downtown Portland, our history, present and future are bound to the Portland metro area and the community at large. This article discusses considerations for integrating CEL into your own classes as well as highlighting the work currently being done at on our campus.
What is Community-Engaged Learning (CEL)?
Community-engaged learning involves collaboration among community partners, students, and faculty/staff for the mutually beneficial exchange of knowledge, experiences, and resources. According to the PSU Faculty Senate-approved description for academic courses bearing the CEL tag, it is important that CEL courses:
- include community-engaged experiences that are central to course outcomes and goals (for all participants)
- ask students to reflect critically on their community engagement.
Some other key components often included in CEL courses and co-curricular programs could also include:
- Social justice orientation. Collaborative experiences that employ a social justice orientation that guides student-community partner engagement.
- Length of engagement. Some CEL students may work on one project over the course of several weeks or even throughout multiple terms while others might participate in a variety of CEL experiences within a course or co-curricular program. Length of engagement time is often a primary measure, and sometimes requirement, of CEL courses and programs.
- Impact and benefit to community partners. Short-term engagements can assist grassroots organizations with tasks like mailings, facility upkeep, and event support, all of which enhance their efficiency and visibility. In contrast, long-term engagements might contribute to organizational capacity building, workforce development, and fundraising efforts.
The depth of CEL collaboration can vary widely. Newer collaborations might start out with a single guest speaker or site visit while more mature partnerships could employ collaborative course design (faculty, community partner and/or students participating in curriculum design, implementation and evaluation), community-based participatory action research, and more significant time commitments at the partner site. Per the above examples, CEL can also take place both on and off campus.
Why CEL?
For decades, PSU students, faculty, and staff have utilized CEL to augment student success. Students can benefit from CEL pedagogies that make direct connections between course content and their academic, professional, and other personal interests. The impact of CEL extends beyond individual courses or academic years and influences alumni well into their professional and civic lives. When CEL utilizes a social justice orientation, it can be aligned with PSU’s ongoing commitment to and pursuit of racial justice, equity, and environmental sustainability.
In alignment with PSU’s commitment to serving the city and other communities, CEL courses and programs foster mutually beneficial and generative efforts that build on community assets and address pressing place-based interests/needs. Since most PSU graduates stay in the Portland Metro area upon graduation, CEL also serves as an avenue for alumni engagement. Many current community partners include PSU alumni among their staff, some of whom originally connected with their employers via PSU’s CEL efforts.
Lastly, as a public institution funded to meet the interests and needs of the Portland area, the State of Oregon, and the wider community, CEL is an accountability mechanism for the funding and other public supports we receive.
How does CEL happen at PSU?
PSU’s strong commitment to CEL is evident through University Studies and the Senior Capstone program, ensuring nearly every undergraduate engages in CEL before graduation. Beyond that, a number of graduate, professional, and other programs also embed their curricular and co-curricular work within meaningful community-connected initiatives and organizations. The examples below illustrate the many ways PSU community members are engaging in CEL:
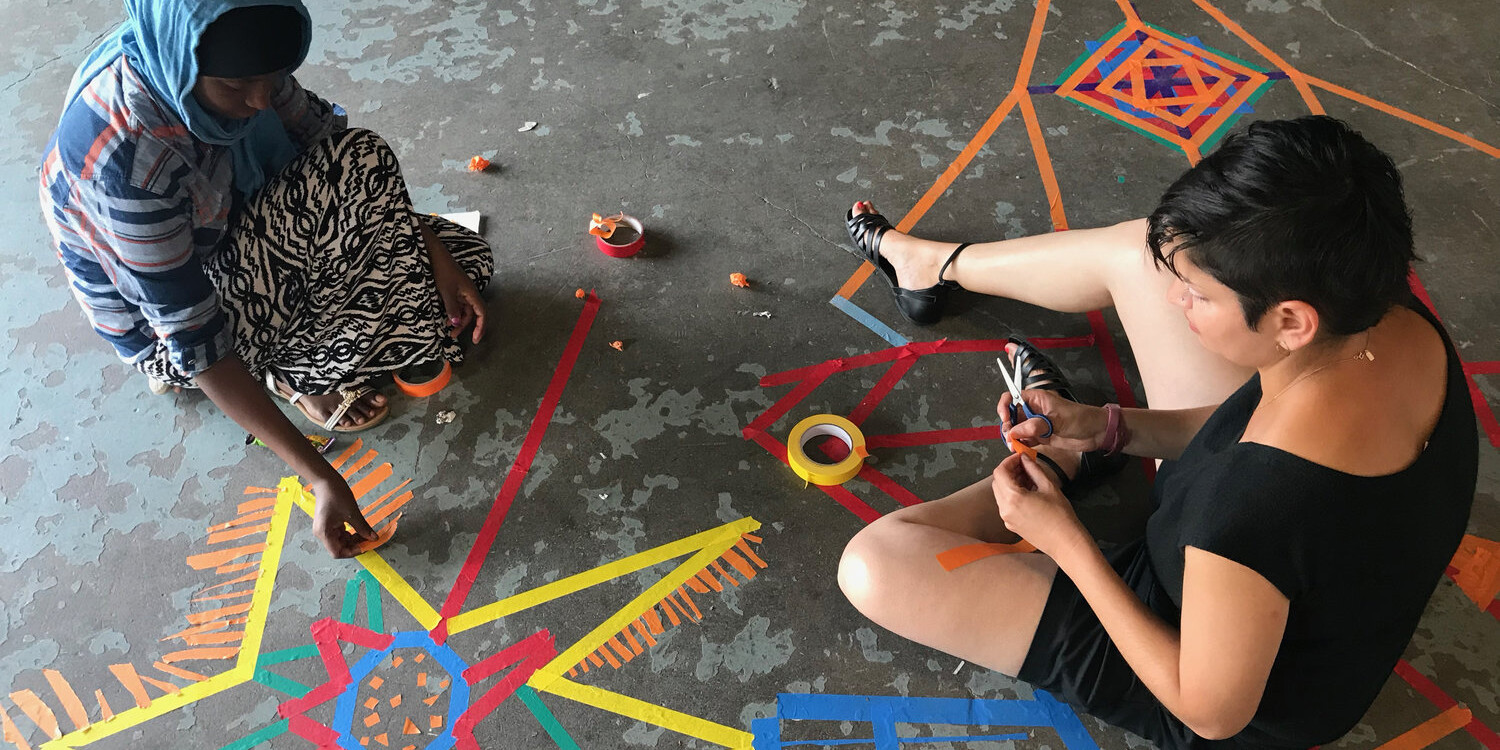
The College of the Arts partners with Dr. Martin Luther King, Jr. Elementary School for Dr. Martin Luther King, Jr. School Museum of Contemporary Art (KSMoCA). KSMoCA connects public school students, teachers, administrators, and staff, PSU students (graduate and undergraduate), and PSU faculty with internationally renowned contemporary artists through collaborative workshops, exhibitions, artist lectures and site-specific commissions.
Students learn about museum practice and careers in the arts by participating as curators, preparators, artists, gallerists, writers, and docents. KSMoCA reimagines the way museums, public schools, and universities can affect people, culture, and perspectives by creating radical intersections for sharing resources across organizations. Programs are developed collaboratively with Dr. MLK Jr. School community, PSU students, and a team of supporting artists.
Nothing found.
The Student Community Engagement Center (SCEC) at PSU employs a critical service-learning framework, which enables students to collaborate on meaningful projects with local nonprofits. SCEC offers a variety of educational equity, environmental stewardship, and economic justice projects as well as other supports and resources.
For more than 50 years, interdisciplinary groups of PSU students have served as camp counselors who build relationships with and support the experiences of campers with disabilities while exploring intercultural communication strategies and the inter-professional, collaborative nature of the nonprofit sector. About 25 years ago, the University Studies Senior Capstone Course at Mt. Hood Kiwanis Camp was implemented. The capstone incorporates academic course content and rigorous reflection supporting the four UNST goals (Communication; Critical Thinking; Diversity, Equity and Social Justice; and Ethics, Agency and Community).
Zapoura Newton-Calvert’s Social Justice in K-12 Education Capstone is an online community-interdependent course partnered with Reading Is Resistance, Teaching for Change, and Libraries for Liberation.
School of Social Work undergraduate and graduate students dedicate 400-500 hours during the academic year to educationally focused, professionally supervised practica. Students develop competence in social work skills and professional values in community-based organizations in support of the community partners’ mission. They engage in responsive practices that address the pressing needs of the most vulnerable and marginalized individuals, families, groups, and communities.
Speech and Hearing Sciences graduate students complete clinical practicum experiences that support services in local schools and provide needed expertise, such as the Bilingual Spanish Assessment Clinic, which conducts evaluations in Spanish and English for children who have been referred for special education.
College of Education teacher candidates complete year-long practicum (student teaching) experiences in K-12 school settings.
Putting Community-Engaged Learning into practice
Are you interested in integrating community projects and partnerships into your teaching?
Meet current community partners at PSU
Identify one of PSU’s existing community partners whose goals align with your course. You can begin looking for opportunities to expand or deepen partnerships by reviewing current partners on the following PSU pages:
- Partnerships & Engagement (Global Diversity & Inclusion)
- GivePulse (Student Community Engagement Center)
- Senior Year Capstone Program (University Studies)
Develop new partnerships
Take time to understand potential partners’ contexts, including their history, goals, and collaborators, while sharing key information about PSU’s academic structure to lay the groundwork for a successful and sustained partnership.
Get personalized CEL support at Portland State
Schedule an individualized consultation with The Office of Academic Innovation to get course or department-level support in integrating CEL.
Explore CEL resources and guides
You may also explore some of the following resources for continued learning about community-engaged learning:

Community engagement toolkit
The Community Engagement Toolkit helps students explore the importance of engaging within the community and how to find meaningful connections. The Faculty and Facilitator Guide for this toolkit includes ideas on how to utilize this tool kit within the classroom environment.

Guide to Community-Engaged Learning Instruction
Explore the relevant chapters in this guide to community-engaged learning instruction, authored by Dr. Christine Cress from the College of Education and other PSU-affiliated scholars. (Contact the Office of Academic Innovation to inquire about borrowing a copy.)

This is an example of an overview page. It includes a brief introductory paragraph to orient students to the week’s topic(s) as well as the learning objectives.Following that, students can see all of the weekly activities/assignments.
Stay current with community-engaged pedagogy
Check in with one of the many professional associations and conferences producing timely research on community-engaged pedagogies:
Kaltura MediaSpace Player Upgrade
Kaltura MediaSpace Player Upgrade
This article was last updated .
Kaltura discontinued its V2 media player, replacing it with the next generation V7 player. This new player has a more responsive design, improved accessibility features, and customizable options to experience your media however you want. To compare the new player to the old player, check out Kaltura’s V2/V7 comparison tool.
How does this upgrade affect me?
If you have embedded video from MediaSpace in your Canvas course or another platform, you will need to replace the embed code.
Although the V2 player may seem to be working fine, it can stop working at any time since it has been discontinued and reached the end of support.
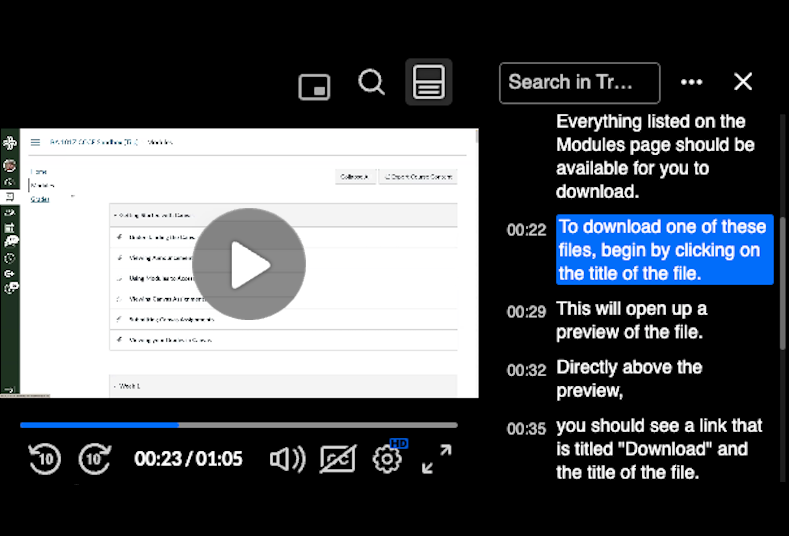
To determine if your embedded video is the old (V2) player or the new (V7) player, look for the following features:
V2 Player
- Square play button
- No transcript visible
V7 Player
- Circular play button
- Transcript visible by default (if available)
Note: All videos hosted on our MediaSpace have been automatically updated. If you have shared a direct link to a video in MediaSpace, no action is needed from you to change to the new player.
How do I update the embed code for my MediaSpace video in Canvas?
The process to replace the V2 player with the V7 player requires that you search for videos in your MyMedia list. We highly recommend that you access your MyMedia page in MediaSpace and take the following steps to make it easier to find your content.
- Delete unneeded videos.
- Update your video titles to use a consistent naming structure. (Example: [COURSE#] Week#: Topic -> “[SPAN 101] Week 4: Prepositions.”
- Publish the videos you want to use to “Unlisted.”
- In your Canvas course, navigate to the Rich Content Editor (editable text box) in the page or tool (quiz, assignment, etc) where you want to update the embedded audio or video player.
- Delete the existing video. You will replace it shortly with the same video. By doing so you will force the player to update.
- Be sure to position your cursor in the Rich Content Editor where you want the updated video to appear.
- In the top toolbar of the Rich Content Editor, select the Embed Kaltura Media (1) icon.
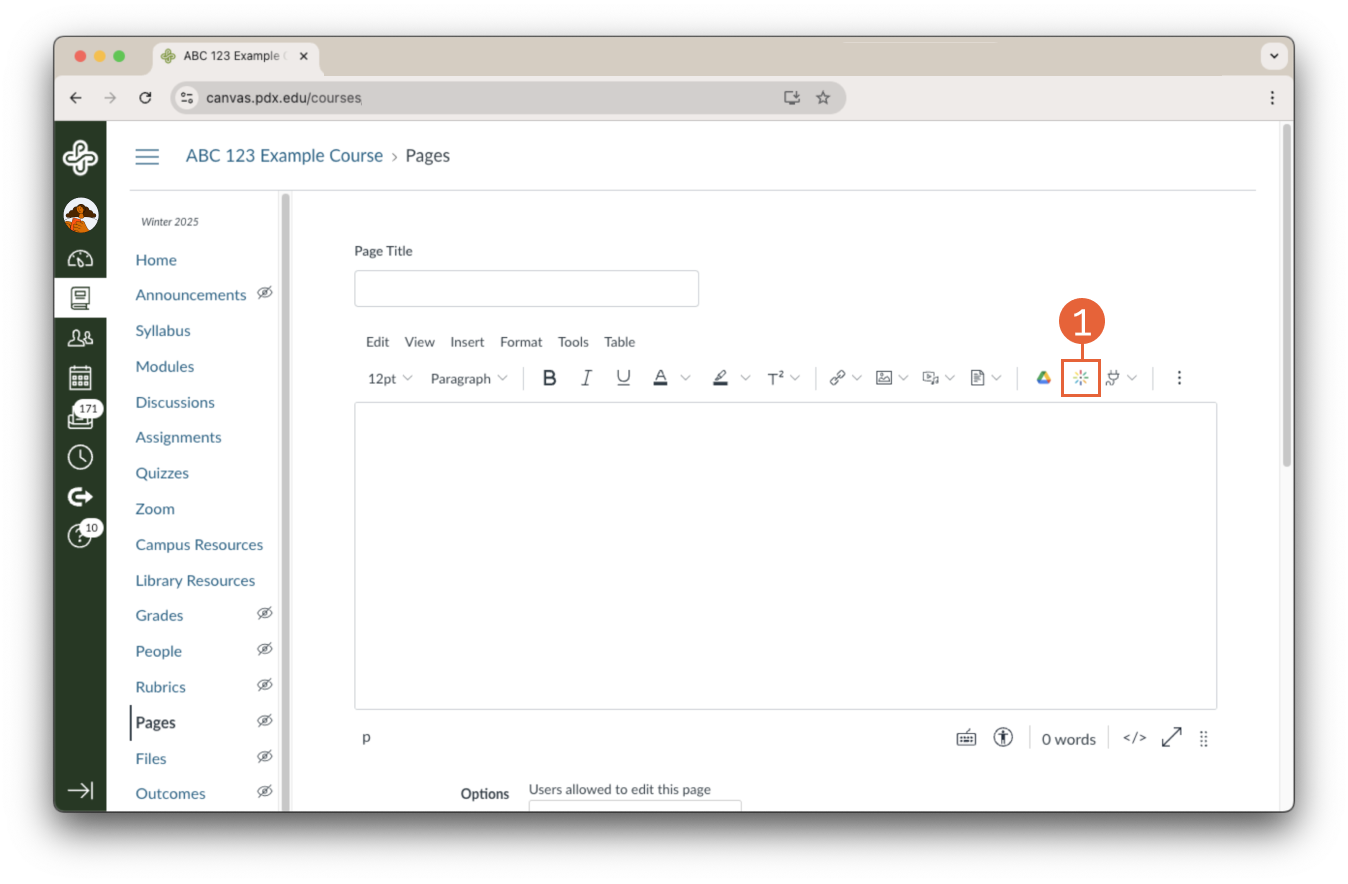
- Search for the media file you want using the Search Bar (2) or by navigating through the list.
- Once you have found the video you want to use, select the blue </>Embed button (3) next to it.
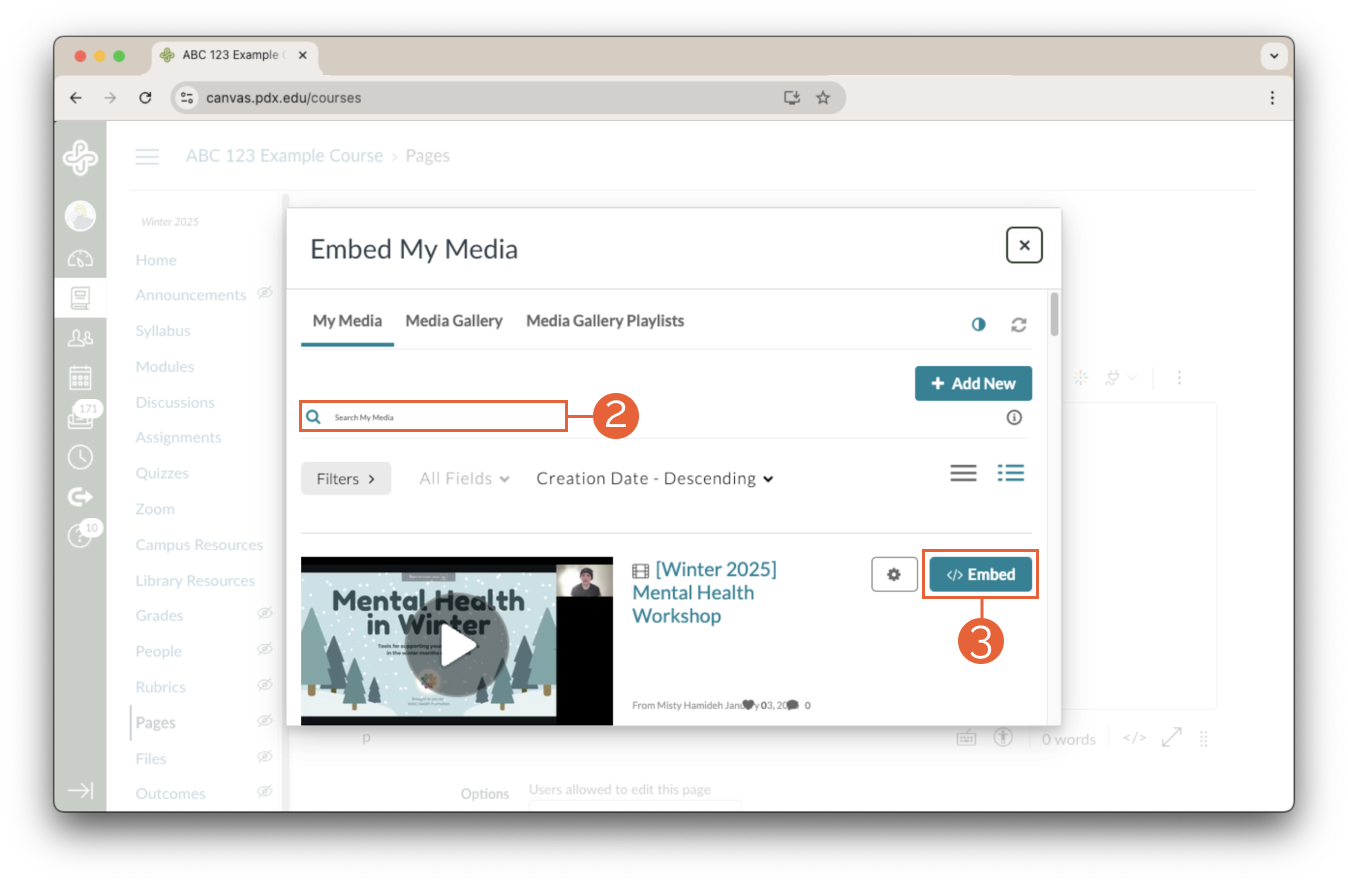
- The video will appear on your page. Save and publish your page, quiz, assignment, or discussion.

Threaded Replies Unavailable in Canvas Discussions
Threaded Replies Unavailable in Canvas Discussions
This article was last reviewed .
Why aren’t Discussions working as expected?
In Summer 2024, Canvas introduced a redesigned Discussions tool, which includes an option to disallow threaded replies. Threaded replies allow students to respond directly to each other’s discussion responses. They are grouped together visually, and each subsequent reply to a post is indented. When threaded replies are disallowed in a discussion, participants can only post top-level responses to an initial discussion prompt; no one can make direct replies to other discussion threads.
When updating the Discussions tool, Canvas inadvertently applied the disallow threaded replies feature to existing threaded discussions. As a result of this feature change, students may find that they are no longer able to reply directly to discussion responses in some courses.
Learn more about threaded versus non-threaded Canvas discussions.
How can I fix the disallow threaded replies issue so participants can reply to discussion replies?
Option 1: Use the temporary button to make all discussions threaded
This self-service button (1) is only visible in courses that still contain at least one discussion affected by the issue.
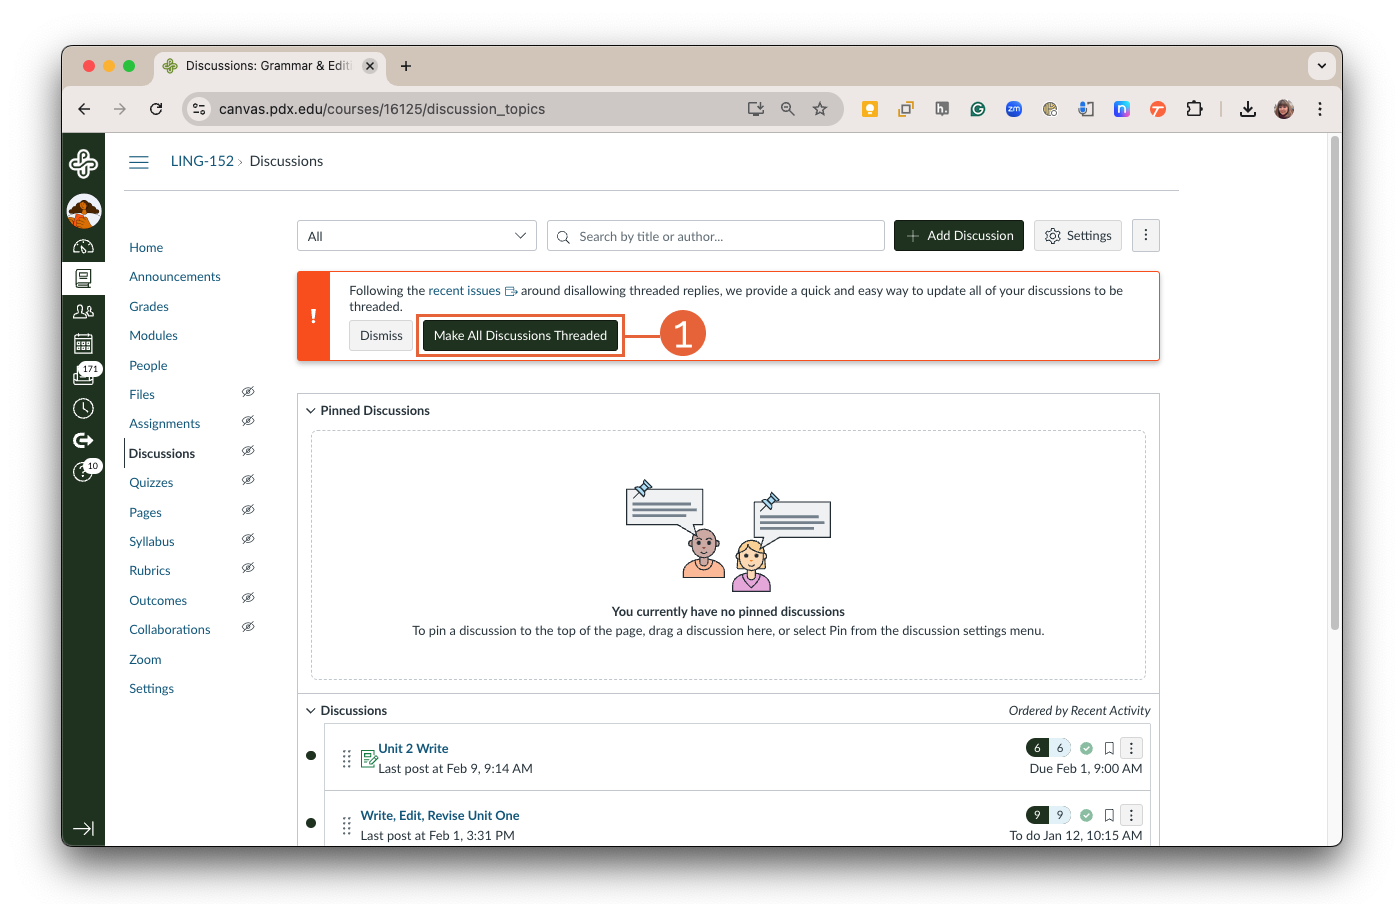
Learn more about this temporary button at the Canvas product blog post, Temporary button to uncheck the Disallow Threaded Replies option in all Discussions.
Option 2: Manually update individual discussions
-
- Navigate to the relevant Discussion’s Edit page.
- Then, uncheck Disallow Threaded Discussions.
- Select save.

Availability Dates won’t update on Graded Discussions
Availability Dates Won’t Update on Graded Discussions
This article was last reviewed .
Are you having difficulty getting Canvas to reflect your graded Discussion availability dates, even after updating the dates in the Discussion’s settings? If so, follow these steps to fix this issue:
- Open the Discussion’s Edit page: Navigate to the relevant Discussion’s Edit page.
- Refer to How do I edit or delete a discussion in a course? for guidance on locating this page.
- Note relevant information: Write down the graded discussion’s Point value and Availability and/or Due Dates set.
- Change the Discussion Graded option: Below the Options section, uncheck “Graded”.
- Remove Date Restrictions: Delete the Availability and/or Due Dates noted in Step 2.
- Save changes: Save the discussion by selecting the “Save” button at the bottom right of the page.
- Revert the Discussion Graded option: Edit the discussion again, and check “Graded” from Step 3.
- Re-Add Date Restrictions: Re-enter the Availability and/or Due Dates noted in Step 2.
- Finalize changes: Select the “Save” button at the bottom right of the page.
The dates should now display as expected.