Contributors:Kari Goin Kono, Misty Hamideh, Lindsay Murphy
Creating accessible PDFs helps ensure that all students can easily read and interact with course materials, including those with visual, motor, cognitive, and learning disabilities. This article outlines best practices for reducing PDF usage, structuring documents, using accessibility checkers, applying optical character recognition (OCR), and utilizing PDF editing tools. By following these practices, you can create documents that are more inclusive and compliant with accessibility standards.
Digital accessibility changes for PSU faculty
In April 2024, the U.S. Department of Justice updated Title II of the Americans with Disabilities Act (ADA) to set clear requirements for accessible web content and mobile applications used by public entities, including public universities. The rule adopts WCAG 2.1 Level AA as the technical standard. The original compliance date of April 2026 has been extended and the new compliance deadline for PSU is April 26, 2027. Learn more about Title II compliance at PSU.
What are my top priorities for creating accessible PDFs?
As a general guideline, we discourage faculty from creating PDFs unnecessarily (for example, for syllabi or assignment instructions). Files are almost always more accessible when shared in the original authoring platform, such as Microsoft Word or Google Docs, and are also easier to edit later. An exception to this rule is if the intent is to print and distribute paper copies, since PDFs better preserve layout and formatting.
We recommend considering the following actions to improve the accessibility of your course materials:
- Reduce the number of PDFs used in your course. Many PDFs do not need to be shared in PDF format. Review the PDFs in your course to determine which should be checked for accessibility and which could be converted to an alternative accessible format.
- Research alternative accessible versions. Before attempting to remediate a PDF, first look for an existing accessible version. Accessible PDFs need to include OCR (optical character recognition) so the text is searchable and readable by assistive technologies. Check the PSU Library or search online to locate an accessible copy before uploading a file to your course.
- Repair your PDFs for accessibility. If you cannot find an alternative version, review the steps outlined below and plan adequate time to repair your PDF. Schedule a consultation with an OAI staff member if you need assistance reviewing a PDF or discussing accessibility, or consider requesting paid remediation service through OIT.
- Review using an accessibility checker. Regardless of the path you take, the final step should be to use an accessibility checker to test your PDF. You can use Panorama to review and repair PDFs uploaded to Canvas. Foxit PDF Editor is also available through OIT and can be used to review or repair PDFs. We recommend using the OAI Accessibility Worksheet for a comprehensive reference.
In situations where you must use a PDF, the following sections outline strategies for improving PDF accessibility through document repair.
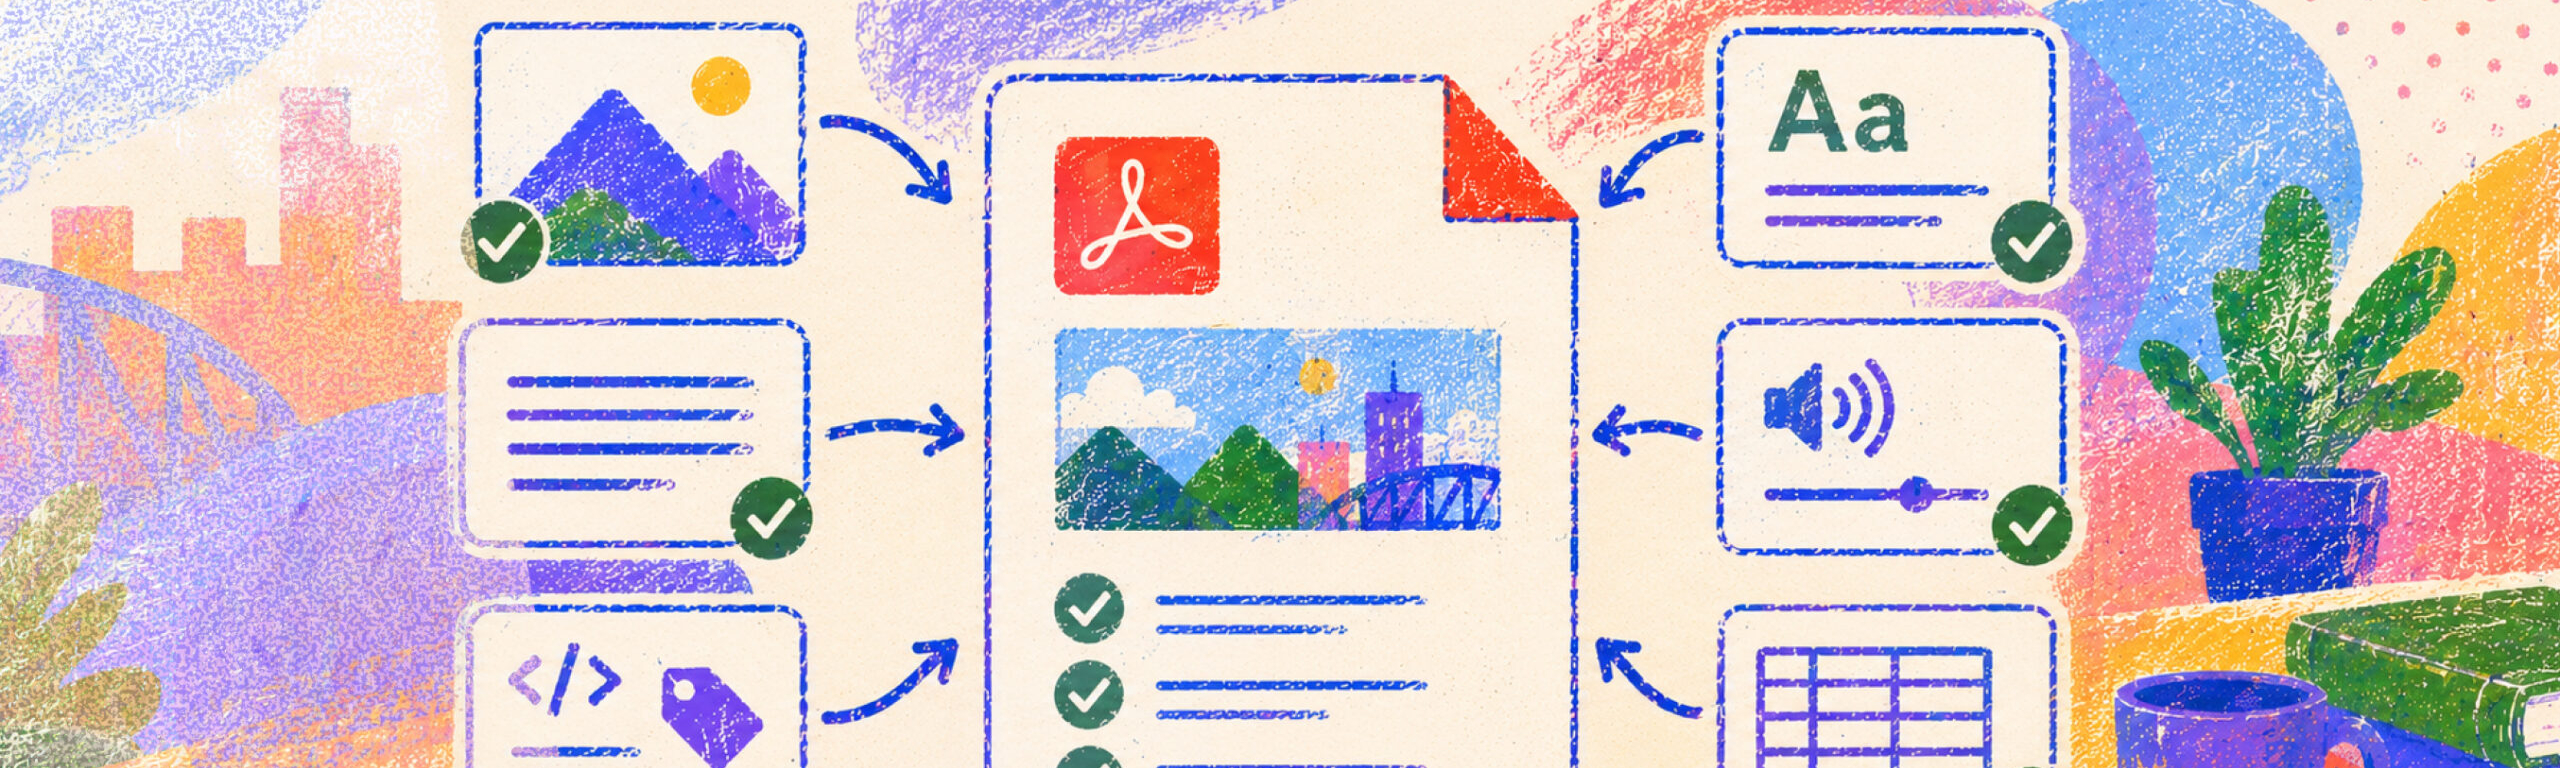
- Create your document using accessibility best practices. Whether you are creating a new document or updating an existing one to share as a PDF, it is important to ensure the formatting aligns with accessibility guidelines. Reviewing the following elements will help ensure proper formatting of your document:
- Headings: Use built-in heading styles (for example, Heading 1, Heading 2) consistently to create a clear, logical structure.
- Lists: Use the built-in bulleted and numbered list tools appropriately.
- Tables: Add header rows and column headers to provide context for table data.
- Images: Use meaningful file names and include descriptive alternative text for all images.
- Review your document using an Accessibility Checker. Accessibility checkers will analyze your document and provide suggestions for improvement. At this time, Google Docs does not have a built-in accessibility checker, but Microsoft Word does! You can download a copy of your Google Doc as a .docx file and open it in Word to use the accessibility checker. However, keep in mind that checkers are limited and may not cover all accessibility criteria. We recommend using the OAI Accessibility Worksheet for a more robust accessibility check.
- Export your document as a PDF.
- In Google Docs:
- File > Download > Save as PDF
- In Microsoft Word:
- File > Save As > PDF
- In Google Docs:
- Review the PDF for accessibility. After exporting your PDF, you will need to review it using an accessibility review method described above.
Creating an accessible PDF from a textbook or printed document requires additional manual effort. Accessibility depends on the quality of the original document, the accuracy of the optical character recognition (OCR), and the time and effort invested in the process.
Important Note: Ensure you are complying with Copyright law and Fair Use guidelines when sharing material that does not belong to you.
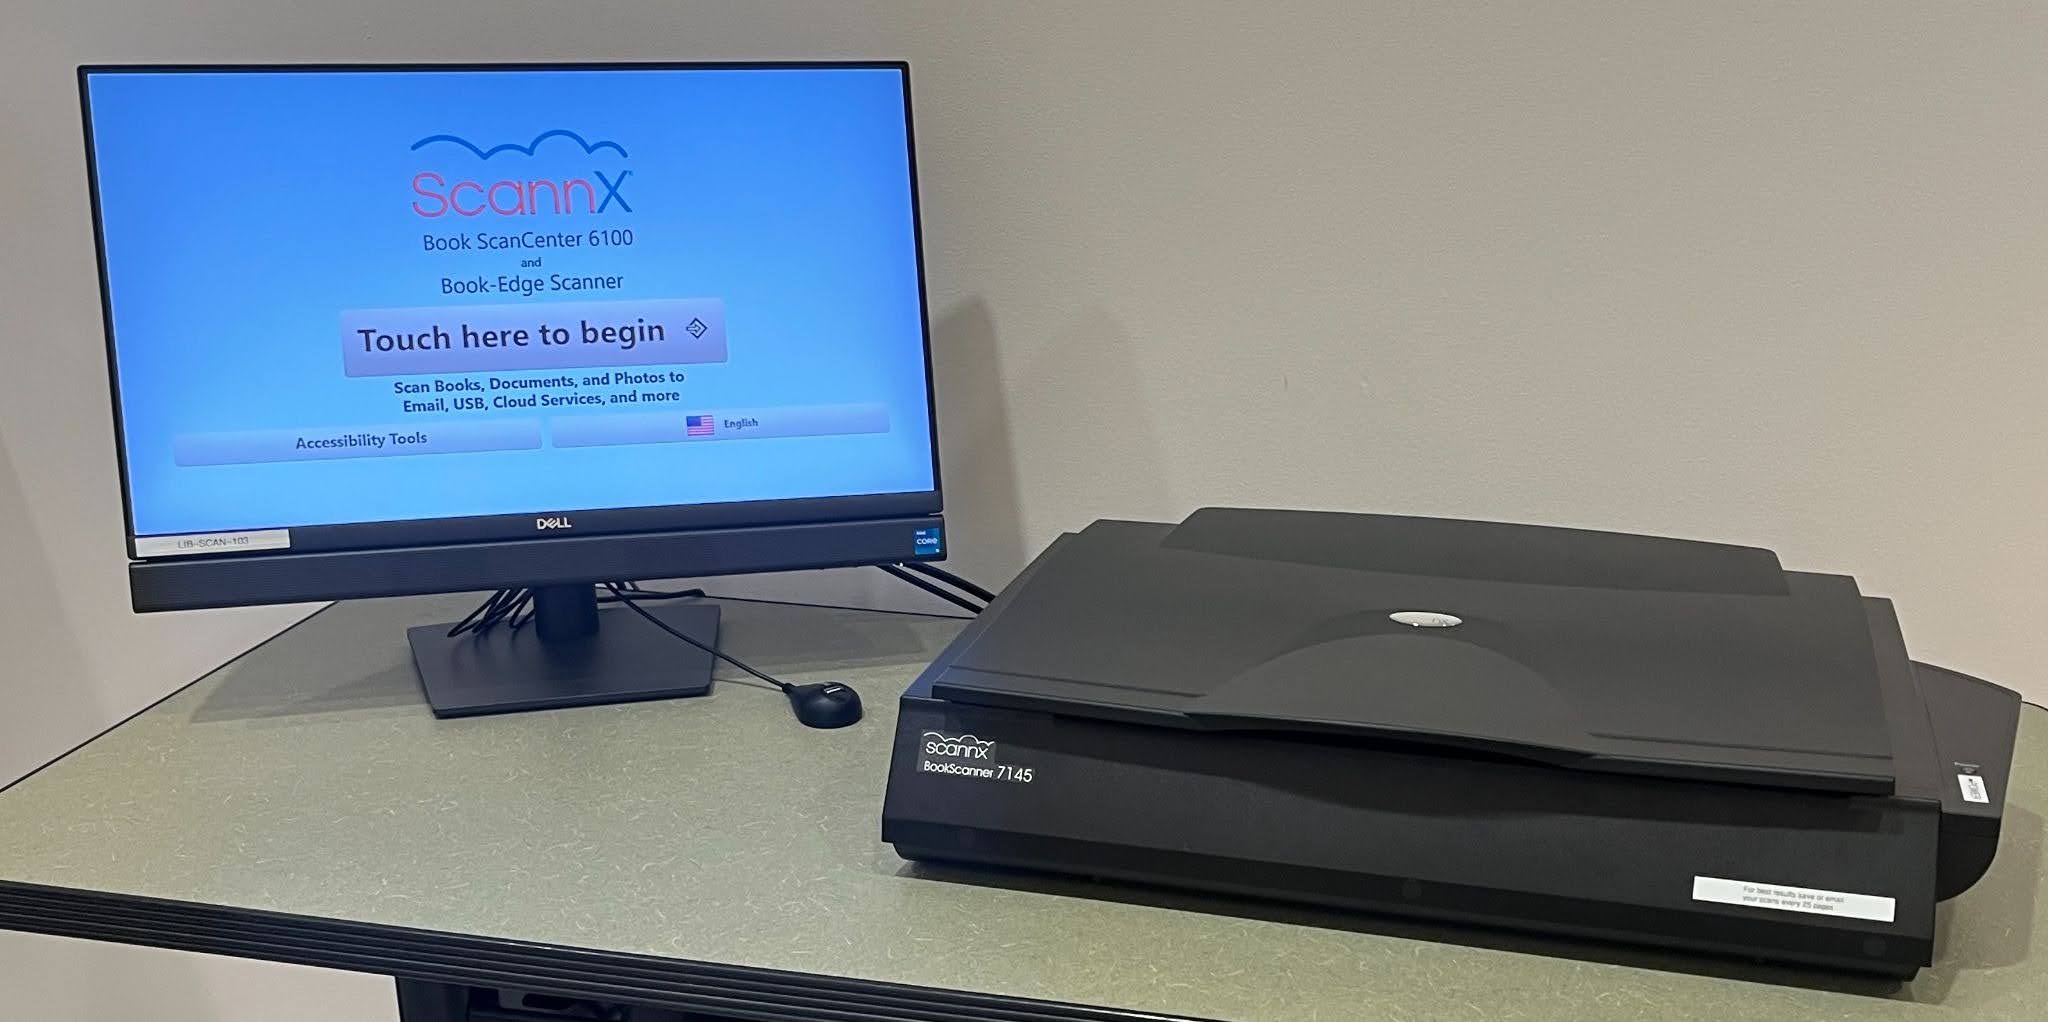
- Scan your document using a high-quality scanner with OCR enabled. The PSU Library has a scanner near the circulation desk that is available to the PSU community. It can scan printed materials with OCR and supports page-by-page book scanning. Be sure to select the “searchable PDF” setting when scanning to enable OCR. (Note: This scanner does not have keyboard access. Check with the library staff if you need assistance using this scanner.)
- Review the PDF for accessibility. After saving your file, you will need to check it using an accessibility review method described above.
In some cases, you may have older scans or other PDF-only copies of course material. The best first step is to check for existing accessible copies. Start by searching the Portland State Library eBook collection or looking online for an accessible open-access version of the document.
If you cannot find an accessible version, contact your subject librarian. They will often be able to help you find an accessible version of your PDF or create a copy that can be shared via eReserves.
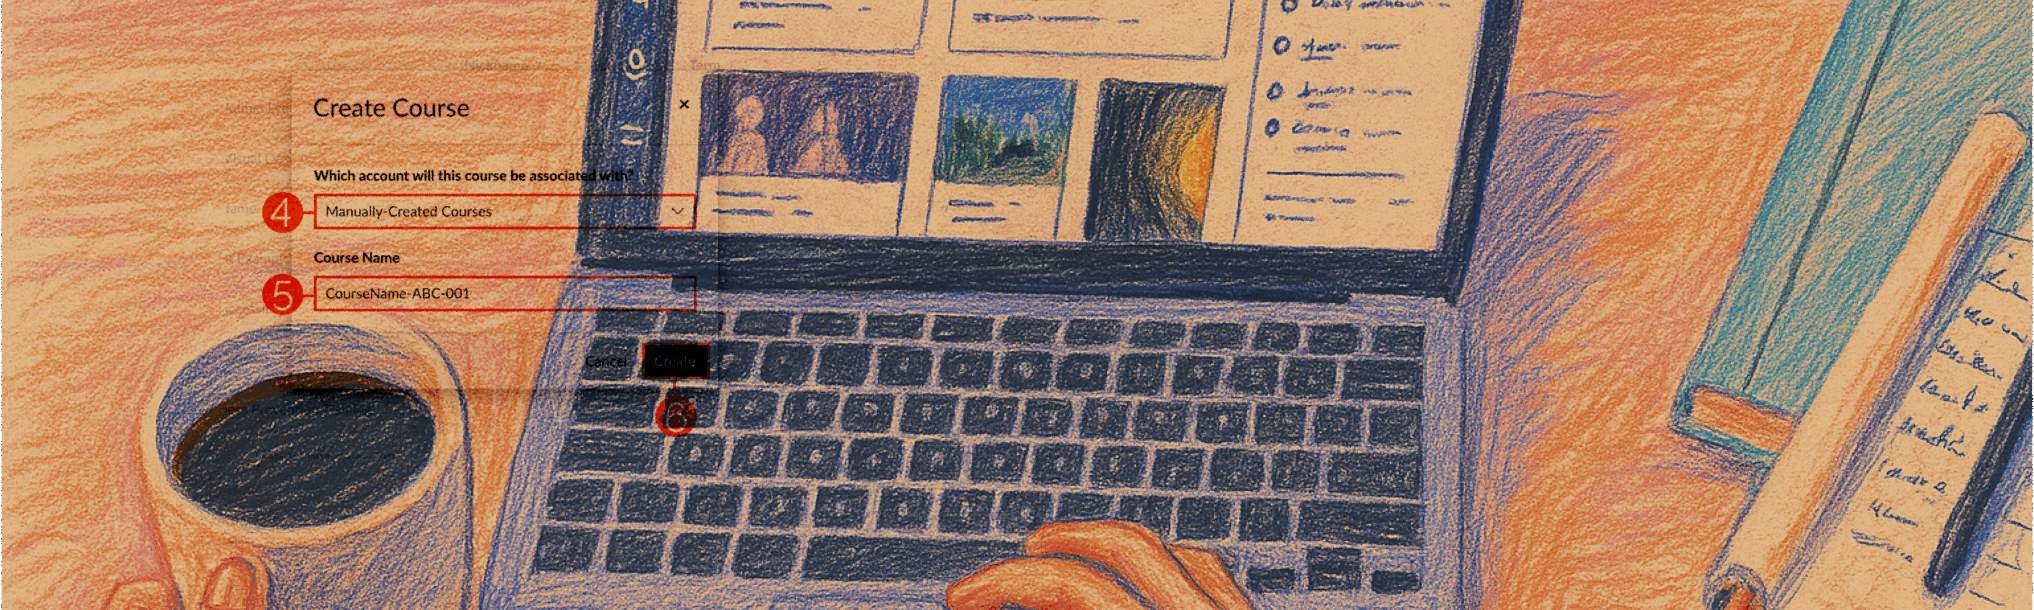
- Use Panorama to apply OCR, if necessary. Start by uploading your PDF to Canvas (if it is not already there). Then use Panorama’s structural remediation tool to generate an OCR version of your PDF.
- Use Panorama to apply PDF repairs. Once the PDF has been OCR’d, open the file Accessibility Report in Canvas to identify issues and apply proposed solutions. Panorama includes many remediation tools that can address common accessibility issues. More complex issues may still require editing in software such as Foxit or Adobe Acrobat Pro.
For a comprehensive list of accessibility standards for WCAG-compliant PDFs, review the Accessible PDFs Worksheet.
Where can I find more accessible PDF resources?
PSU librarians can assist with your search for accessible content, help scan library-owned materials with OCR, and provide guidance for the appropriate use of copyrighted materials.
NaturalReader is a text-to-speech tool that can help you determine whether your PDF is accessible to students who use screen readers.
Panorama is an accessibility checker and remediation tool that works directly within your Canvas course. You can use Panorama to remediate a number of PDF accessibility problems.
Once you have a Foxit license, you can use the software to improve the accessibility of PDFs. Learn more about OIT’s Foxit pilot, including how to request a license.
You might also like


👋Need more help?
Submit a support request through our Faculty Support portal for assistance.