
ATLAS: Setting up a workspace in Canvas that auto-enrolls students
ATLAS: Setting up a workspace in Canvas that auto-enrolls students
This article was last updated .
Before you begin this process, you will need to make sure you have creator privileges in an ATLAS region. If you do not have these privileges (or are not sure if you do), contact your department PebblePad coordinator or the OAI Faculty Support Desk.
Begin by creating a PebblePad LTI Express Assignment
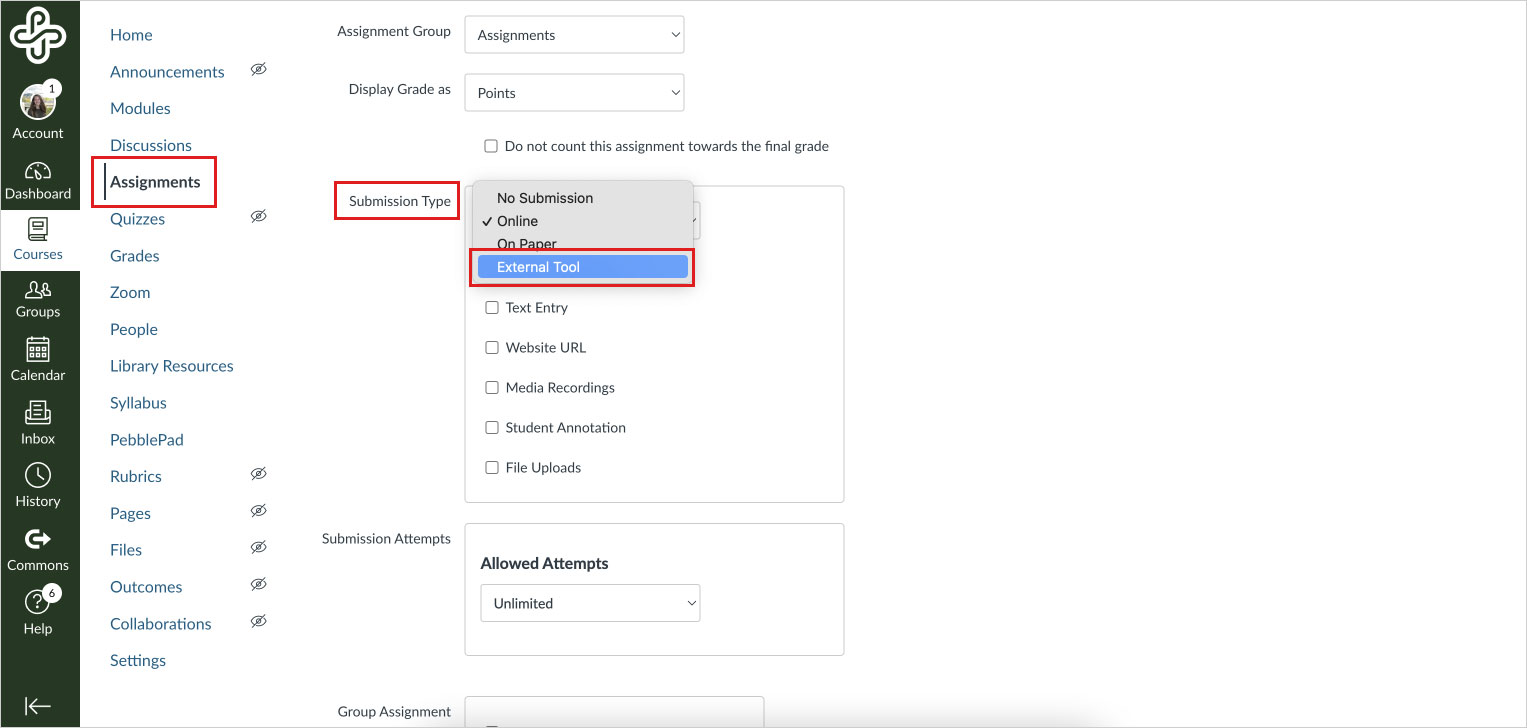
- Navigate to the Assignments area in your Canvas course and select the +Assignment button to create a new assignment.
- Enter a name for the assignment and any other details you want to include in the spaces provided.
- In the Submission Type menu, select External Tool.

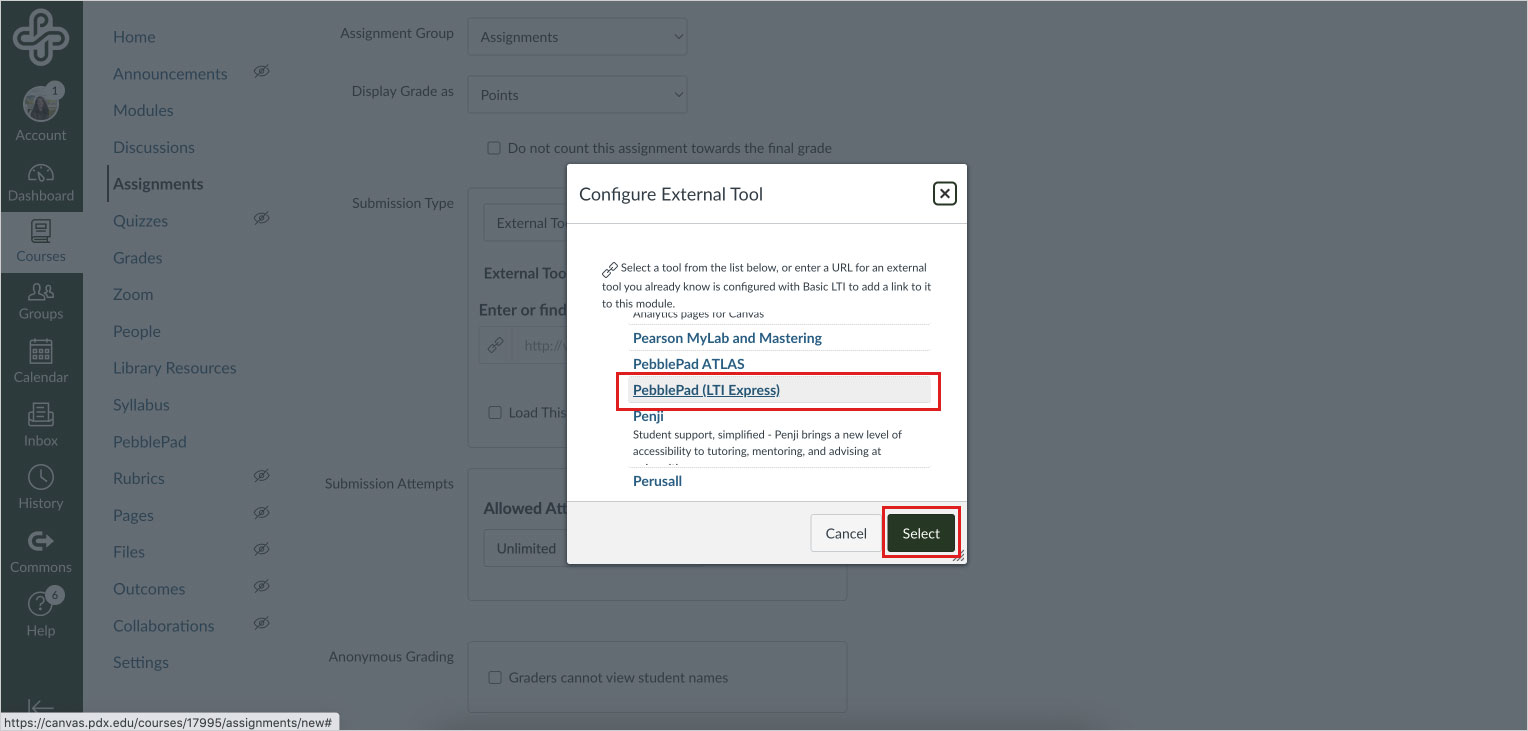
- Select the Find button and then scroll to PebblePad LTI Express.
- Use the Select button to create your LTI link and close the menu. Important: do not use the small X in the upper right corner to close this menu. It will close, but no LTI link to PebblePad will be created. In that event, delete the Canvas assignment and start over.
- Complete the Canvas settings for the assignment, including number of submission attempts and due date. Then choose Save (do not publish until you have set up the workspace).
Next, you will need to set up your ATLAS Workspace
- From the Assignments page, select the PebblePad LTI assignment link you just created and follow the prompts to load the page in a new window.
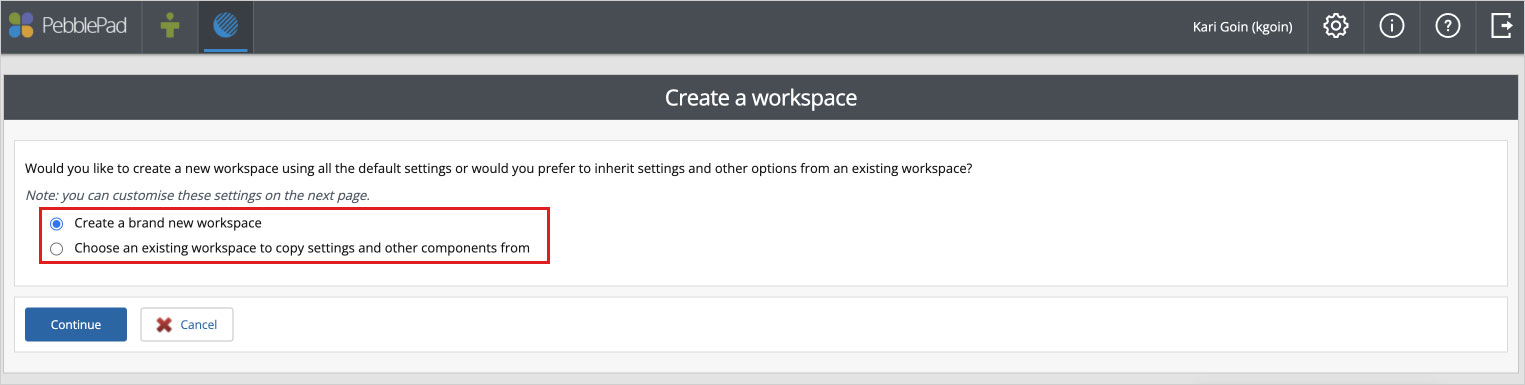
- If this is the first time you are adding a PebblePad link to this course, a page will appear prompting you to either create a brand new ATLAS Workspace or copy an existing one.
-
- If you have created a workspace in another course, you can choose it from the dropdown to copy the settings and skip to Step 4.
- If you choose to create a new workspace, you are presented a basic Workspace configuration with the name is prefilled based on the Canvas Course title, which can be changed before saving. Also, it is important to note that you can keep working on the Workspace in Setup Mode before activating it.
-
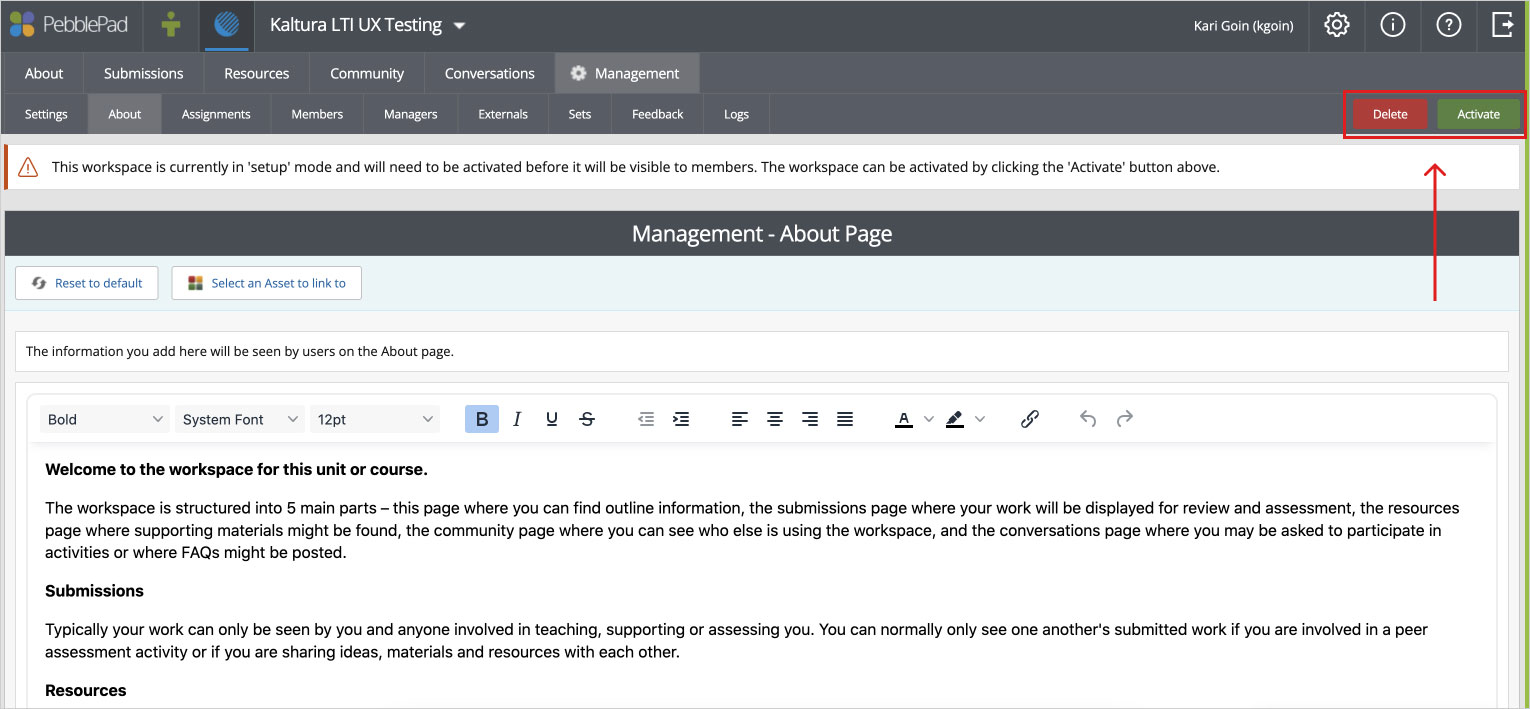
- Select each of the tabs to enter the relevant information for your Workspace:
-
- Basic Settings: Complete the naming of the Workspace, or accept the default one
- Advance Settings: Complete the other configuration options. Note: If copying an existing Workspace, this tab will not appear.
- Managers: Confirm that instructors from the Canvas course were added as Managers in the Workspace.
- Member: Confirm that students from the Canvas course were added as members of the Workspace.
-
- Select Finish.
- Select Activate and follow the prompts to confirm the status change. (Note: You may see a prompt, showing the number of users that will be created in PebblePad and the number of accounts that already have a PebblePad account. This is for information only.)
- When you are ready for students to begin accessing the workspace, make sure to Publish the link in the module or on the Assignments page. Once published both students and instructors can click on the PebblePad LTI Express link to be taken directly to the ATLAS Workspace to access Resources there like Portfolios or Workbooks and Templates. From this point on the linked ATLAS Workspace will sync enrollments from Canvas to ATLAS.

End-of-term Canvas grading checklist

Contributors:Misty Hamideh
As you near the end of the term, it is a good idea to make sure the Canvas grades accurately reflect your students’ work and that all assignment grades have been posted for your students to review. Follow these steps to make sure everything is in order before you submit your final grades to Banner.
Ensure grades are calculated correctly.
Check your syllabus and confirm that your grading breakdown matches your Canvas gradebook. A good way to check is by entering the maximum point value for each grade column in the bottom row for your Test Student. If you intended to weight grades, but instead have a point-based total, you can still adjust that to weight grades by assignment group.
Enter zeroes for any missing work.
By default, the Canvas gradebook totals only entered scores. Missing assignments are not automatically calculated as zero. Instead, they display a dash and are left out of the calculated total, giving students an inflated total percentage. They can uncheck the “calculate based only on graded assignments” box on their grades page, but we recommend not assuming they’ll do so. Instead, enter zeros for all unsubmitted assignments or create a “missing submission policy” and set it to zero.
Record all extra credit.
Make sure the extra credit you want to give students is factored in correctly. You can add extra credit by creating an assignment set to zero points. This video shows how to set up an extra credit column for both a points-based and a weighted gradebook.
Adjust visibility of grades.
If you meant to keep grades hidden until manually posted but find that some students can see their grades, it may be because you’d entered those grades before switching from Automatically Post Grades to Manually Post Grades. The visibility icon in the grade column header will show that they’re hidden, but that only applies to grades entered after switching to manual posting - the policy is not retroactive. In that situation you can select Hide Grades, which will affect the previously-posted grades.
Export gradebook, if necessary.
Lastly, if you don’t want to enter grades in Canvas, you can export your Canvas gradebook to Excel and enter data there. Then use the Import a CSV File option to upload your grade changes to Canvas.

Teaching online at Portland State

If you’re new to teaching online at Portland State University or just want to refresh your skills, this guide can help. It’s specifically for the “Online – No Scheduled Meetings” course modality. Some of its sections may not be relevant for other modalities. For a condensed version, scan the Course Management Timeline. If you don’t find what you need in this guide, contact the OAI Support Desk.
(If you would like a hard copy of this guide, please download and print this accessible PDF version.)
These resources have the foundational principles for this guide. You might find it helpful to review them first.
These websites are mentioned throughout this guide. They’re the online tools you’ll use most often.
- Odin account: Official PSU login for all campus services
- myPSU: A central place for student and faculty resources
- Banweb: Course roster and submission point for final grades
- Gmail: Official PSU email
- Canvas: PSU’s learning management system (LMS), the hub for your online course
- Kaltura MediaSpace: Where you’ll upload the videos you record
Before the term starts
Before classes begin, there are a few important steps to take—both to understand your students and to get your course and technology set up for a smooth start.

Get to know the PSU community
PSU is unique in part because of its demographics. The university was originally founded to serve veterans from WWII. These insights might help you support students and encourage them to persist in their studies.
-
- Your department will process your teaching contract. The first date of your teaching contract is usually two weeks before the term begins.
- You’ll need access to a live Canvas shell. Typically, you’ll be enrolled in your live shell during week seven of the previous term. Contact the OAI Support Desk if you are not enrolled by week eight.
- Verify that your department will assign you a teaching assistant (TA), if applicable.
- You may receive an email from the Disability Resource Center (DRC) that one or more of your students has an accommodation. Review the email carefully to understand and implement each accommodation.
- Even though your course is online, place a copy of your textbook on course reserve at the library, for students on campus — if possible.
- Most departments require at least one office hour appointment per week during the term. Schedule these in Canvas via Zoom and communicate them with an announcement, in your syllabus, or, if appropriate, on the Canvas course homepage. Instructors report that students don’t take advantage of online office hours. Low attendance is common. Consider these recommendations.
Students report that a challenge to their success is the instructor’s lack of familiarity with the required course technology. You can get up to speed by enrolling in this Canvas course: Growing with Canvas. Next, think about your technology needs and contact the library if you need to borrow any tech items to teach your course.
Here are some other tips for familiarizing yourself with course technology:
-
- Have you taught in Canvas at PSU before? You can Import course materials from an existing Canvas course shell.
- Ensure that your course materials are appropriate for the modality. Students want course materials designed for the modality. If you have publisher integrations or specialist technology, consider how to integrate them within your Canvas course shell.
- It’s helpful to experience your course as students do. Try the Student View feature within Canvas.
- If your course uses videos, make sure they have captions. This helps students follow along, take notes, and reinforce concepts — and it’s also necessary for Americans with Disabilities Act (ADA) accommodation.
- Within Canvas, you can lock modules — but do it carefully and with intention. Students often report such gatekeeping issues as a barrier to their learning.
- When you finish setting up your Canvas course, publish it.
Start your term right
Clear, consistent communication at the start of the term helps students understand what’s expected—and sets the tone for a successful learning experience.
Communication practices to identify
- Tasks for students to complete daily, weekly, or throughout the term
- Your expectations for students
- Your response times
- Your preferred communication method
- Clear grading policies, including consequences of late submissions
Be sure to keep these consistent throughout the term. Model your expected communication style in all course interactions and communication channels.
Next, determine where and how to communicate them. Ideally these items can be part of the syllabus. Confirm with your department whether you can change your course’s syllabus (and assignments, learning outcomes, recommended or required texts, etc.) You could also place them on your Canvas course homepage or within an introductory discussion post.
Either way, consider also sending students a welcome email with any or all of this info along with how to access the course and a request to complete a pre-term survey. For a quick start, use an email template. For more ideas explore Essential student communications.
What to include in your syllabus
If you can edit the syllabus, consider:
-
- Adding a course outline (Students often request a detailed course summary in one place, to help them plan.)
- Adding overall course goals (and using the Announcements/Modules tool to share weekly goals, helping students connect work to goals)
- Double-checking that your due dates within Canvas match the syllabus (and using the Announcements tool to inform students when a timed response is required)
For more syllabus ideas, consult Building a syllabus, which includes a syllabus template.
First week of term: Build your learning community
The first week of the term is your chance to set the tone, build community, and help students feel connected to you and each other.

Introduce yourself!
Introductions can help establish a social presence — that someone is “real” and “there.” When introducing yourself to your students, you could
- Include things about your professional life (e.g., teaching philosophies, links to articles you have written, presentations you have delivered, your blogs) and your personal life (e.g., pictures of your pets, vacations, hobbies). You could do this in text or as video or audio via Zoom.
- If you’re comfortable, declare and model your pronouns — add or edit them within Zoom and Canvas.
- Upload a profile picture to Canvas.
Record an orientation video
Create a course orientation video with a short syllabus overview, including course objectives, required readings, interaction guidelines, expectations, and due dates.
Build activities to foster class community
Within your course, if allowed, build activities to foster class community, support open communication, promote regular and substantive interaction, and establish trust. These could include student introduction videos, ice-breaker activities, a general course bulletin board and dedicated discussions in the discussion forum, and weekly office hour(s).Within your course, if allowed, build activities to foster class community, support open communication, promote regular and substantive interaction, and establish trust. These could include student introduction videos, ice-breaker activities, a general course bulletin board and dedicated discussions in the discussion forum, and weekly office hour(s).
Manage your waitlist
On the first day of the term, the automated waitlist function will stop. You’ll need to manage the waitlist in Banweb. This means you’ll give students an override to allow them to register.
Throughout the term: Maintain your presence
Instructors play an important role in creating social and teaching presence (Ladyshewsky, 2013). Being present in your online course is key to keeping students engaged, leading to overall student success. Student-instructor interaction is one of the strongest predictors of student learning and may be the primary variable for predicting online course learning outcomes (Arbaugh et al., 2009).
Here are a few ways to stay connected to your students and help them feel like part of your learning community:

Reinforce your communication expectations
- The best method to communicate with you
- How soon you will get back to them, including whether you’re available on the weekends
- How long you will take to grade or give feedback on their work, including work submitted late
Post regular announcements
Keep communication up, including notification about any delay in feedback or grading.
Keep interactions with students on a predictable schedule.
For example, schedule and release three weekly announcements:
- Instructor tips
- Additional course-related resources
- Upcoming assignment due dates
Best practices for staying connected with students
- Use virtual office hours effectively.
- Monitor each student’s academic engagement and success. Identify students who may be struggling or disengaged, and proactively send them emails to check in and/or encourage them to come to your virtual office hours.
- To keep students on track, give each module at least a short introduction to the topic. Indicate which materials to review and which activities and assignments to complete. Remember to include due dates for every assignment and activity in the module.
- Schedule an optional session in Zoom (How to Host a Zoom Meeting) for a live check-in with your students. Allowing students to meet with you in real time can help to build community in your course. Be sure to have some kind of interaction planned to keep students engaged.
- Keep video lectures relevant. Students value videos that tie concepts together — and it’s even better if video lectures are paired with discussions.
-
- Diagnose misperceptions and misconceptions.
- Identify conflict.
- Summarize discussions.
- Identify areas of agreement and disagreement.
- Seek to reach consensus and understanding.
- Encourage, acknowledge, and reinforce student contributions.
- Draw in participants (Shea et al., 2006).
Consider creating a midterm feedback survey with anonymous survey tools such as Canvas and Google Forms. If you collect feedback, address it before the end of the term. You don’t have to implement every requested change, but you should acknowledge the feedback you receive and provide transparency around any changes you make in response.
Help create a learning community
Group and peer-review assignments can support social, teaching, and cognitive presences in the online learning environment (SUNY Online Course Quality Review Rubric). Interactions among students are one of the cornerstones of f online learning communities (Rourke et al., 2001). They can enhance learning, increase knowledge comprehension, and help students acquire competent skills (McConnell, 2006). Instructors play a pivotal role in creating community and affecting learning outcomes and students’ knowledge construction (Barnes, 2016), in part because they design and scaffold peer interactions and collaboration assignments and activities (Stephens & Roberts, 2017).
A community serves as an information exchange (Moller, 1998). Consider how the course provides students with opportunities for interactions to share advice, information sources, and tools, and to inject knowledge from diverse sources of information with guidance from the instructor. The benefits of resource sharing:
-
- Students become responsible for their learning.
- Students and the instructor become equal participants within the community.
- The full reservoir of existing knowledge and skills is utilized.
- Relationships within the community are strengthened as participants draw upon one another’s knowledge and skill (Stepich & Ertmer, 2003).
Here are some practices to foster student-to-student interaction and other recommended instructional strategies:
- Challenges Facing Group Work Online
- Designing and Fostering Effective Online Group Projects
- Facilitating Collaboration in Online Groups
- Strategies for Instructors on How to Improve Online Group Work
- Using a Jigsaw (Students work in small groups to develop knowledge about a given topic before teaching what they have learned to another group.)
Hone your feedback, rubric, and grading
Instructor feedback catalyzes student learning in online environments (Ertmer et al., 2007). It improves student learning and increases instructor social presence. Feedback gives students a feeling that someone is there who cares about their progress (Bonk & Khoo, 2014).
PSU students often report that instructors take too long to grade assignments and that feedback is too late to be useful, vague, unclear, or inconsistent.
Best practices for giving meaningful, timely feedback
- Keep students updated: Make announcements on how grading is progressing, reasons for delays, and when to expect individual feedback.
- Set deadlines strategically: Many students who take online courses work full-time and do their homework over the weekend. If you don’t want to deal with last-minute questions on Sunday evening, don’t make assignments due on Sunday midnight.
- Have real-time, just-in-time conversations: When a student struggles with a particular concept or need individual support, consider making a phone call or scheduling an optional synchronous Zoom session (Darby & Lang, 2019).
Not all feedback leads to performance improvement. Feedback can improve student learning if it’s (Vardi, 2013):
-
- Clear, direct, and prescriptive
- Short and targeted
- Focused on the deep, meaningful aspects of the task, such as the content, level of analysis, and structure within the text
Feedback should explain the grade by relating the standards in the rubric to the specifics of the task and what the student did in the assignment. For example: “You have described in your own words what the company has done in the local community. This description meets the ‘pass’ standard of performance.”
Feedback should also explain what the student needed to have done to reach the next grade level. For example: “To move up to the ‘credit pass’ level, you needed to research beyond the company’s website and news reports to find independent data that would allow you to analyze ….”
Explain what the student needs to do to reach the next higher performance level in the subsequent assignment. (“To produce a good proposal for this company, I suggest you check … and analyze …. This will help you come up with a better strategy.”)
Link your feedback to the structure of the text with content. (“You identified some interesting positives and negatives with the company’s performance. The quality of your analysis would have benefited from another section, following on from the positives and negatives, that compared the underlying reasons for the difference in performance.”)
- Overemphasize surface features (e.g., grammar, spelling, referencing conventions.
- Correct everything in the text.
- Make general comments that could apply to any written task.
One way of clarifying assignment requirements is to provide rubrics alongside assignment details. Rubrics have advantages that you’ll want to consider. In Canvas, you can add a rubric to an assignment, a graded discussion, or a quiz.
Another way to clarify assignment requirements is to give students examples.
Students want to know what their progress is in a course. A well-designed and up-to-date gradebook allows students to check in on their progress continuously throughout the term.
Occasionally you may encounter some forms of plagiarism — particularly if your course uses Turnitin. Check with your department to understand how to uphold academic integrity.
End of Term Checklist
- Submit final grades to Banweb by 5 p.m. on the Tuesday after finals week.
- Need to approve an incomplete? Contact your department.
- Did students frequently ask certain questions? Could such questions come up again in future terms? If so, create short video or text responses to share ahead of time with future students. Consider creating assignment-specific, topic-specific, or course-wide responses, as appropriate.
- Review the course for student assessments and note areas of continuous improvement.
- You should receive a copy of your course evaluations after the term ends. Review it for common themes and areas to consider adjusting in future offerings, and contact your department about any feedback you want to implement.
- Seek mentorship within your department and inquire about connecting with other colleagues.
- Review the OAI workshop schedule for any future offerings.
For more ideas, visit Wrapping Up: End of Term Procedures.
-
- Arbaugh, J. B., Godfrey, M. R., Johnson, M., Pollack, B. L., Niendorf, B., & Wresch, W. (2009). Research in online and blended learning in the business disciplines: Key findings and possible future directions. The Internet and Higher Education, 12(2), 71-87.
- Barnes, C. L. (2016). Where’s the teacher? Defining the role of instructor presence in social presence and cognition in online education in W. Kilgore (Eds.), Humanizing online teaching and learning.
- Bonk, C. J., & Khoo, E. (2014). Adding some TEC-VARIETY: 100+ activities for motivating and retaining learners online (pp. 1-368). OpenWorldBooks.com and Amazon CreateSpace.
- Darby, F., & Lang, J. M. (2019). Small teaching online: Applying learning science in online classes. John Wiley & Sons.
- Ertmer, P. A., Richardson, J. C., Belland, B., Camin, D., Connolly, P., Coulthard, G., ... & Mong, C. (2007). Using peer feedback to enhance the quality of student online postings: An exploratory study. Journal of Computer-Mediated Communication, 12(2), 412-433.
- Ladyshewsky, R. (2013). Instructor presence in online courses and student satisfaction. The International Journal for the Scholarship of Teaching and Learning, 7(1), 1-23.
- McConnell, D. (2006). EBOOK: E-Learning Groups and Communities. McGraw-Hill Education (UK).
- Moller, L. (1998). Designing communities of learners for asynchronous distance education. Educational technology research and development, 46(4), 115-122.
- Rourke, L., Anderson, T., Garrison, D. R., & Archer, W. (1999). Assessing social presence in asynchronous text-based computer conferencing. The Journal of Distance Education/Revue de l'ducation Distance, 14(2), 50-71.
- Shea, P., Li, C. S., & Pickett, A. (2006). A study of teaching presence and student sense of learning community in fully online and web-enhanced college courses. The Internet and Higher Education, 9(3), 175-190.
- Stephens, G. E., & Roberts, K. L. (2017). Facilitating collaboration in online groups. Journal of Educators Online, 14(1), n1.
- Stepich, D. A., & Ertmer, P. A. (2003). Building community as a critical element of online course design. Educational Technology, 33-43.
- SUNY Online Course Quality Review Rubric - OSCQR. (n.d.). Retrieved from https://oscqr.suny.edu/
- Vardi, I. (2013). Effectively feeding forward from one written assessment task to the next. Assessment & Evaluation in Higher Education, 38(5), 599-610.

Organizing Content in Canvas
Need to log in to Canvas? Follow this link to the Canvas log in portal.
This website and resources are intended for Portland State instructors. For PSU students looking for help with Canvas and general tech support, please contact the OIT Helpdesk.
Additional Canvas resources for PSU students can be found in OIT’s Canvas Resources for Students.
Canvas has several tools for adding content to your course:
-
- Pages: Canvas-specific pages created within Canvas or imported from Commons
- Files: PDFs, Word documents, slide decks, etc., created elsewhere and uploaded into Canvas
- Assignments, Discussions, and Quizzes: built directly in Canvas for students to submit work
- External URLs: links to sites outside Canvas
- External Tools (Contact OAI for a list of our integrated tools.)
Here’s how to organize that content in ways students will find consistent and predictable.
Introducing Modules
Modules can organize course content by weeks, topics, or other parameters. They create a one-directional, linear flow of what students should do in a course.
Each module can contain files, discussions, assignments, quizzes, and other learning materials such as Pages. You create content using those Canvas tools, then organize it in modules.
OAI recommends using modules to develop course organization and simplify navigation. They can reduce the need to tell students to “go there and do this” and then “go somewhere else and do that.” This can be frustrating — as you may have experienced yourself in poorly designed online training.
A specific benefit of using modules: You can hide the Assignments, Quizzes, Discussions, Pages, and Files links from the Course Navigation menu in the student view. This gives students one central location to find everything. That means fewer “where is” questions for you and less frustration for your students.
Structuring a Module
Once you have all your content in a module, you can order items to help students move through it in a logical way. You can manually drag and drop each item or use the Move To option, which is also accessible from the keyboard.
Also consider using text headers and indenting to create visible sections in your modules.
You can make your module function as a checklist by adding requirements that help both you and your students track their progress.
Pages are used to present content that doesn’t exist in a separate file or other Canvas assignment. Since pages can also include links to other Canvas items, you can use them to organize content into weekly outlines. This helps you share course materials with more context and different organizational structures than are possible in modules alone.
Consistency is key: Once you choose an organization strategy, the best thing you can do for students is to implement it as consistently as possible.
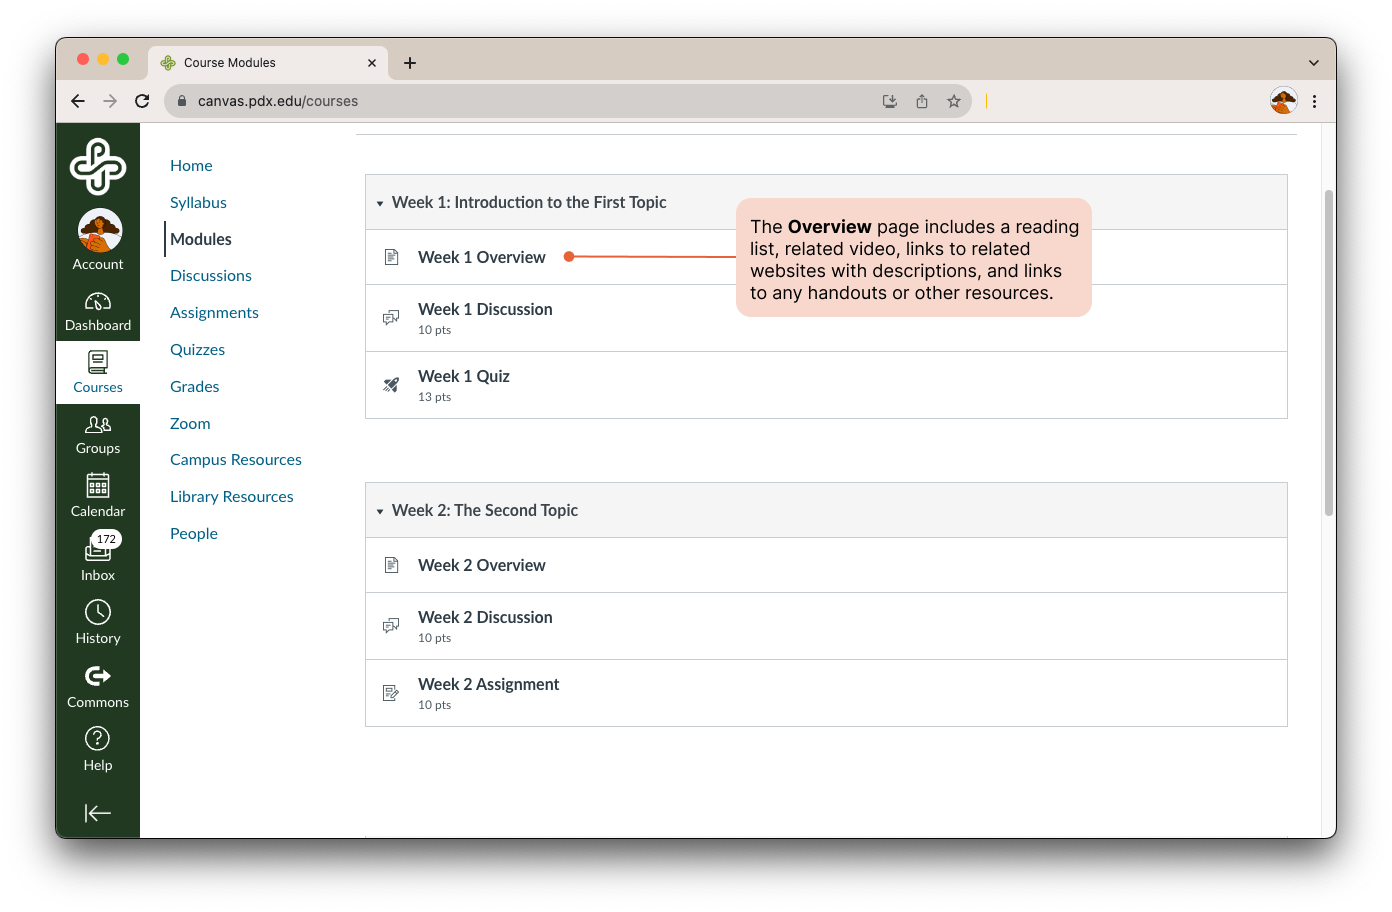
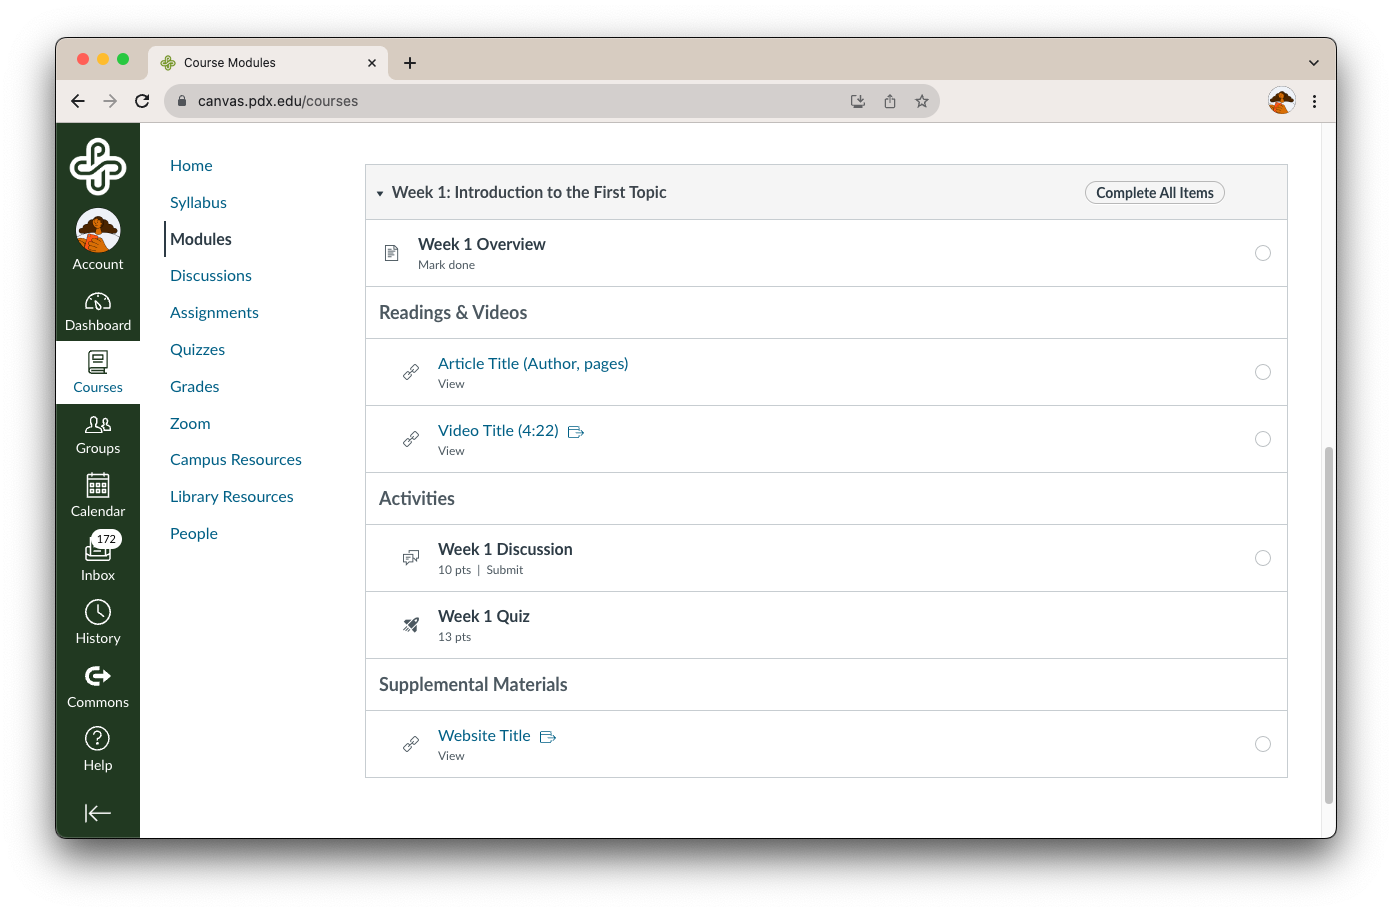
Example Modules
Condensed Module: Each module begins with an overview Content Page that lists books or chapters as well as links to other items for students to read, watch, and explore.
Detailed Module: Each item in the module has its own link. This includes readings as well as activities and assignments.
Content Samples
Use this example from the Commons to get started organizing your own modules. (For help using Commons, review Meet Canvas Commons.)
Note: Samples will import into their respective tool. If you import the Weekly Overview Page, it will show up in the “Pages” section of the selected course.
Adapted from “Using Canvas Modules” in Start Here 102: Best Practices in Online instruction, licensed CC BY 4.0 by Grace Seo, University of Missouri.
Learn More Elsewhere

Course management timeline

Contributors:Misty Hamideh
Instructors have a lot to think about before, during, and after each term. Be sure to accomplish these essential tasks.
Pre-term (at least two weeks prior)
Don’t wait until the last minute to get your course prepared for the new term. Before opening your course to students, reflect on the last time you taught. Think about ways to enhance your course for the upcoming term. This guide points to articles about new teaching strategies, as well as steps you to make sure your course is published and open to students on the first day of the term.
Also, take some time to review the emergency management resources for faculty at PSU. This page provides important emergency contact information, steps to take before classes start and a sample statement you can include on your syllabus.

University deadlines to consider
Check the PSU Academic Calendar for these specific dates:
- Schedule of Classes available online
- Priority Registration begins
Weeks 1-3
Early and regular communication with your students is important and this guide offers key contact points and ways to help your students get the support they need before the term even begins. If you’re new faculty, make sure to use your Gmail account at mail.pdx.edu. This is also where you can access the Google Suite of Education applications. If you need help preparing your course, please contact the Office of Academic Innovation as early as possible to schedule a consultation.

Week 2: Initiation of attendance
Department of Education also requires instructors to track and document attendance for each course in which they are registered. To satisfy the initiation of attendance requirement, students must attend or participate in academically related activities for each class in which they are registered within the first two weeks of the term.
University deadlines to consider
Check the PSU Academic Calendar for these specific dates:
- Last day to drop with 100% refund
- Last day to add with instructor approval
- Last day to drop without a “W” withdraw on academic record
Weeks 4-8
Being present in your course is key to keeping students engaged, leading to overall student success. This guide outlines a few things you can do to stay connected to your students and help them feel like part of your learning community.

University deadlines to consider
Check the PSU Academic Calendar for these specific dates:
- Last day to change grading option
- Last day to withdraw from a course
Weeks 9-12
As the term ends, here are a few things to do before you relax and celebrate your course success! This guide highlights steps to share grades with both your students and the registrar, and helps you prepare for the next time you teach the course.

University deadlines to consider
Check the PSU Academic Calendar for these specific dates:
- Deadline for submitting final grades
- Official grades available online

Supporting Students through Difficult Classroom Conversations

Contributors: Megan McFarland, Harold McNaron, Lindsay Murphy, Grant Scribner, Kendra Woodstead
The classroom can be a place to explore controversial topics including equity, identity, religious beliefs, and political views. These topics may come up as part of your curriculum, or through external factors and events. You may or may not choose to engage students in difficult classroom conversations — but either way, it’s important to prepare and know how to offer student support.
Notice your own responses and emotions surrounding a topic and recognize that you and your students may not be able to show up as your best selves for these conversations. One approach to this might be transparency with your students, acknowledging how challenging the topic is and giving everyone space to process before moving forward with a conversation.
If you do choose to engage students, it will be important to acknowledge the range of perspectives and intense emotions that are likely present in your classroom. The following tips may be helpful for framing a conversation where students with diverse experiences and points of view can engage productively with one another.
Establish community agreements before discussing difficult topics.
Encourage your students to help create these collaboratively. They might include one or more of the following agreements:
- Addressing ideas rather than people
- Taking and making space to ensure everyone has a chance to speak
- Entering the conversation with a spirit of curiosity and good will
- Welcoming correction and reflection
Identify a clear purpose for the conversation.
Is the class interested in exploring a question, better understanding the context of a recent event, reflecting on the impact of current events, or something else? There is no right answer, but it is helpful for students to agree on a focus and purpose before diving in.
Provide space to summarize the discussion.
Provide space to summarize the discussion, receive student feedback, and allow students to reflect on their feelings and experiences. This might look like a brief exit email or poll, a word in the Zoom chat, or a Google Doc with reflection notes.
Recognize that difficult topics may impact students differently.
Your students likely experience a range of emotions when responding to difficult topics, informed by a range of factors including their lived experiences, intersecting identities, and feelings of safety in the class space. Particularly during uncertain and highly stressful circumstances, some students may be more at risk for marginalization connected to race, ethnicity, gender, sexual orientation, age, or region/country of origin.
- It may help to encourage a discussion of students’ relevant experiences while being mindful to not ask students to self-disclose information they may not be ready to share.
- Consider asking students to complete an anonymous poll about their questions or concerns (or email you privately, if an individual response is needed). Options include Google forms, discussions, and survey tools. Find out whether students feel they are making progress, if they are having difficulties with the course, and if they have specific suggestions for addressing any challenges they identify.
Acknowledge the impact on your students.
- Begin by recognizing that different people have strong emotions from a variety of perspectives, and it may be hard to focus.
- Give your students a chance to write for a minute or two to process their thoughts and feelings, and/or identify people they want to reach out to for the types of connections and processing that would benefit them. Then move on to your plan for the day.
- Note the difficulty of focusing and of controlling strong emotions and let students know they can feel free to take a brief break to refocus.
If a student raises a topic when you had not planned to discuss it, classroom discussion agreements might provide guidance to have a productive and respectful conversation. If you do not feel prepared for a conversation, you can recognize that the student might want to have the conversation, but explain that you want to think further about whether and how to engage it as a class.
Seek support on and off campus.
- File a discrimination/harassment claim.
- Refer to this resource regarding threatening or suspicious behavior on campus.
- Refer to SALP resources about free speech and communication.
- Consider completing a Bias Incident Report Form to notify and get support from PSU’s Bias Review Team. The form can be filled out anonymously if needed.
- Consider completing a referral form to alert the PSU Cares Team that a student may be in crisis and/or need timely support.
- Refer to the Office of Academic Affairs academic freedom website and their resource guide for responding to challenges or threats to freedom of expression.
- Are your students engaging in protest? If so, review these policies and protocols related to protest and speech on PSU’s campus.
- Consult relevant language from the Code of Conduct:
- Discriminatory Harassment: verbal comments, graphic or written statements, or physical conduct by a student based on Protected Class(es) that is so severe, persistent, or pervasive that it interferes with or limits a student, employee, volunteer, or PSU community member’s ability to participate in or benefit from the university’s educational and/or employment opportunities, programs, or activities.
- Disruptive behavior: any behavior that interrupts the normal operations of the University, including teaching, classroom activities, research, administrative functions, disciplinary procedures, or other authorized University activities.
- Harassment: a course of conduct, including intimidating, coercive, or verbally abusive behavior, directed at a specific individual(s) that causes, or is intended to cause, emotional or physical distress and serves no legitimate purpose.
- Threatening communication: Threats made verbally, online or through electronic communication with sufficient content such that it causes fear of injury or other harm are prohibited.
Community Spaces that Support Students
These PSU resources may be useful to students navigating difficult topics and conversations:

Mindful Meanderings
By PSU Campus Rec and SHAC