
Use Google Docs for Student Collaboration
Use Google Docs for student collaboration
When students work in groups for an activity, you’ll often want them to document their work. You can facilitate this by creating shared Google Docs for students to use.
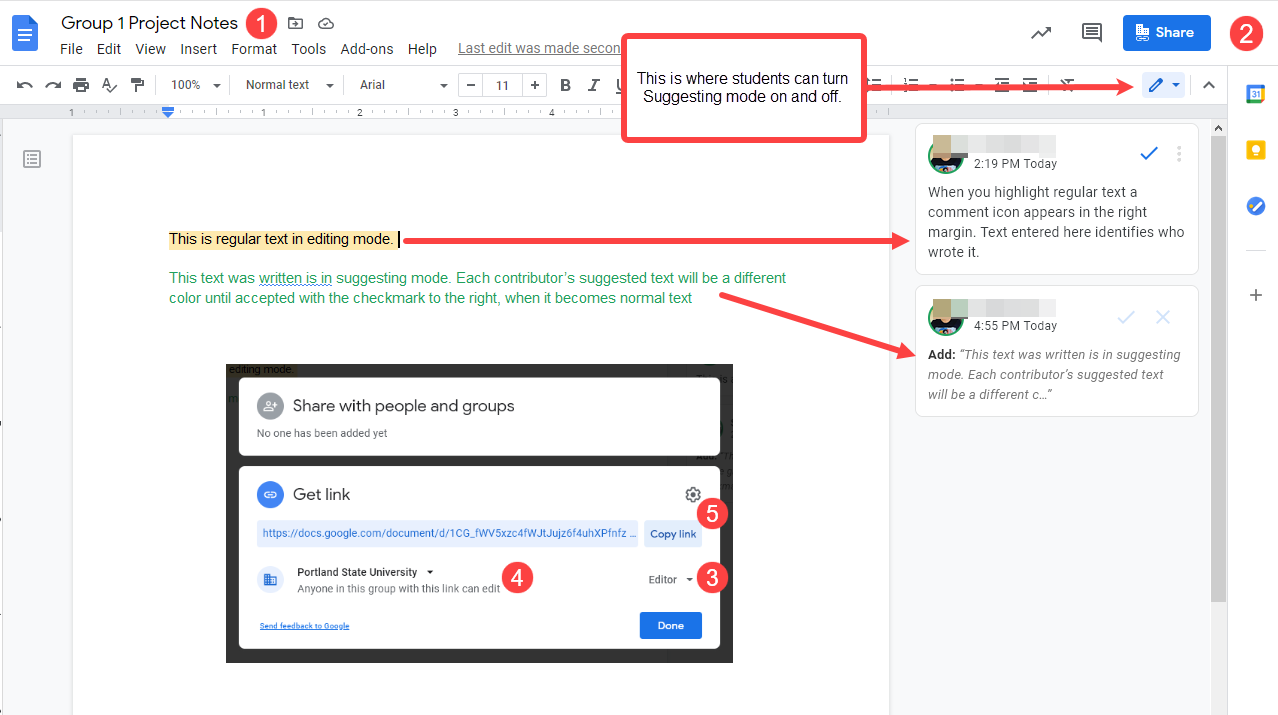
There are two ways to identify each collaborator in a Google Doc. One is to have students write in suggesting mode, which creates colored text and names each author in the margin. Edits are shown with strike-through text. This option is selected in the small menu with a pencil icon located in the upper right corner of the open Google Doc screen.
Another method is to have students use comments to annotate the main text. Comments are made by highlighting a portion of text. This creates an icon in the right margin, which becomes a text-entry field when you click it. Comments are identified by author, and others can reply. Comments that include @StudentUsername will also send an email of the comment to the person named, which is helpful for asynchronous collaboration.
Steps to set up docs and sharing permission
- Create and name a Google doc for each student group.
- For each doc, click the blue Share button in the top right corner.
- In the Get link area of the share pop-up, click View and change it to Edit.
- From the sharing menu, select Portland State…anyone in this group with this link can edit.
- Copy each document link and save them in your class prep notes, labeled with the group name/number.
You can now post the doc links for students in Canvas, or share them in the chat of a Zoom meeting. Clarify for students whether you want them to identify each collaborator’s work, and whether they should use suggesting mode or comments for this. You can also share this tutorial with them. As owner of the docs, you can always change the sharing settings later to prevent further work in them.
Google Docs auto-saves regularly, and past versions can be viewed and restored. Nevertheless it’s good to remind students to save a local copy of any text they don’t want accidentally changed or deleted. For more information, check out Google’s support site for Google Docs.
This article was last updated .

End-of-term checklist

You can use this article as a checklist to help you wrap up your course at the end of term.
Canvas gradebook
If you’ve been using the Canvas gradebook, make sure you’ve entered all of your grades, double-checking to ensure the Canvas grades accurately reflect the grading parameters you intend. Then make sure that all assignment grades have been posted for your students to review.
It’s also good practice to download a copy of the gradebook for your records.
Submit final grades
The grade in the Canvas gradebook is not official, so you will also need to enter your students’ grades into Banner.
How to get students access to your course after the end of the term
By default, students will no longer have access to their Canvas courses beginning the first day of the following term (i.e. Winter term courses will be available to students until the first day of Spring term). If you would just like all students to have access to your course for longer, you can change your Course End date.
If you only want to allow a specific student ongoing access to complete the course, you’ll need to follow the instructions linked below to request access for incomplete students.
Thinking ahead
Now that the term is over, take some time to relax and celebrate your course success! In most cases, this won’t be the last time you teach this course. Take a moment to reflect on the past term and think about ways you might be able to enhance your course for future terms. OAI+ has many articles that can give you ideas about new teaching strategies that you may want to try to implement.
This is also the time to start planning your student communication for the next term. Early and regular communication with your students is important and can start weeks before the term officially begins.
Nothing found.
Zoom Recording and Student Privacy
Zoom Recording and Student Privacy
You may have Zoom class recordings you’d like to share with students in a subsequent class. This is possible under FERPA as long as no students from your earlier class appear in the recording. There are two ways to avoid recording students in Zoom. These depend on whether you record to the Zoom Cloud or locally to your computer.
Note: to control a meeting’s recorded layout, you must be the host or participant who starts the recording. You should also make sure your Zoom desktop client is up-to-date. Check for updates by clicking your profile image in the upper right corner of the Zoom desktop app. Toward the bottom of that menu, select Updates.
For Zoom Cloud recordings
For recording to the cloud, use the “Spotlight” option. This lets you choose up to 9 participants to appear in the recording, so it’s great for when you have guest speakers. Learn more about the Spotlight option in the Zoom Help Center. For student discussions, you can either pause the recording or use breakout rooms. You can also edit out student discussion segments from the recording later, by uploading it to MediaSpace. Once you’ve logged into your Kaltura MediaSpace at least once (at https://media.pdx.edu/) all your Zoom Cloud recordings are backed up there. This makes it convenient to use the MediaSpace video editor.
For local recordings
If you record locally to your computer, the “Pin” function allows you to select specific video thumbnails to display. Other participants may see the full gallery, but your recording will show only the video(s) you pin. Learn more about the Pin options in the Zoom Help Center. You’ll still need to pause recording for student discussions, move them to a breakout room, or edit them out later.
The Zoom Help Center also has a FAQ list about local and cloud recording layouts.
Recorded videos are most effective when short, so look for key presentations, demonstrations, or explanations to share in later courses rather than following a “lecture capture” model.
This article was last updated .

Share Zoom Recordings
When you set a Zoom Cloud recording settings to Share, it generates a link you can make public or restrict to PSU users.
- Sign in to your Zoom web portal at pdx.zoom.us
In the navigation menu on the left, click Recordings.
Click the Share button on the right of the recording you want to make available.

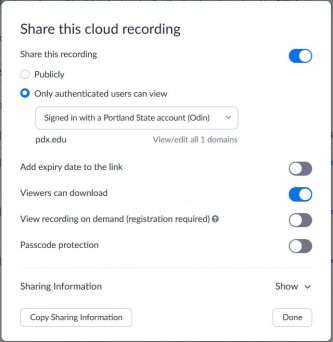
- This displays setting options:
- Share this recording: Allows the recording to be shared publicly or internally. Switch the toggle off if you want the recording to be private. If you share the recording, Zoom will create a web page where visitors can view the cloud recording.
Add expiry date to the link: Allows you to set number of days or specific date when the link will expire for viewers.
Viewers can download: Allows viewers to download the video in addition to viewing it online.
Viewers can see transcript: Allows viewers to see the auto transcript if Zoom was able to process one.
On-demand(Registration Required): Requires users to enter their name and email address before viewing or downloading the recording. The host will be able to download a report with this information.
Password protection: Requires users to enter a password before viewing or downloading the recording. After toggling this to on, enter a custom password and click Save.
Copy sharing information to clipboard: Copies the link and password (if enabled) to your cloud recording. Share this information to allow others to view the cloud recording. - Click Done to save these settings.

This article was last updated on .

Email templates for the start of term

Contributors:Misty Hamideh
Sending a welcome email to your students before the term starts is a great way to introduce yourself and set a positive tone for the course. By sharing a little bit about who you are and what students can expect, you can ease first-day nerves and help everyone feel more prepared. While helpful in any course format, a welcome message is especially valuable for building connections and creating a supportive environment in online courses.
What to include in your welcome email
What you decide to include in your welcome message should represent who you are as a person and instructor. When crafting it, consider including this essential information:
- A warm greeting that welcomes your students to the course
- Basic course details: Course title, term, instructor name (including any co-teachers or TAs), meeting times/location (for in-person courses), Canvas course link (if applicable)
- Required materials: Textbooks, lab equipment, or other items that will be needed on the first day, plus where to acquire them
- Communication expectations: Best way to reach you, office hours, expected response times
- Personal introduction: a brief background, teaching philosophy, fun fact about yourself
- Information about campus resources: Consider sharing How to Find Help at PSU and/or department-specific resources.
Welcome email templates
Whether you’re teaching in person, online, or a mix of both, these templates provide a starting point that you can adapt to your own course and teaching style. They include placeholders for essential course details, tips for highlighting important campus resources, and prompts to add your personal information.
Send your message with Google Groups!
About two weeks before the start of each term, a Google Group is created for each course in Banner. These groups make it easy to quickly email all the students in any of your classes without having to look up the roster or add each student to an email individually.
Use Google Groups to send a message to all the students in your class
Hello Everyone!
I’m excited to welcome you to [class name] this term! Before our first class, here are some important details to help you get prepared:
📅 Course meetings
- When: [days] from [start time – end time]
- Where: [Building/room #].
📖 Course materials
- Required Textbook(s): [title + where to get it]
- Other Materials: [list + where to get them]
- Canvas Course: Available starting [date] at [Canvas link]. You’ll find additional readings, activities, and updates posted there.
- Syllabus: [I will send you the syllabus on [date]. // The syllabus is attached to this email. // The syllabus will be available in Canvas.]
✉️ Communication
- Best way to reach me: [email/phone/office hours/other]
- Expected response time: [timeframe]. If you don’t hear back from me within [timeframe], please send a follow-up email. I will appreciate the gentle reminder.
❓ Need help?
I am always happy to answer questions or help you find the right person on campus to help! You can also check out How to Find Help at PSU or log in to your my.pdx.edu page for more support options.
👋 A little about me…
[Write a short, personable introduction. Share something about your background, interests, or why you enjoy teaching this course. Students often appreciate knowing who you are outside of academics, too! Consider adding a photo or short welcome video.]
I look forward to meeting you and working together this term. Let’s make it a great one!
Warmly,
[Your Name]
Hello Everyone!
I’m excited to welcome you to [class name] this term! Our course does not officially begin until [date], but I thought I’d send a quick welcome message to help you get prepared and learn a little more about the expectations for this course.
📅 Course meetings (Only for Online – Scheduled Meetings courses)
- When: [days] from [start time – end time]
- Where: On Zoom; refer to our Canvas course for the meeting link.
📖 Required materials
-
- Syllabus: [I will send you the syllabus on [date]. // The syllabus is attached to this email. // The syllabus will be available in Canvas.]
- Required Textbook(s): [title + where to get it]
- Other Materials: [list + where to get them]
🖥️ Canvas course
- Canvas Course Link: [link]
- Availability: [start date – end date]
- Course Organization: You’ll find all readings & activities organized by week on the Modules page. Watch [this video] for a tour of our course.
- New to Canvas and/or online learning? You can find tutorials by selecting Help from the lefthand navigation bar in Canvas and choosing “Technology Help for Students.” Also, an introductory Canvas course is available to all students called “Online and Remote Learning Support.”
✉️ Communication
- Best way to reach me: [email/phone/office hours/other]
- Expected response time: [timeframe]. If you don’t hear back from me within [timeframe], please send a follow-up email. I will appreciate the gentle reminder.
- Course updates/announcements: I will use the Canvas announcements tool to share any important updates or reminders. I strongly encourage you to make sure that your Canvas notification settings are up-to-date so you receive these notifications in a timely manner.
❓ Need help?
I am always happy to answer questions or help you find the right person on campus to help! You can also check out How to Find Help at PSU or log in to your my.pdx.edu page for more support options.
👋 A little about me…
[Write a short, personable introduction. Share something about your background, interests, or why you enjoy teaching this course. Students often appreciate knowing who you are outside of academics, too! Consider adding a photo or short welcome video.]
I look forward to meeting you and working together this term. Let’s make it a great one!
Warmly,
[Your Name]

Essential student communications

Early and regular communication with your students is very important. This guide offers key contact points and ways to help students get the support they need before the term even begins.
If you’re new faculty, make sure to use your Gmail account at mail.pdx.edu. This is also where you can access the Google suite of education applications. If you’re new to online teaching, contact the Office of Academic Innovation as early as possible for help preparing your course.
Email Your Students
Approximately two weeks before the start of each term, a Google Group is created for each course in Banner. You can use your class group to email all students enrolled in your course. Some tips to save time and effort:
-
- These groups are maintained for two terms — so make sure to select the email address for the correct term.
- You don’t need to work from scratch. The Office of Student Success has created helpful email templates with information for an initial email, along with a course syllabus.
- Don’t wait until your syllabus is absolutely final. You can label it clearly as a “draft” and provide as much information as possible.
Include Student Service Links on Your Syllabus
Throughout the term your students may need PSU services. Linking to services on your syllabus is a great way to let students know what’s available. These could include free e-tutoring, disability resources, tech support, library help, and more.
Publish Your Course and Open It Early
You can publish your Canvas course before the term starts. This can help students who may have concerns about course requirements or who are new to online learning. Even if you don’t plan to teach online, it’s where students expect to find your syllabus and course materials.
Post an Announcement and Share Instructor Information
Your home page is the “megaphone” of your course. It’s reassuring for students to know you will post important announcements here, along with your contact information. If your home page is not configured for this, you can get help from OAI Support or modify it yourself.
Learn About Students with a Google Form Questionnaire
You can create a Google Forms Survey to learn about your students before the term starts. Along with their academic experience, it’s important to know whether your students have any significant constraints on their coursework.
Schedule an Early Zoom Office Hour Check-In
It can really help students to have a brief “in person” conversation before term starts. This will alleviate anxiety for students who have questions about course requirements or structure. It can also foster engagement and make your first week more productive.
You Don’t Need to Record in a Classroom!

Contributors:Emily Connelly
If you are new to remote teaching, you may be wondering how you can conduct your regular class lecture activities outside of a classroom. Zoom and other technologies can accommodate many teaching practices and use cases.
It’s in everyone’s best interest to seek a non-campus based solution wherever possible. If your concerns are not addressed in the following suggestions, please contact the OAI Faculty Support desk to discuss further.
-
- Zoom has a robust annotation feature that can be used on virtual documents or the virtual whiteboard.
- If you do not have a touch screen and find it difficult to write with a mouse, pen tablets like those from Wacom can also be used.
- You can also run Zoom on a tablet and record annotation directly. This option may not be practical to record yourself with the camera at the same time.
- Document cameras can be plugged into your computer via USB and used as a second camera in Zoom or Kaltura Capture. Using it in Zoom you will be able to switch between the document camera and a shared screen in similar fashion to using a podium. If you are in need of a document camera, the PSU library has a limited number available for check out.
- Zoom has built in support for screen sharing an iOS device via cable or AirPlay, which you can use in conjunction with a free whiteboard app like LiveBoard.
- Zoom has a robust annotation feature that can be used on virtual documents or the virtual whiteboard.
There is a lot of anxiety around running programs like Zoom with lots of participants’ home wifi connections. Our advice is to take stock of what your internet can do, and make plans from there. Are you able to:
- Watch streaming videos on YouTube with multiple devices at once? Watch multiple YouTube videos on the same device at the same time?
- Do you have access to a physical network connection to your modem? This will be a stronger signal than wifi.
- Are you able to download and upload large files into a cloud storage center like Google Drive or a media storage space like Mediaspace or YouTube?
- Is your internet connection available reliably or is it something that needs special arrangements or a costly additional data plan?
Consider that there is no one way to teach remotely. If you have a reliable signal at home that seems too slow to leverage Zoom there are many other tools you can use to teach that offer amazing pedagogical value. If you can upload large files and want video, consider using a tool like Kaltura Capture to pre-record content for your students and offer a discussion session on Zoom you can dial into with audio if you still want a synchronous component
Normally when you create a class that will be offered at a distance, we have time to find or build solutions — unfortunately, this is not the current situation. We cannot aim for perfection; we have to look for creative alternatives, knowing that we don’t have the time or technology to design the way we would prefer. This quarter is somewhat of a shared experiment: we are not going to be able to recreate everything we would normally do.
The global education community has come up with some amazing experiences for students online in situations like this. Contact OAI to set up a meeting with one of our Instructional Designers to look at potential solutions.
Standard hardware in computers of the past five to seven years is pretty great and should be able to handle basic streaming and video and audio recording. The things that really hurt audio and video quality are a few basic considerations when setting up:
- Avoid having a bright light/window behind you.
- Set your computer up so the webcam is almost at eye height with you. If you have a laptop without a stand, stacked books are an easy fix.
- If possible, invest in a headset/headphones with a built in mic. Cheap bluetooth ones sell for around $8 and even they will assist you with a better audio quality by keeping your microphone at relatively the same distance from your face throughout the course of your session. Using headphones will also help prevent echoing and feedback during class.
- Remember to practice! Zoom has a test session available at https://zoom.us/test you can use at any time to make sure your equipment is in good working order.
- PSU Library has a limited supply of laptops and other equipment available for check out, if your equipment cannot accommodate recordings.
- You and your colleagues can co-facilitate Zoom meetings by using the co-host functionality.
- You and your colleague can each pre-record short videos or audio, separately using Kaltura Capture.
Again, remember you do not have to create video or web conferences to create a successful remote session! If you still want a multimedia feature, why not try your hand at an audio recording? Or, if you have headphones with a microphone, take a stroll around the block with your cell phone and create a pre-recorded lecture. Take your laptop to a park and use Kaltura Capture, just remember that headset! Good audio is the most critical component of video: Viewers will tolerate hard to see/bad video, but we do not typically have the same patience for poor audio.

Allow Non-PSU Guest Access to Your Zoom Meeting
Allow non-PSU guest access to your Zoom meeting
In the past, allowing a non-PSU guest into your meeting required you to temporarily change your settings to allow anyone with a Zoom account to join. This creates a security risk. The new security standard is to create an authentication exception for a specific non-PSU guest. You can add authentication exceptions to a single meeting, all instances of a recurring meeting, or a single instance of a recurring meeting.
Limit meetings to authenticated users
- Sign in to the Zoom web portal at pdx.zoom.us.
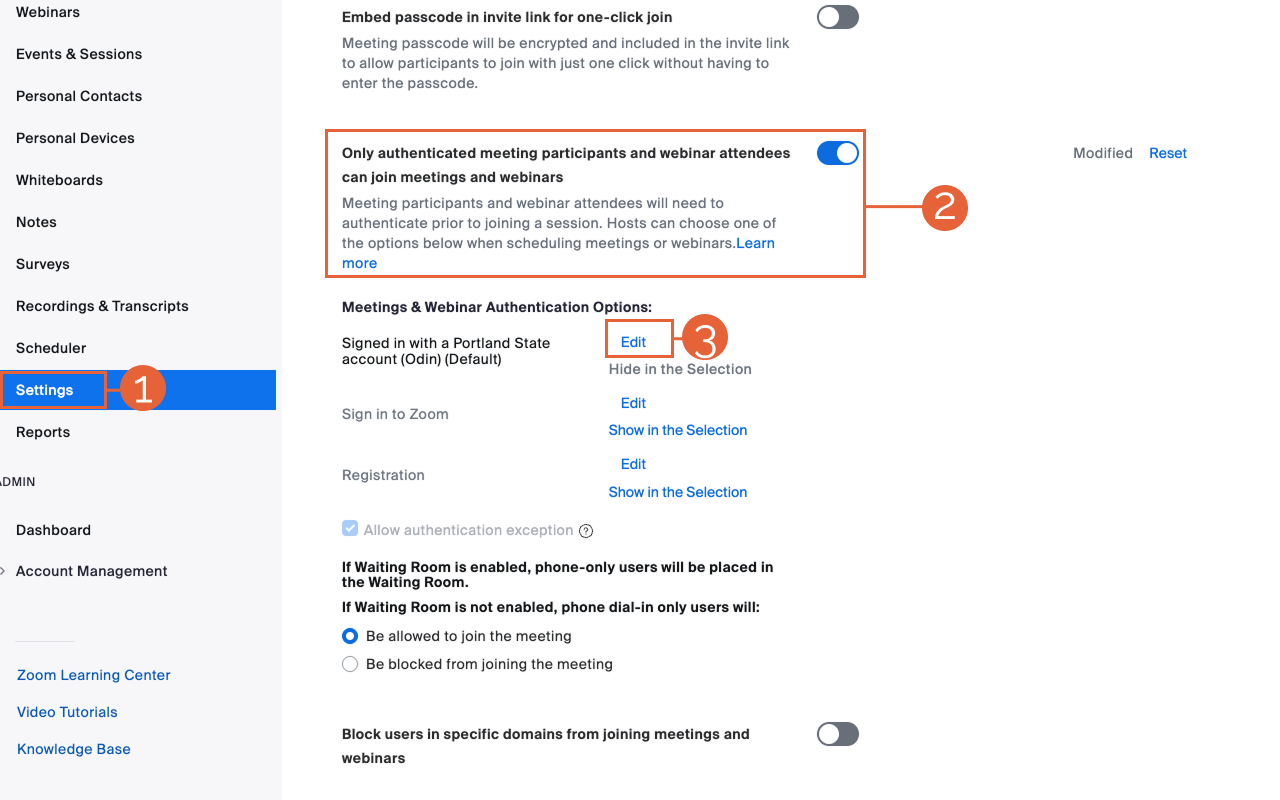
- Select the Settings tab on the left (1), then select the Meetings tab from the top navigation.
- Scroll down to Only authenticated meeting participants and webinar attendees can join meetings and webinars. Select the toggle button (2) so it is on (blue).
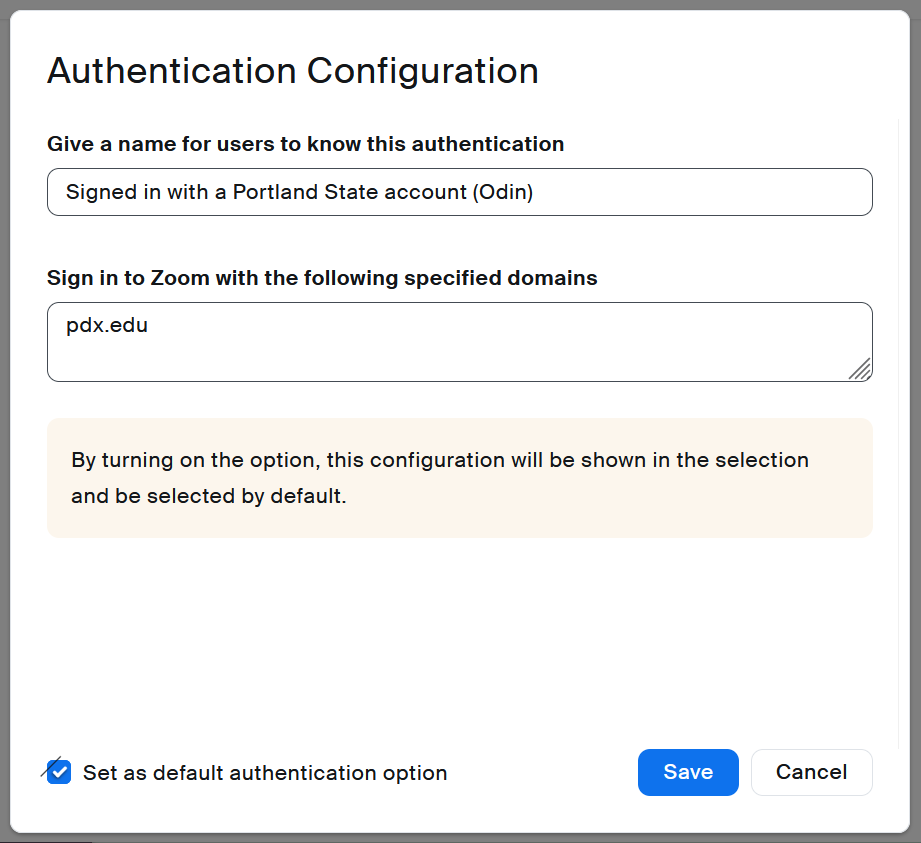
- Below this toggle button, check to see if Signed in with a Portland State account (Odin) is your current default setting (it should say (Default)), as in image below.
- If it is not, select Edit. (3)
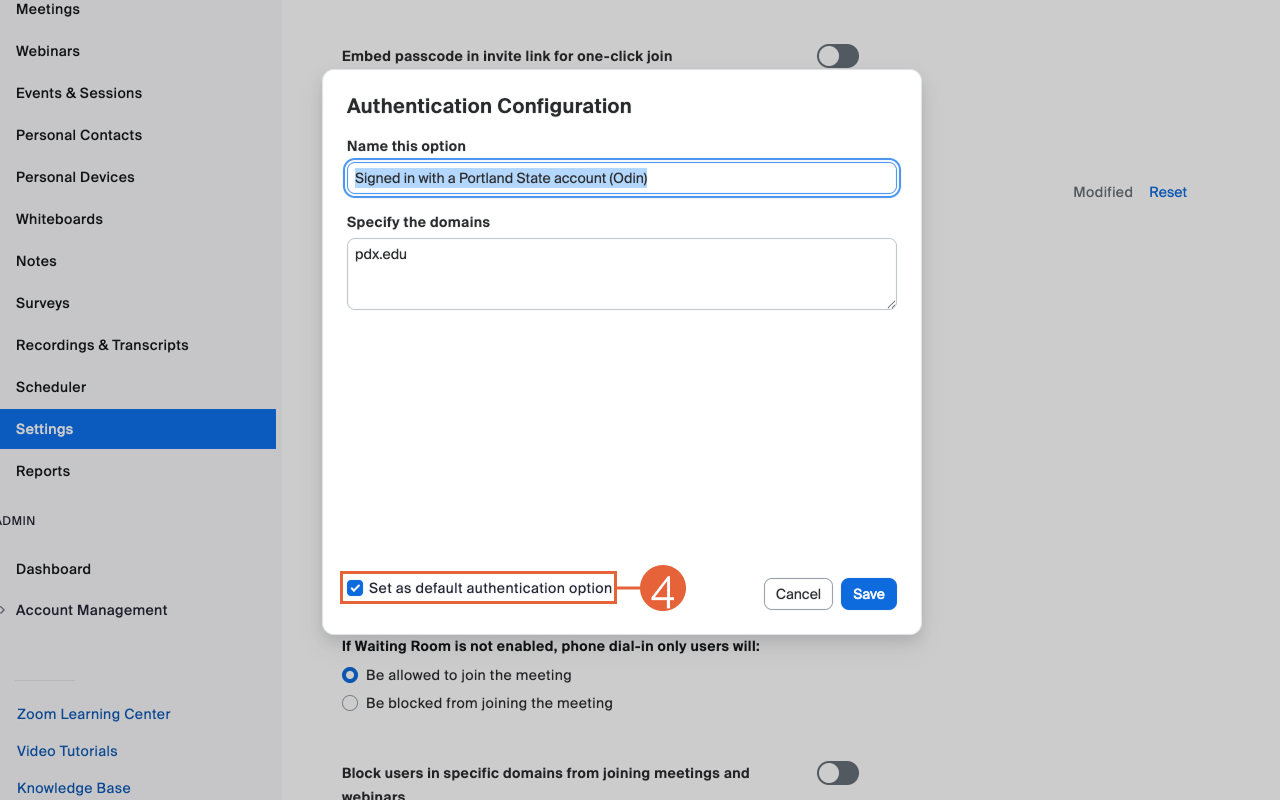
- Select the checkbox to Set as default authentication option. (4)
- Select Save.
You can’t add authentication exceptions to meetings that use your personal meeting ID. You must select “generate a meeting ID automatically.”
- Sign in to the Zoom web portal.
- Schedule a meeting.
- Under Meeting ID, select Generate Automatically.
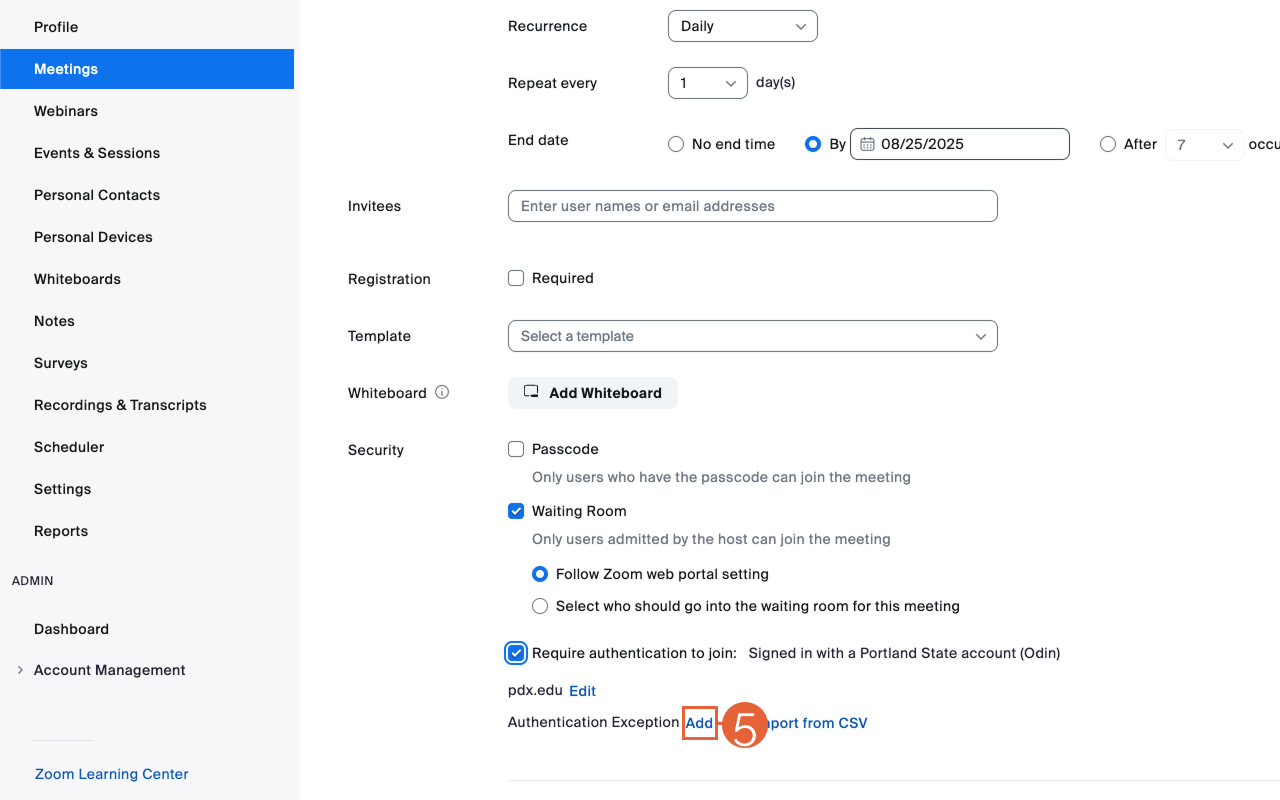
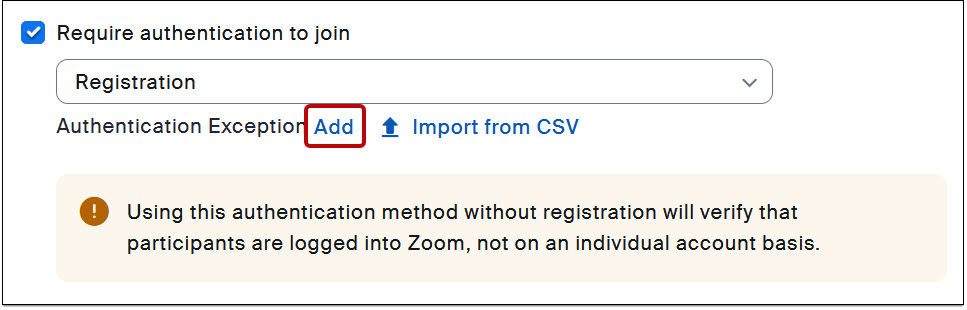
- Under Security, select the check box next to Require authentication to join.
- Next to Authentication Exception, select Add.
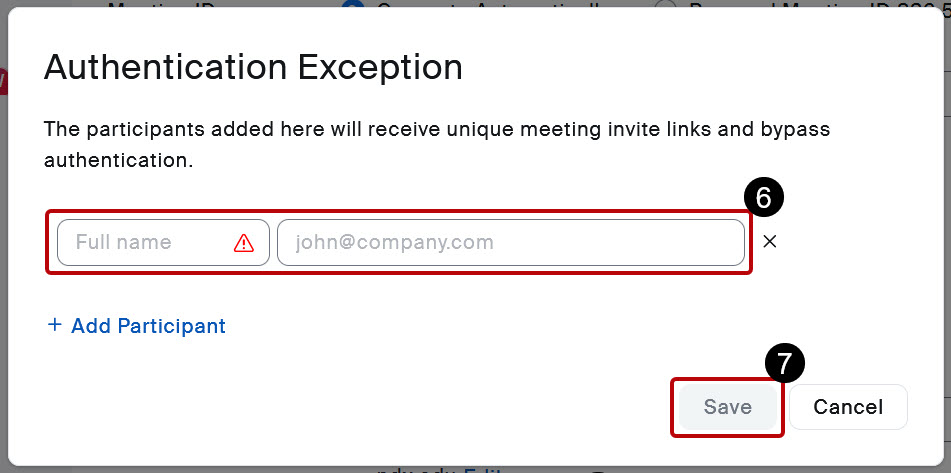
- Enter the guest participant’s name and email address. Select Add Participant to add more exceptions.
- Select Save.
- Choose your other meeting settings, then select Save to schedule the meeting.
You can’t add authentication exceptions to meetings that use your personal meeting ID. You must select “generate a meeting ID automatically.”
- Sign in to the Zoom web portal.
- In the navigation menu, select Meetings.
- Locate the meeting you want to add an authentication exception to, then select Edit. You may have to hover over the meeting title to see the Edit button.
- In the Edit Recurring Meeting dialog, choose either Edit This Occurrence or Edit All Occurrences.
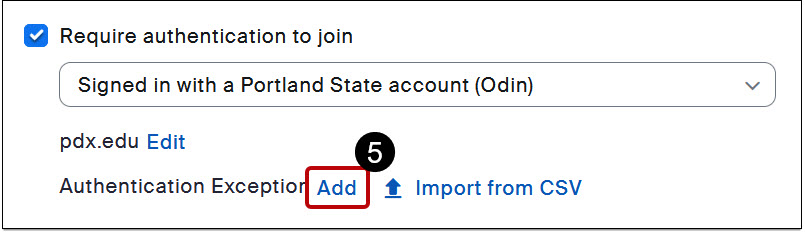
- Next to Authentication Exception, select Add (5).
- Click Add Participant.
- Enter the guest participant’s name and email address. Select Add Participant to add more exceptions.
- Select Save.
- Modify any other meeting settings as needed, then select Save.
This article was last updated .
Zoom Checklist
See full Zoom-bombing prevention suggestions
Review Zoom Recording and Student Privacy and Conferencing, Web Recording and FERPA
Before Scheduling (Global Defaults)
- Make sure you’ve downloaded and are using the most recent version of the Zoom client.
- ❗ Don’t share the meeting URL publicly.
- ✅ Enable Screen sharing and limit to Host Only
- ✅ Enable Annotation if needed during meeting
- ? Disable Allow Participants to rename Themselves
When Scheduling (Meeting Settings)
- ? Disable Join before host
- ✅ Enable waiting room
- ✅ Enable Only authenticated users can join and restrict to Signed in with a Portland State account (Odin)
- ✅ Enable Mute participants upon entry (optional, depending on class size)
During the Meeting (Crowd Control)
- Click Participants to open the Participant Panel during the meeting. Keep it open during the entire meeting for quick access to participants and settings.
- Click Chat to open the Chat Panel during the meeting. Keep it open during the entire meeting for quick access to chat and settings.
Click Chat kebab menu (…) to disable or limit participant chat. - ? Disable Participant Annotation
- Click More from the participant panel and select
? Disable Allow Participants to Unmute Themselves
✅ Enable Lock Meeting once all participants have joined
Emergency! (React Quickly)
- ❗ Use the Security panel (first available in Zoom client 4.6.10 released 4/7/2020) for quick access to
Lock Meeting (prevent additional participants from joining)
Enable Waiting Room (if not already enabled)
? Disable Participant Share Screen
? Disable Participant Chat
? Disable Participant Renaming - Share your screen to quickly replace any inappropriate content someone else might be sharing. Host sharing overrides participant sharing.
Hover next to name of participant to
Mute audio
Stop video - Click down caret next to participant name to
Put in waiting room (temporarily remove participant)
Remove (permanently remove participant from the meeting)
Report any Zoom-bombings to OAI.
This article was last updated on .
Zoom-bombing prevention
Zoom-bombing prevention
Note: for best meeting security, regularly download the most recent version of the Zoom client. We recommend doing this monthly.
Preventing unwanted guests and bad behavior in Zoom meetings is a combination of configuring your settings and learning key crowd control techniques. We suggest you first go through your settings and make our recommended changes. Then, read about crowd control techniques and practice them.
Recommended settings
There are settings in Zoom that can help you reduce the likelihood of a Zoom Bombing attack. Most settings can be adjusted at both the global and individual meeting-levels. Global settings will affect all subsequently scheduled meetings, including via the Canvas-Zoom integration.
Limit meetings to authenticated users
The global setting for your PSU Zoom account should always be set to require PSU authentication. This ensures that meeting guests will have full access to Zoom features like breakout room pre-assignment. When students are able to join with any Zoom account, they can unintentionally log in with a personal account and be excluded from necessary Zoom features. Instructions on allowing a non-PSU guest into a meeting are below.
- Sign in to the Zoom web portal at zoom.pdx.us
- Schedule a meeting.
- In Settings, select the Meetings tab and scroll down to Require authentication to join. Select the toggle button so it is on (blue).
- Below this toggle button, check to see if Signed in with a Portland State account (Odin) is your current default setting. If it is not, select Edit.
- Select the checkbox to Set as default authentication option.
- Select Save.

Allow an authentication exception for a non-PSU guest
In the past, allowing a non-PSU guest in your meeting required you to temporarily change your settings to allow anyone with a Zoom account to join. This creates a security risk. The new security standard is to create an authentication exception for a specific non-PSU guest. You can add authentication exceptions to a single meeting, all instances of a recurring meeting, or a single instance of a recurring meeting.
Note: You can’t add authentication exceptions to meetings that use your personal meeting ID. You must select Generate Automatically.
Add a non-PSU guest to a new meeting
- Sign in to the Zoom web portal.
- Schedule a meeting.
- Under Meeting ID, select Generate Automatically.
- Under Security, select the check box next to Require authentication to join.
- Next to Authentication Exception, click Add.
- Enter the guest participant’s name and email address.
(Optional) Click Add Participant to add more exceptions.
- Click Save.
- Choose your other meeting settings, then click Save to schedule the meeting.
Add to an existing meeting
- Sign in to the Zoom web portal.
- In the navigation menu, click Meetings.
- Locate the meeting you want to add an authentication exception to, then click Edit.
- In the Edit Recurring Meeting dialog, click either Edit This Occurrence or Edit All Occurrences.
- Next to Authentication Exception, click Add.
- Click Add Participant.
- Enter the guest participant’s name and email address.
(Optional) Click Add Participant to add more exceptions. - Click Save.
- Modify any other meeting settings as needed, then click Save.
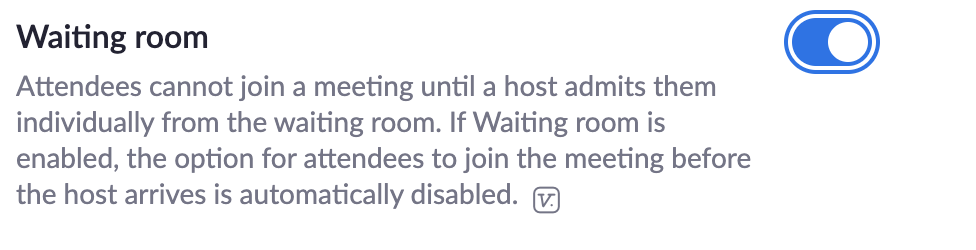
Put participants in a Waiting Room
Waiting rooms are currently set as the system default for newly scheduled meetings This means that all meeting participants will be automatically placed in virtual waiting room, until you manually let them in to your meeting. You can admit participants individually or all at one time, once you have verified they are people you actually invited.
To enable Waiting Room for an individual meeting:
- Sign in to the Zoom web portal at pdx.zoom.us.
- In the navigation menu, click Account Management then Settings.
- On the Meeting tab, navigate to the Waiting Room option under In-Meeting (Advanced) and verify that the setting is enabled.
- If the setting is disabled, click the Status toggle to enable it. If a verification dialog displays, choose Turn On to verify the change.
- Select who you want to admit to the waiting room.
All participants
All participants joining your meeting will be admitted to the waiting room.
Guest participants only
Only participants who are non-PSU participants or are not logged into any Zoom account will be admitted to the waiting room. If not logged in, they will have an option to log in.
Optionally select the pencil icon to set a custom waiting room message.
Click Save if prompted
Note: You can also enable/disable a waiting room for individual meetings when scheduling new or editing existing meetings.
Set Meeting Passwords
Note: This option is not as secure as using a Waiting Room, since students can share passwords with the public. Use this option only with highly trusted invitees.
Setting a meeting password will require participants to enter a six digit code upon entry to your meetings. This feature is available for meetings as well as Personal Meeting Rooms and can be used in combination with Waiting Rooms for added security Meeting Passwords. Meetings are assigned a random password. You can assign or update the password to one of your choosing.
Set Passwords on a Meeting by Meeting Basis:
- Sign in to the Zoom web portal at pdx.zoom.us.
- Click on Meetings from the left navigation menu.
- Schedule a new Meeting or select an existing Meeting to edit
- If editing, scroll to the bottom of the selected meeting page and click Edit this Meeting.
- Under Meeting Options, enable the checkbox for require meeting password. Customize the password as needed.
- Click Save when done.

Note: You can also update this setting globally so it is the default for all subsequently scheduled meetings by logging into the Zoom Web Portal at pdx.zoom.us, and clicking Settings from the left navigation menu. You will have additional customization options at the global-settings level.
Require advance registration for public meetings
You can require participants to register for a meeting in order to attend. This is generally not advised for class meetings, but it is strongly recommended for public meetings or with meetings where the Zoom links are posted publicly. This requires users to register to receive the meeting link/password (if required). The meeting host can customize the registration field and approve or deny guests.
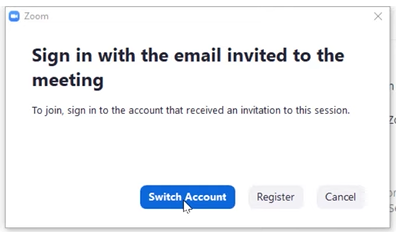
In the past, Zoom meetings that required registration generated a link that could be shared with someone other than the person who registered. A new update requires registered users to join with the email they registered with. If a guest tries to sign in with the wrong email domain, they are prompted to switch accounts. Attendees must register with an email associated with an active Zoom account. This must be done before registration can be completed.
Schedule a meeting with required registration
- In Settings, make sure Only authenticated users can join meetings is on (toggle button is blue).
- In the menu of options, select Signed into account associated with invited email.
- When scheduling a meeting, in the Require authentication to join menu, select Registration, then Save.
- If a registered user tries to log into the meeting using a different email. They’ll see this message:
Adjust the Registration Settings:
After enabling registration, a new set of options will appear at the bottom of the meeting details page.
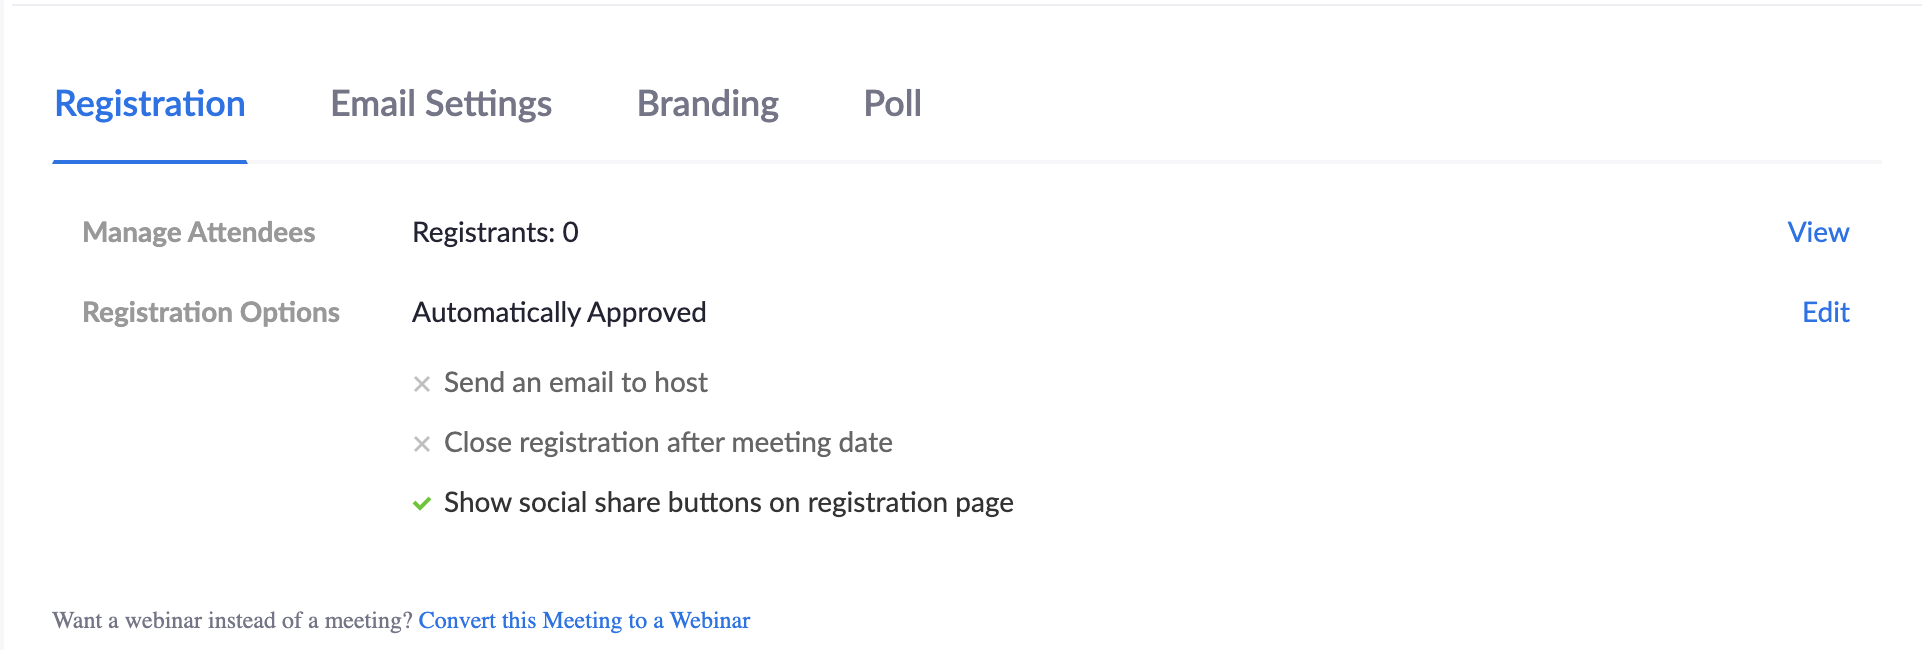
- Click Edit on any tab to view and edit options.
- See Zoom registration documentation for more information.
Crowd Control Techniques
There are a number of features within Zoom that you can use during a meeting to help manage your participants, and mitigate unwanted behaviors.
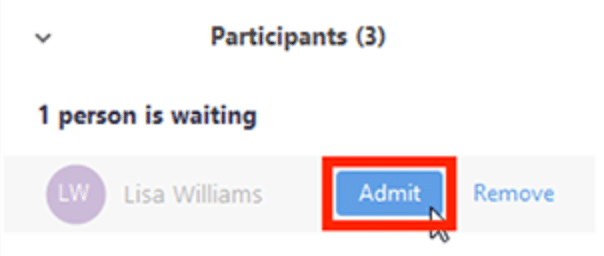
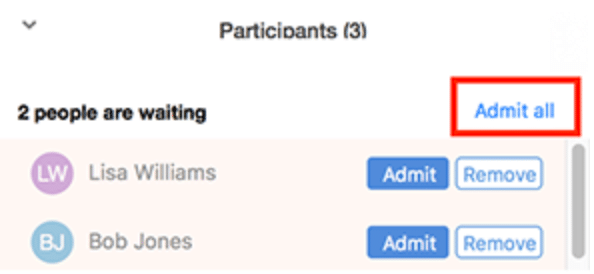
Manage your waiting room
You’ll need to have enabled a waiting room for your meeting ahead of time.
- Join your meeting as the host.
- Click Manage Participants from the Host Controls.
- Click Admit to allow the selected participant join the meeting.
- Click Admit All to allow all waiting participants to join the meeting.
Manage participants
As the host, you have a number of crowd control tools accessible to you in the host control panel. We outline them below, and also recommend Zoom’s In Meeting Controls 101 Video.
Host Controls
You may need to move your mouse to the bottom of your screen to trigger host controls.
Host controls contains all settings needed to control your participants in meeting. This menu contains individual user settings and controls for the whole meeting.
Click Participants to open the participant window.
Mute a Participant
Hover to the right of a user’s name to find the mute/unmute options for audio and the stop video/ask to start video option.
Remove a participant
Temporarily remove a participant by selecting Put in Waiting Room in the drop down next to the participant’s name. This feature removes the guest back to the waiting room, and you can allow them back into the meeting as you choose.
Select Remove from the drown down next to the participant’s name to block the user from re-entering the meeting. This does not ban the user from your meetings permanently. Please make sure to report the guest.
Mute all Participants
At the bottom of the Manage Participants window, click the Mute All button. This will mute everyone in the meeting except the host.
Disallow participants from unmuting themselves
- Click More
- Make sure Allow Participants to Unmute Themselves is deselected. When users need the host to unmute them, have them raise their hands or comment in chat.
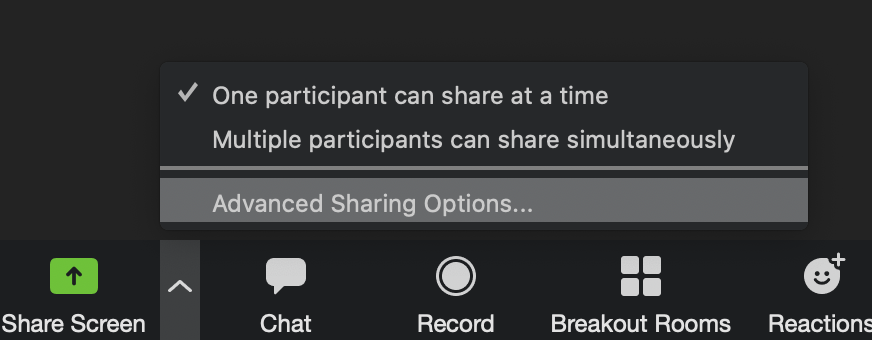
We highly recommend that you control who shares their screen by setting it so that only you, the host, can share your screen. This is the default setting for all PDX users. When this setting is on, the host can grant participants permission to share their screen at their discretion.
To allow participants to share their screen
- Click the caret to the right of the Share Screen button from the host controls.
- Select Advanced Sharing Options.
- Select the All Participants option under Who can share?
- Do not change the default (Only Host) option under Who Can Start Screen Sharing When Someone Else is Sharing.
- Close the dialogue box.
Zoom has a feature that allows users to annotate on top of any shared source. If you have enabled annotation for your meeting(s), any participant will be able to annotate the shared screen by default.
To temporarily disable participant annotation in a meeting
- Start a screen share
- Click the kebab (…) on the right side of the host controls.
- Click the option to Disable Attendee Annotation to prevent participants from annotating the shared screen.
- If you need to allow shared annotation, it’s recommended to select the option to Show Names of Annotators to prevent anonymous annotation.

Lock your meeting
When all of your participants have arrived in your meeting, you can “lock” the meeting so that no more participants can join or ask to join. When you lock the meeting, no new participants can join, even if they have the meeting ID and password.
When ready to lock, click Participants in host controls.
![]()
Click Lock Meeting
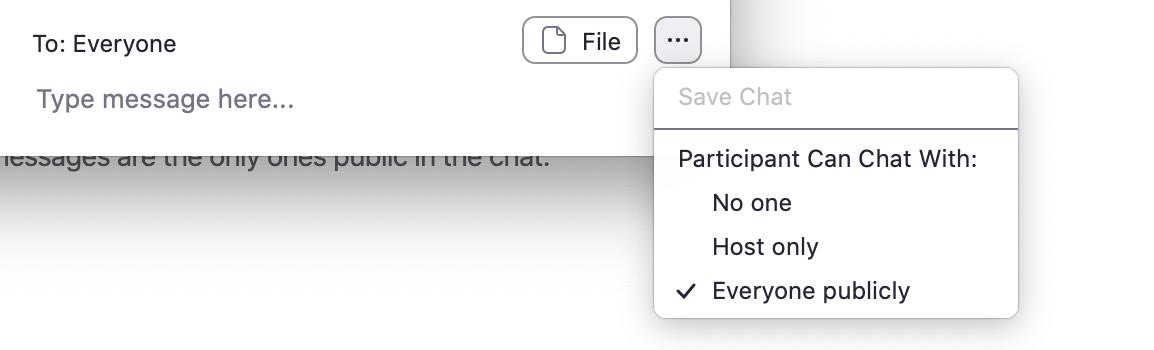
Adjust chat settings
If the chat feature is causing disruption, you can adjust it to allow participants to chat with the host only, all participants publicly, all participants publicly and privately, or no one.
- Click Chat in host controls to open the chat window.
- Click the kebab icon (…) in the corner of the chat window.
- Select the option you would prefer.
This article was last updated .