This article was last updated Jun 12, 2025 @ 12:33 pm.
Why would I use Zoom Whiteboard?
Zoom Whiteboard is a virtual tool for visual collaboration. It enhances meetings by allowing instructors and students to brainstorm, annotate, and organize ideas together. It’s useful for interactive discussions, problem-solving, and concept mapping. Zoom Whiteboards also support asynchronous engagement, enabling ongoing collaboration, group work, or reflection outside of class time.
We recommend creating Zoom Whiteboards for classes through the Zoom LTI (the Zoom tab in Canvas) in your course. This ensures that they are automatically linked to your course, making them easier for students to access. This can also create better organization, helping you find whiteboards you’ve created in the past more easily.
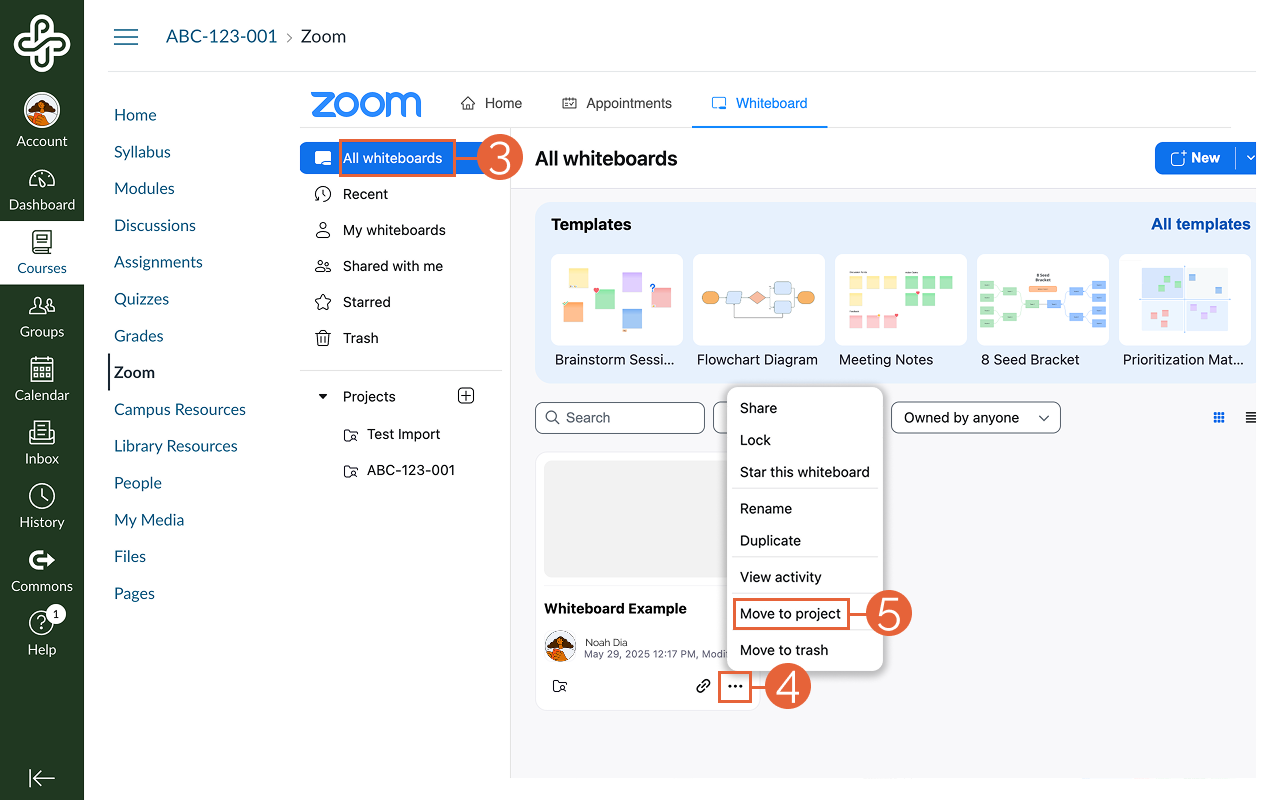
If you're creating a Zoom Whiteboard that is not affiliated with a class, you may use the Zoom web portal to create and share your whiteboard.
Use Zoom Whiteboards for synchronous collaboration
Start a Zoom meeting.
In the meeting controls toolbar, select the Whiteboards button.
Select New Whiteboard or Existing Whiteboards. The new whiteboard will open in the meeting window.
If it appears, close the welcome dialogue window after selecting New Whiteboard. (Don’t open a new classic whiteboard.)
If you selected Existing Whiteboards, you will be asked to select from the following:
How do you want to open the board?
Collaborating: Users are granted edit access.
Presenting: The board opens in presentation mode, and users are granted view access.
Allow persistent access: Allows verified meeting participants to access the whiteboard after the whiteboard is closed and after the meeting ends.
If your Zoom meeting was scheduled through the Zoom LTI, your students will have access to whiteboards shared during the meeting through the whiteboards tab in the Zoom LTI area.
Use Zoom Whiteboards for asynchronous collaboration
When the steps or screenshot are long, collapse content into an accordion with an introductory sentence here for context an and guidance.
Step 1: Create or choose the whiteboard you want to use
Open the Zoom page (1) in your Canvas Course Navigation Menu.
On the top navigation menu, select Whiteboard (2). The page will open a view of your whiteboards within the Canvas course.
If the whiteboard you want to use is already in the course, you can move to the next step. However, if you don’t see the whiteboard you want to use, you may need to move it from another course/project:
Select All whiteboards (3).
Find the whiteboard you want and select the options icon (4) on the whiteboard or right-click on the whiteboard.
Select Move to project (5) from the dropdown menu. This will open the Move board to project popup window.
Select the desired course from the New project (6) dropdown menu.
Select Move (7) to finalize your changes.
Step 2: Adjust your Zoom LTI share settings
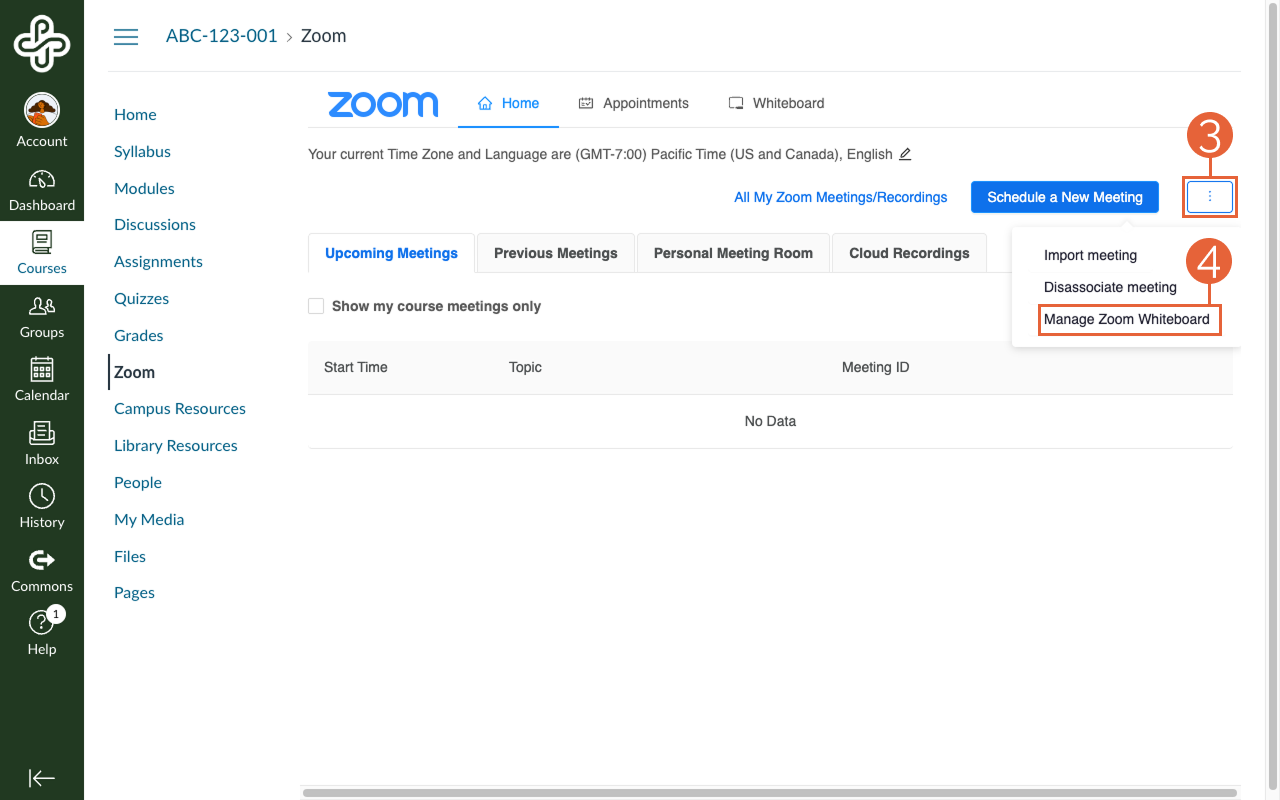
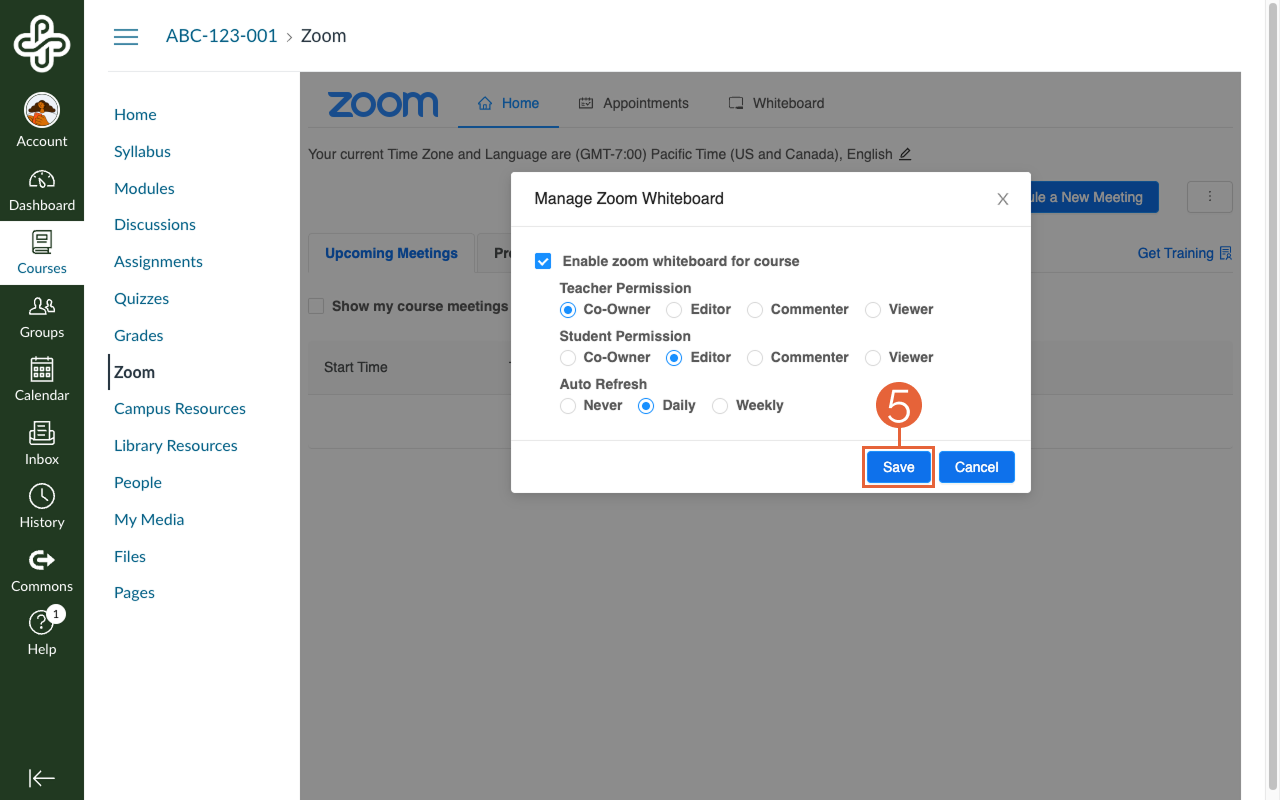
By default, when a Zoom Whiteboard is created in a Canvas course, all students in the course will have Viewer access. If you would like your students to add to or edit the board for asynchronous collaboration, you’ll need to add them as Editors by doing the following:
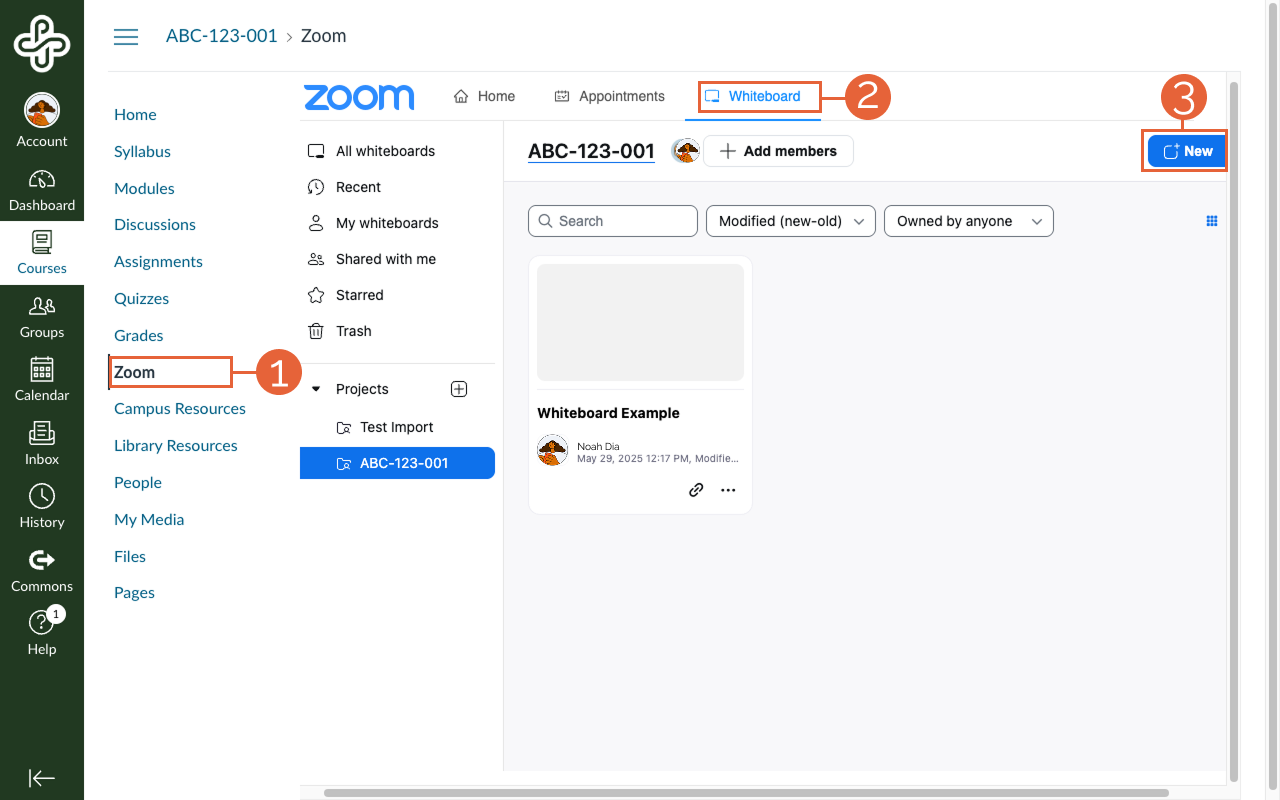
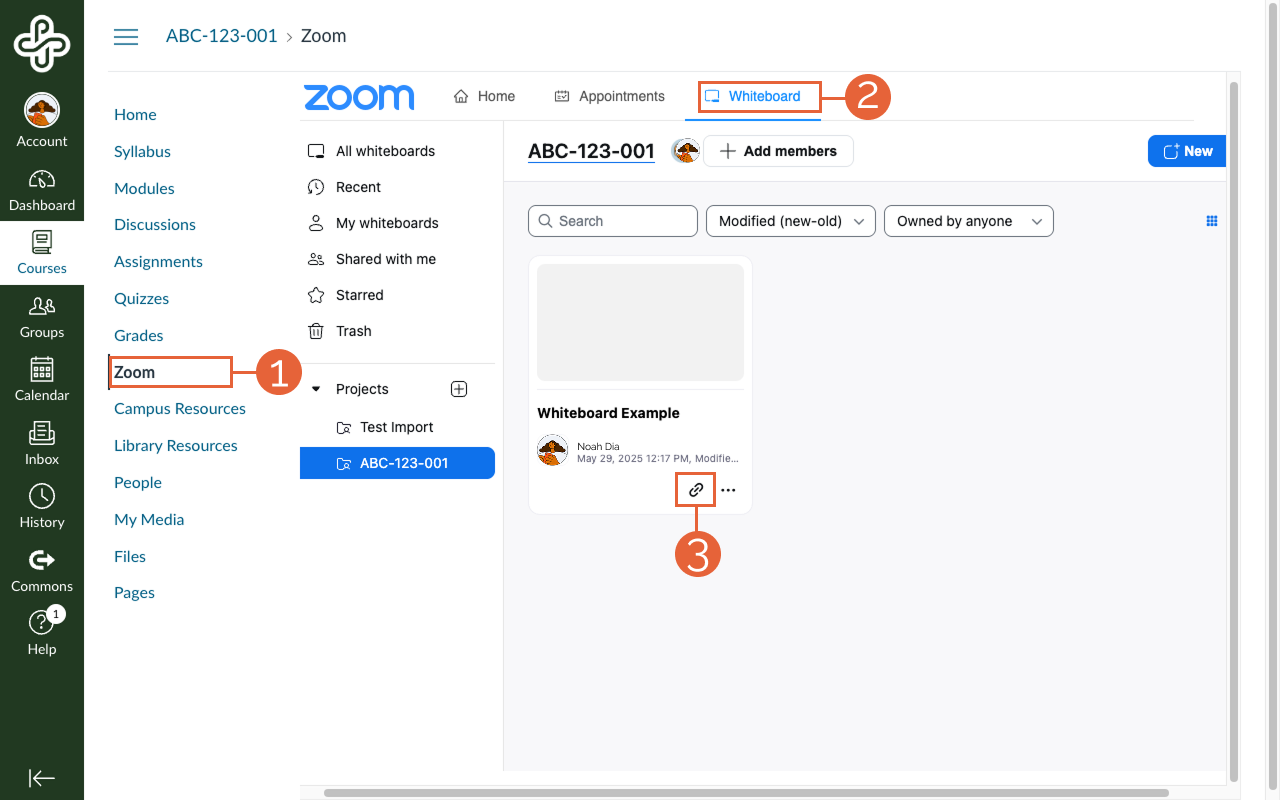
1. Open the Zoom page (1) in your Course Navigation Menu
Ensure you are under the Home page (2) while in the Zoom LTI.
Select the options icon (3) to the right of the Schedule a New Meeting button.
A dropdown menu will appear. Select Manage Zoom Whiteboard (4) from this menu.
The pop-up window Manage Zoom Whiteboard will appear. The recommended settings are listed below:
Enable Zoom whiteboard for course
Teacher Permission: Co-Owner
Student Permission: Editor
Auto Refresh: Daily
Select Save (5) to finalize your changes.
Step 3: Manually share the whiteboard with students (optional)
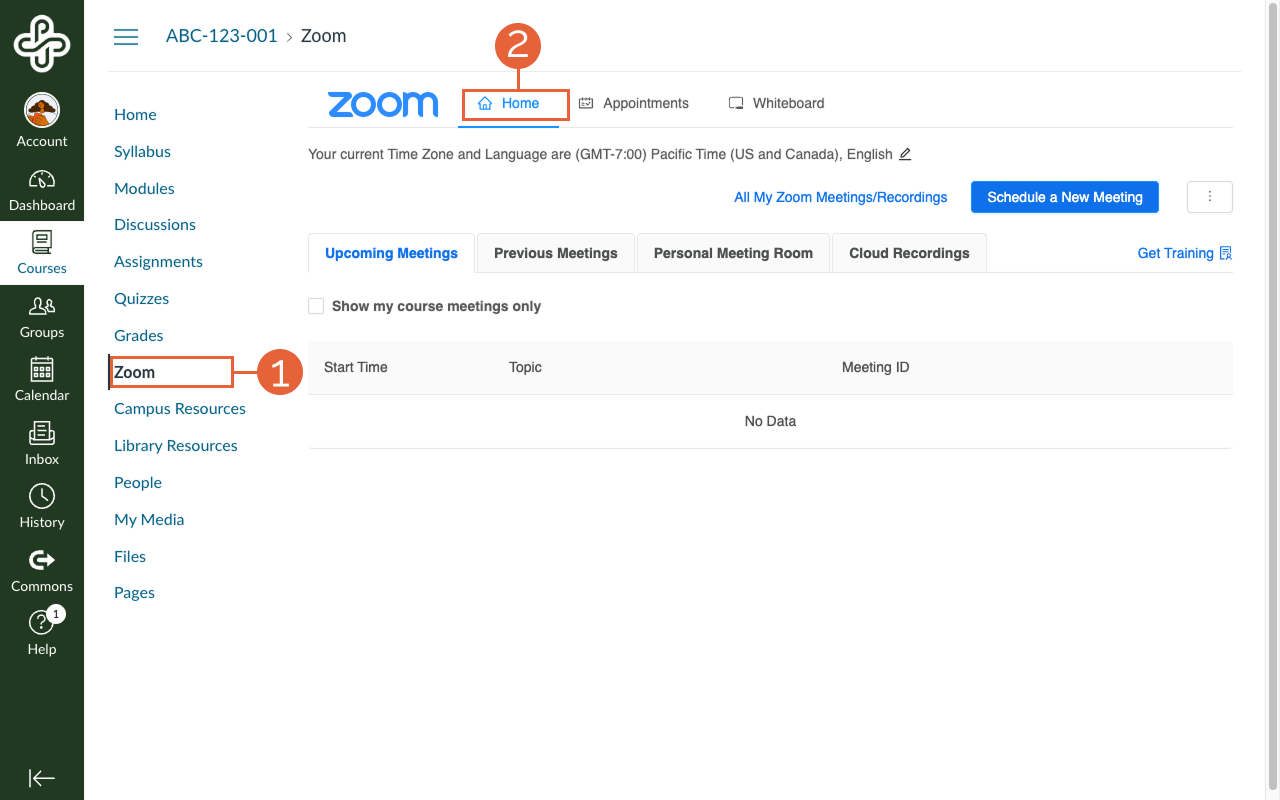
Once you have either created a new whiteboard or moved an existing one to your course and you have adjusted the Zoom LTI settings to grant students editing access, students will be able to access the whiteboard via the Zoom page in their course. However, you can share a link directly to the whiteboard from another part of the course, like an announcement or within modules, to make it easier to find.
Open the Zoom page (1) in your Course Navigation Menu.
On the top navigation menu, select Whiteboard (2). The page will open to a view of your whiteboards within the current Canvas course. (To confirm you are in the correct course, make sure the correct project is highlighted in the menu.)
Find the whiteboard you want and select the link (3) icon. This will automatically copy the link for that whiteboard, allowing you to paste it into other parts of your course.
Whiteboard tips and tricks
You can add instructions directly to a whiteboard to help contributors know how to contribute.
You can create multiple pages within a single whiteboard. This is one way to set up collaboration spaces for breakout groups to contribute during class meetings.
Zoom includes many whiteboard templates that you can use as is or modify to fit your needs.
Canvas courses with associated Zoom Whiteboards will appear as Whiteboard Projects. These projects help organize your boards into shared spaces for specific projects or groups of people.