

Add an extra credit question to a New quiz
Canvas Quizzes do not have a true extra credit option for automated grading. It’s possible to award extra credit, but this requires manual grade input as shown below. For large classes that need a mostly-automated option, see “Creating an Extra Credit Quiz.”
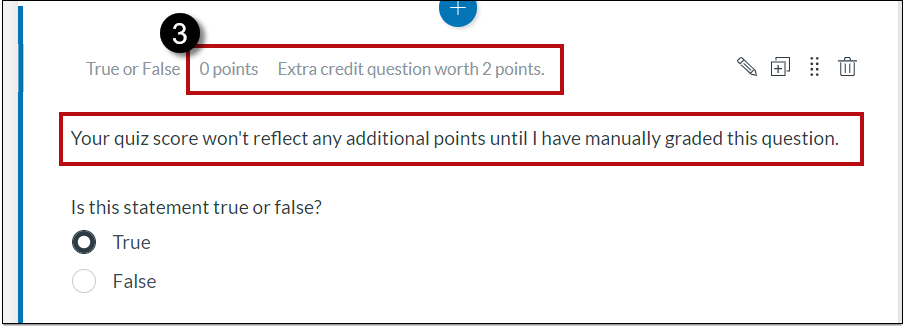
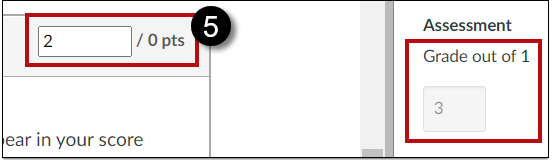
To create an extra-credit question, you set that question’s point value to zero. When you grade the question, any points assigned are added to the quiz total. The total can exceed 100%. Once extra points are manually entered with SpeedGrader, the new total transfers to Grades as usual.
Note: in the New Quiz engine, it’s possible to enter a point value for the full quiz that differs from the sum of points-per-question. For example, if you set the total points on the assignment details page to 50 and create a quiz with 10 questions each worth 1 point, the quiz has a total of 10 points but is worth 50 points when graded. If a student answers 9 questions correctly, their quiz score is 90% (9/10). However, their final score in the Gradebook will be 45/50 (90%). For quizzes with extra credit questions, we recommend that the assignment total and sum of point values are the same to avoid student confusion.
- Create a quiz and, on the assignment details page, enter the total possible standard question points, excluding any possible extra credit points.
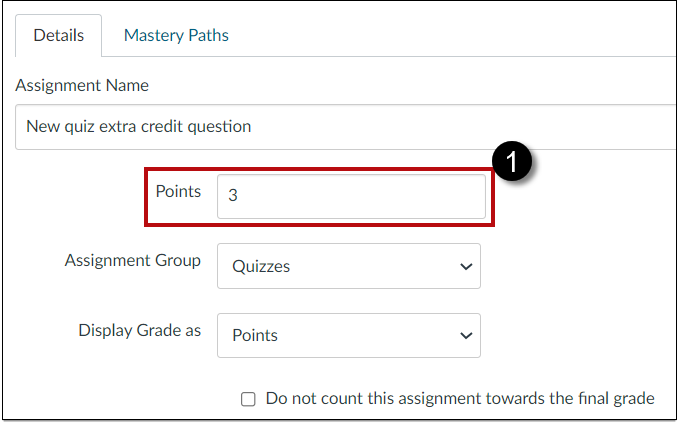
- Select Build and enter each required question and point value, selecting Done after each question. Make sure the sum of these question points corresponds with that in your assignment details.

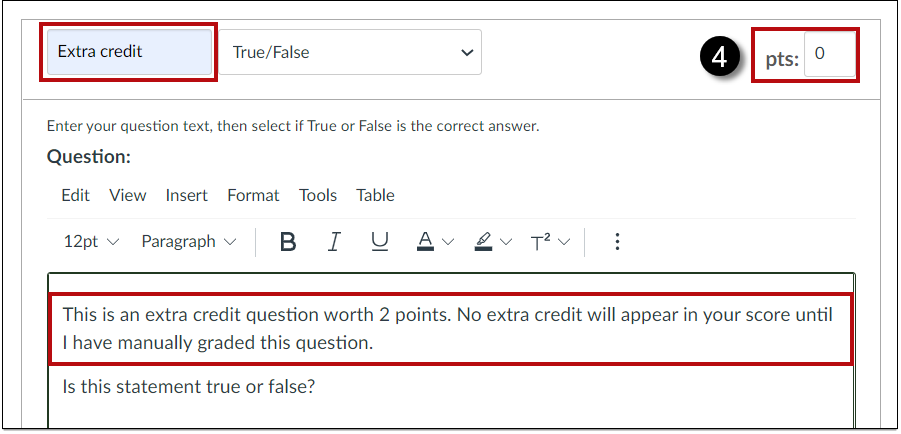
- For an extra credit question, create a question and enter the point value as zero. We recommend letting students know that extra credit points must be manually graded.
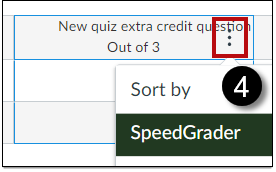
- Grading completed quizzes: open SpeedGrader from the Grades column for this quiz.
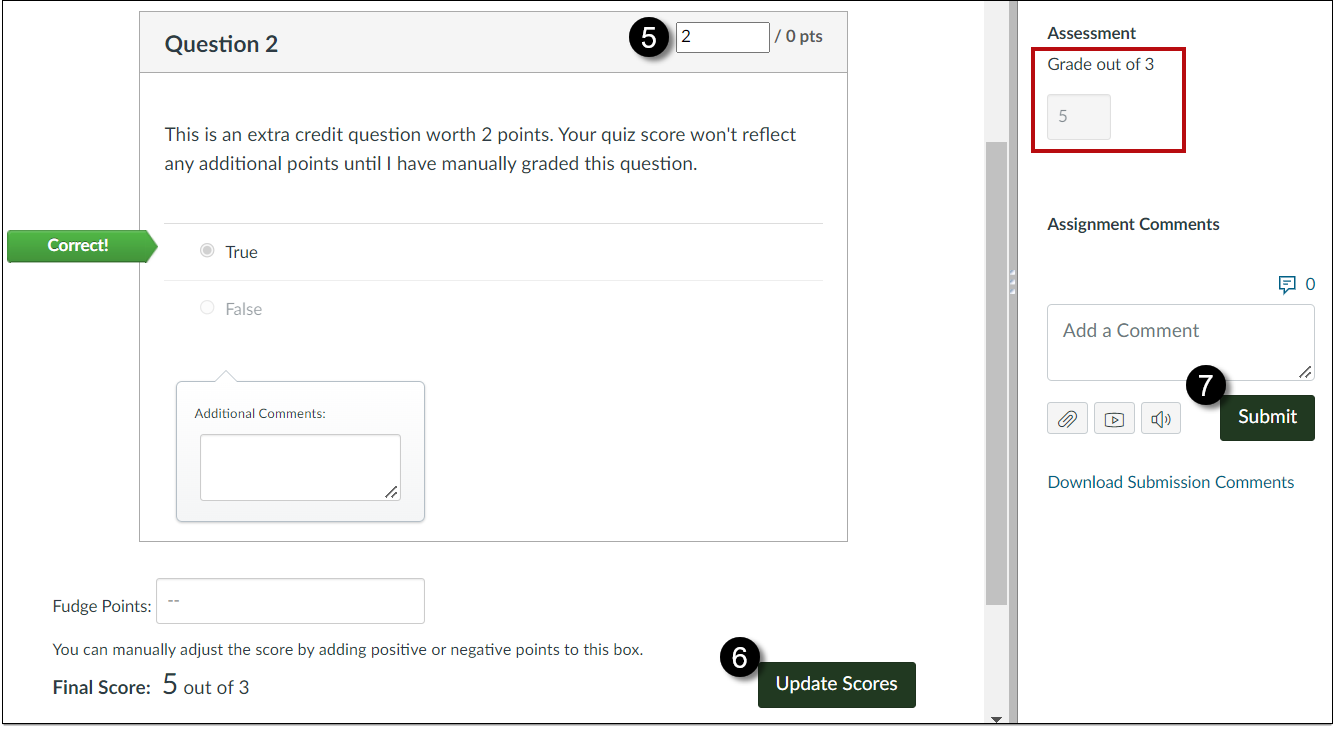
- Add points for a correct extra-credit question.
- Select Update to save these scores to Grades. The score can exceed 100%.
- Enter optional feedback in the Comment field and select Submit.
This article was last updated on .

Add an extra credit question to a Classic quiz
Canvas Quizzes do not have a true extra credit option for automated grading. It’s possible to award extra credit, but this requires manual grade input as shown below. For large classes that need a mostly-automated option, see “Creating an Extra Credit Quiz.”
To create an extra-credit question, you set that question’s point value to zero. When you grade the question, any points assigned are added to the quiz total. The total can exceed 100%. Once extra points are manually entered with SpeedGrader, the new total transfers to Grades as usual.
-
- Create a quiz with the Classic quiz engine, enter settings, and save it.
- Select Edit and the Questions tab.
- Enter each required question and point value, selecting Update Question after each one.
- For an extra credit question, create the question and enter the point value as zero. We recommend letting students know that extra credit points won't be reflected in their score until the question is manually graded.
- After students complete the quiz, open SpeedGrader and add points to each correct extra-credit question.
- Select Update to save these scores to Grades. The score can exceed 100%. Enter optional feedback in the Comment field and select Submit.

This article was last updated on .

User Roles in Canvas
Student Roles
Student
- Primary use: Students enrolled in a course site.
- Permissions: The student role has permissions to view course content and engage in course activities, including the ability to submit assignments, participate in discussions, and view the course roster.
- Limitations: Students cannot view or modify settings for a course.
Observing: Nobody
- Primary use: To identify students who have been waitlisted.
- Permissions: Observers have “read only” access to the course content. This role can also be linked to a student enrolled in a course in order to monitor their progress. In that case the role is Observing: [student name].
- Limitations: Observers have no permissions to edit or participate in course activities. As in the classroom, students trying to get into a waitlisted class need to keep up with course activity during the add/drop period in case they get in. When that period is over, students not admitted will no longer be in your roster with this role.
Inactive
- This is not a role, but a status that means the student has withdrawn from the class after the start of term.
- You can “conclude” their enrollment (see the tutorial for this), but we strongly advise leaving inactive students in your roster if they’ve submitted any coursework. If a student uses financial aid or the GI Bill, they may need to request a record of their enrollment and activity in your course, even after they’ve dropped it.
Teaching Roles
Teacher
- Primary use: For instructors who need full access to the Canvas features for instruction.
- Permissions: Teachers have all course-level permissions, including the ability to add, edit and delete all content in a course, edit course settings, and manually add individuals with active Canvas user accounts.
- Limitations: None.
Guest Teacher
- Primary use: For instructors who are not the instructor of record to participate in and facilitate some parts of the course.
- Permissions: Guest Teachers have most course-level permissions, including the ability to add, edit and delete all content in a course.
- Limitations: Guest Teachers cannot add or delete individuals from a course, nor publish the course.
Community Partner
- Primary use: The community partner role is for community-based learning partners to be able to participate and co-author elements within a course (such as co-creating learning objectives) in partnership with the instructor of the course.
- Permissions: Community Partners have the ability to add, edit and delete content and activities, manage groups, and facilitate discussions.
- Limitations: Community Partners can view the user list, but cannot and/delete students or view grades.
Note: Community Partners must have an Affiliate Account and Odin username to access Canvas.
TA (Teaching Assistant)
- Primary use: For assistant instructors and teaching assistants.
- Permissions: TAs have permissions similar to the Teacher role. They have all course-level permissions, including the ability to add, edit and delete all content in a course, edit course settings, and manually add individuals with active Canvas user accounts.
- Limitations: TAs cannot add other Teachers or TAs into the course, nor publish the course.
Mentor/Grader
- Primary use: For graders.
- Permissions: Mentor/Graders are restricted from editing the course and is designed to exclusively grade student work.
- Limitations: This role is restricted to only being able to grade users.
Staff Roles
Designer
- Primary use: For instructional designers/technologists (and staff with similar responsibilities) who write and manage course content, but do not actually teach courses or grade student work.
- Permissions: Create course content, discussions, announcements, assignments, quizzes, and other content features.
- Limitations: Designers cannot view or modify grades. Designers cannot add Teachers or TAs to the course, but can add students.
DRC Service Provider
- Primary use: For DRC contracted workers who need access to the course in order to provide accommodations.
- Permissions: Same permissions as the student role. Has permissions to view course content and engage in course activities, including the ability to submit assignments, participate in discussions, and view the course roster.
- Limitations: DRC Service Providers cannot view or modify settings for a course.
Quiz time extensions
There are two Canvas setting areas to check when accommodating students who need extra time on a quiz.
- The time and attempts allowed on a quiz can be extended in quiz Moderation.
However, quiz availability dates still apply when moderating a quiz: If the Available Until date passes when students are taking the quiz with extended time, the quiz auto-submits even if the student’s time extension has not expired. - The Available Until date/time can be customized for accommodated students.
This is done in quiz Assign settings.
Moderation to give a student more time: Classic quiz
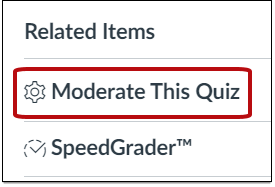
- Moderate This Quiz is found in the Related Items list. This will be to the right or below your quiz (depending on your browser width) after you select it (don’t select the Edit button).
- Find your accommodated student in the class list. Select the small pencil icon to the far right in order to enter additional attempts and/or time.
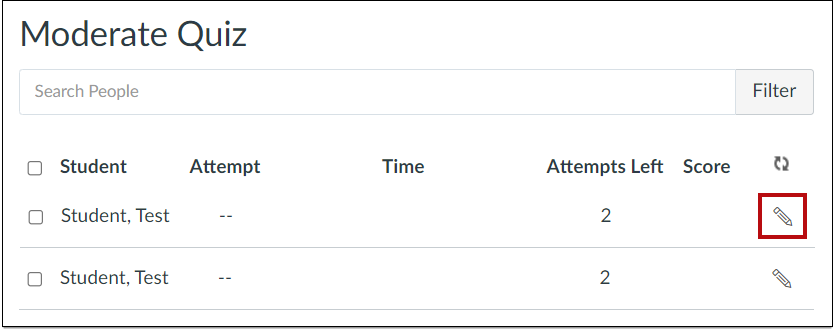
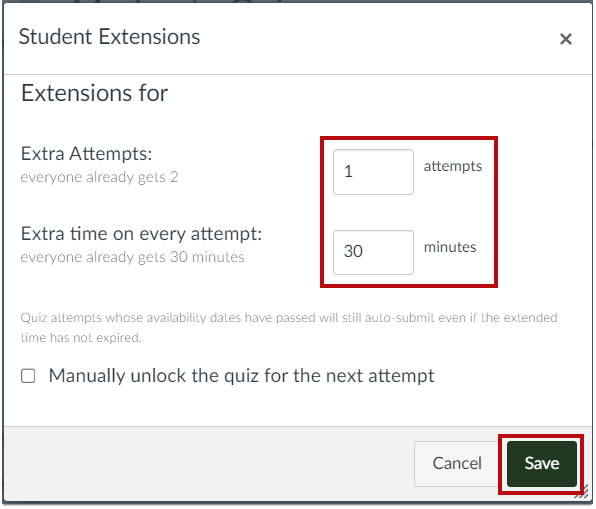
- Select Save.
Moderation to give a student more time: New quiz
- Select the quiz and then scroll down to select the Build button.
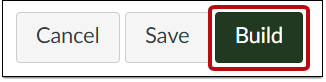
- At the top of the screen, a row of tabs is available. Select Moderate.

- Find your accommodated student in the class list. Select the small pencil icon to the far right in order to enter additional attempts and/or time.
- Select Save.
Settings to give a student a later Available Until date/time
- Classic Quiz: select the quiz and then the Edit button. Scroll down to the Assign area.
New Quiz: select the quiz and scroll down to the Assign area. - Below the main Assign to (Everyone) fields there is an + Add button.
Select that button to generate an additional Assign to form.

- The initial form will now say Everyone Else instead of Everyone. In the new form, enter the accommodated student name(s). You can now duplicate the initial date/time settings and create a new Until date/time to encompass the quiz time extension.
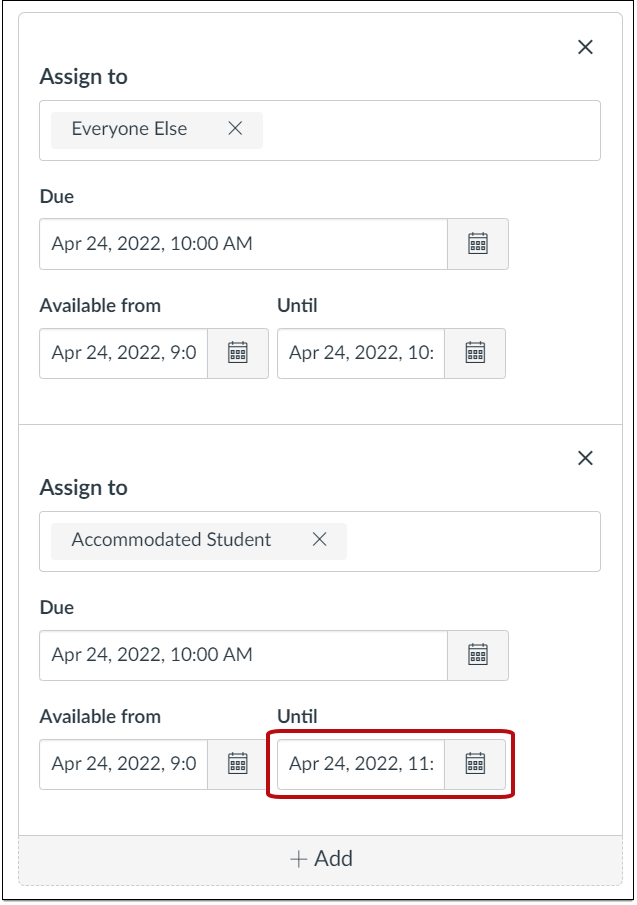
- Select Save.
This article was last updated on .
Zoom meeting roles: co-hosts and alternative hosts
Zoom defines meeting management roles as:
- Host: The user that scheduled the meeting. They have full permissions to manage the meeting. There can only be one host of a meeting.
- Co-host: Shares most of the controls that hosts have, such as managing attendees. The host must assign a co-host during the meeting. Co-hosts cannot start a meeting.
- Alternative host: Shares the same controls as co-hosts, but can also start the meeting. Hosts can assign alternative hosts when they schedule a meeting.
Alternative hosts must have PSU credentials
In your PSU Zoom account, an alternative host must be a PSU community member and have an Odin username to login and authenticate with.
Co-hosts may be non-PSU guests
A co-host may be a meeting participant from outside the PSU community. To admit a non-PSU participant to your meeting, first adjust the default sign-in requirement from PSU account membership to any Zoom account. Once the guest is admitted to your meeting, you can assign them the co-host role.
Next, make sure your own account settings have the co-host role enabled.
- Sign into the Zoom web portal at https://pdx.zoom.us/
- In the navigation panel, click Settings.
- Click the Meeting tab.
- Under In Meeting (Basic), verify that the Co-host setting is enabled.

- If the setting is disabled, click the toggle to enable it. If a verification dialog displays, click Turn On to verify the change.
There are two ways to make a participant a co-host during a meeting.
Once the guest is admitted:
- Hover over their video.
- Click the ellipsis (….) icon.
- Click Make Co-Host.
Or use the participants panel:
- Click Participants in the meeting controls at the bottom of the Zoom window.
- In the participants panel, hover over the name of the guest who will co-host, and choose More.
- Click Make Co-Host.
This article was last updated on .

Display your syllabus file in the Syllabus area
The Syllabus tool can be configured to display your uploaded syllabus file. Optionally, you can also display a Course Summary, which lists course activities by date.
- Navigate to the Syllabus tool and open the Insert menu below the Syllabus Description heading.
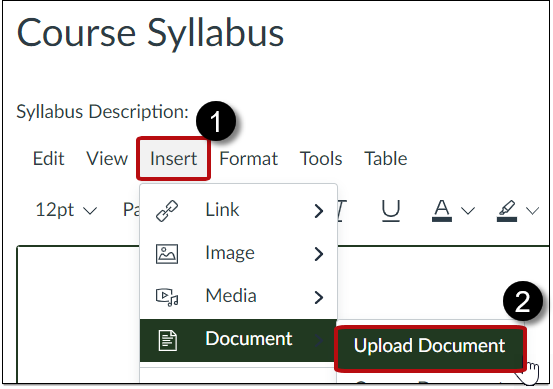
- Select Document and Upload Document.
- Locate the syllabus file on your computer and upload it. This creates a hyperlink.
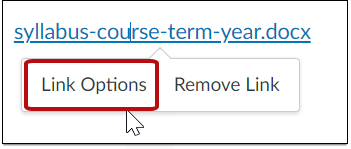
- Select the hyperlink and then Link Options.
- In the Link Options panel, rename the hyperlink if desired.
- Select Preview inline and Expand preview by Default.
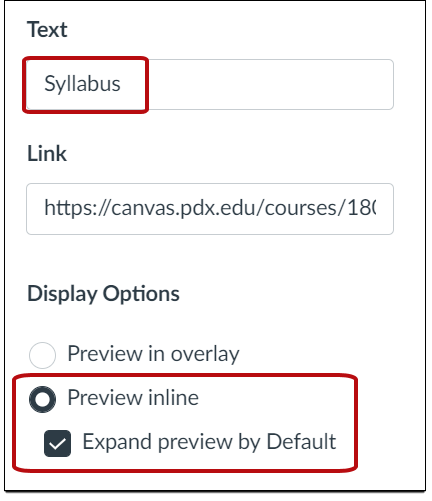
- At the bottom of the Link Options panel, select Done.
- Optional: below the description field you may select Show Course Summary.
If selected, a Course Summary is automatically generated based on assignments and calendar events. Summary Items can only be changed by editing or deleting the assignments or events. All assignments (unpublished and published) are visible to instructors in the Summary, but students don’t see unpublished assignments. - Select Update Syllabus. Your document will now automatically preview, and can also be downloaded by selecting the Download icon.

This article was last updated on .

Incomplete Student Access to a Canvas Course
There are two ways to provide ongoing access to a Canvas course for a student who needs to resolve an Incomplete or complete remaining coursework after the term ends.
Option 1: In most cases, the goal is to reopen the course for only specific students. Reopening the course only for specific students requires the creation of a new course section with associated access dates. To request extending student access in an existing Canvas course, please fill out the Incomplete Student Access form.
Option 2: Instructors can reopen a course by extending the course End Date. However, this will allow all students enrolled that term to revisit the course.
Note: You may not be able to extend the course date if you have previously changed the settings to Participation: Course and the new end date has already passed. If the course is still considered active, you should be able to update this setting. If the course end date appears grayed out, please fill out the Incomplete Student Access form for assistance.
After the section for the Incomplete is created, you may need to alter due dates for the student to complete assignments.
If the student encounters issues after their access has been extended, please direct them to OIT student support.
Request Course Information from the D2L Archive
All D2L for-credit courses with student enrollment dating back to the academic year 2018-19 are stored in an archive maintained by The Office of Academic Innovation and the Office of Information Technology. This archive includes course materials and student data, and will be held for three years from the start of Winter term 2022, when we switched to Canvas.
Purpose of the D2L Archive
Information on student course participation dates and grades must be available for three years to accommodate requests related to incompletes, financial aid applications, transfer credit requests, etc. This data may include: last date of attendance, grades, assignment submissions, and quiz scores if the quiz was associated with a grade item. Discussion participation is difficult to export and should be requested only for specific dates/topics. Comments left with grades will be available if they were left in the Grades feedback area.
Note: students must contact the course instructor or program chair to request these materials.
Instructors may request materials for promotion and tenure needs, provided the request is for specific course materials by title. Broadly scoped requests for “all student submissions,” etc. are not feasible.
Instructors may request to have archived courses transferred to a Canvas shell. These will not include student materials, and the course may not reflect the original design but will include most original course files and materials (some D2L quiz questions libraries and most LTI integrated materials will not be available).
How to request available materials
Faculty or program chairs can request archived materials by contacting OAI Faculty Support with the details below:
- Your full name and Odin username.
- The course subject code (your department/program acronym as found here): https://www.pdx.edu/materials-management/campus-mail-codes
- The course level number.
- If the course was cross-listed in D2L (either by subject or level, as with some 400/500 courses) please list both department codes and/or course level numbers. Please specify that you need the crosslisted version of the course.
- The course section number/code. This is important to include, so please check Banweb or your syllabus from that term to make sure you request the right section.
- For student data, the student’s name and Odin username, and a detailed description of the data needed.
This article was last updated on .
Add a non-credit student with a Provisional Account
PSU non-credit students are not issued standard Odin accounts. Instead, they create a Provisional Account using a personal email address. The steps for this are:
- The student visits https://oam.pdx.edu/provisional/register/
- They enter a personal email account that does not end in pdx.edu.
- A confirmation email is sent requesting a password.
- Once the password is accepted, the student can login to Canvas. No courses will appear on the Dashboard yet.
- Lastly, the student must send their account email address to each non-credit instructor. Instructors can then manually enroll the student.
For instructors, adding non-credit students is similar to adding a matriculated student, with one important difference. These students’ email addresses are stored in Canvas as a Login ID. To enroll a non-credit student:
- From your Canvas course, select the People option in course navigation.
- Select the +People button in the upper right corner.
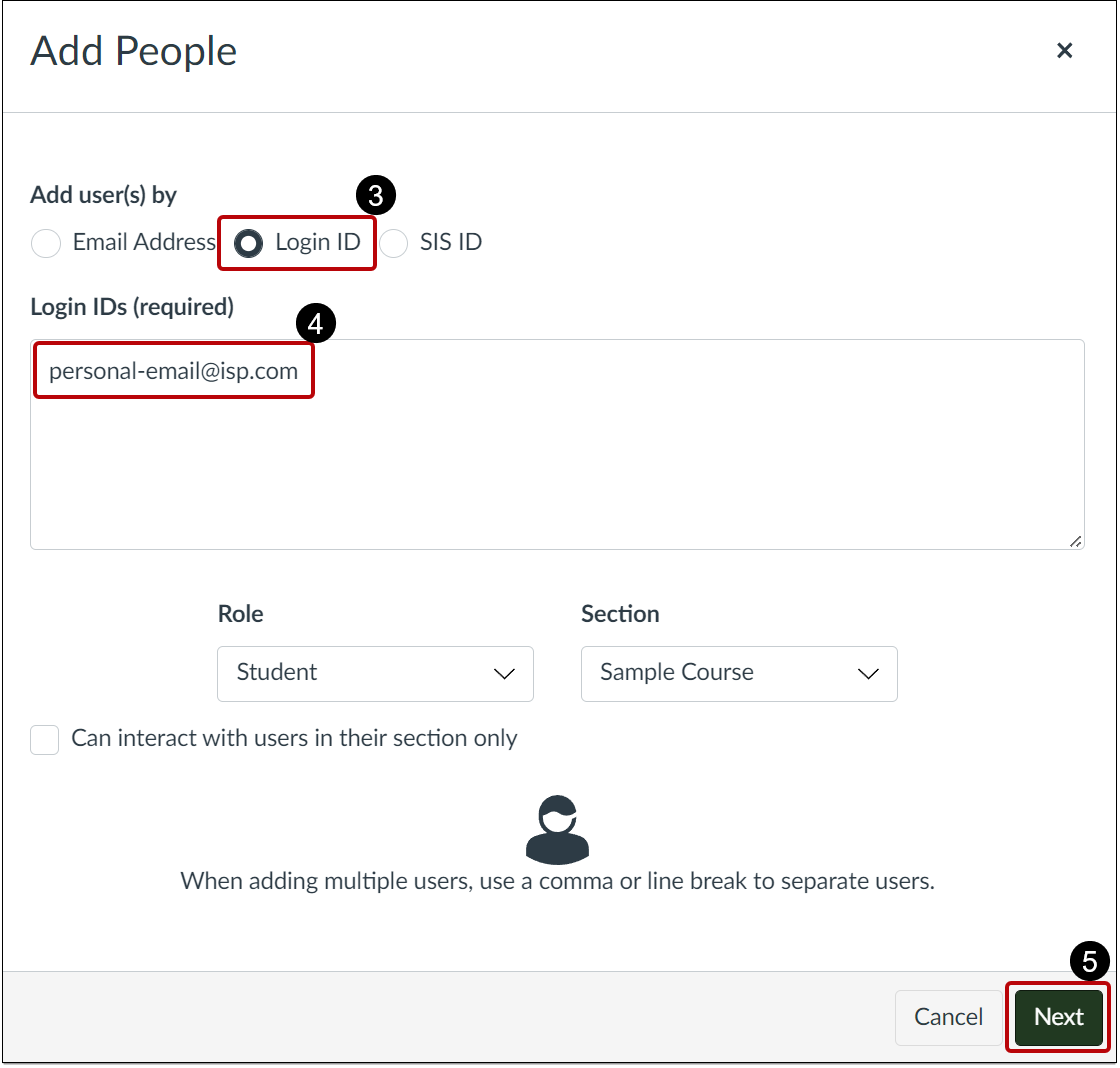
- In the Add People window, select Login ID (this will deselect the Email Address option).
- Enter the personal email address supplied by the student. You can enter multiple addresses separated by commas.
- Select the Next button.
- If the Canvas account is found, select Add Users to invite the student. You may also want to send a separate message to each student letting them know they’ve been enrolled and should see an invitation on their Canvas Dashboard.
- If the Canvas account is not found, alert the student.
This article was last updated on .
Add your syllabus to a module and link it to your homepage
For instructions on using the Syllabus tool in Canvas, see How do I use the Syllabus as an instructor? The instructions below show the “Homepage 2 (minimal information with tool links)” available on Canvas Commons.
Upload your syllabus file to a module
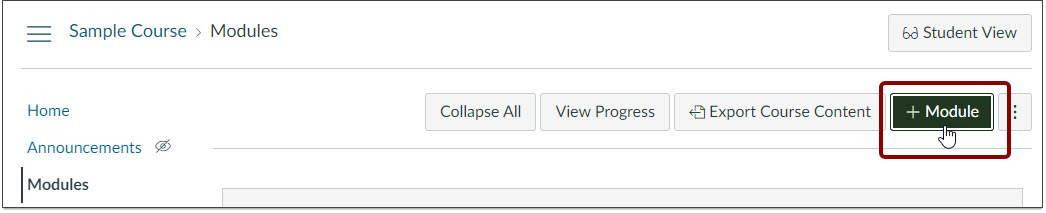
- Select Modules in the course navigation.

- Select the + Module button.
- Name the module and select the Add Module button.
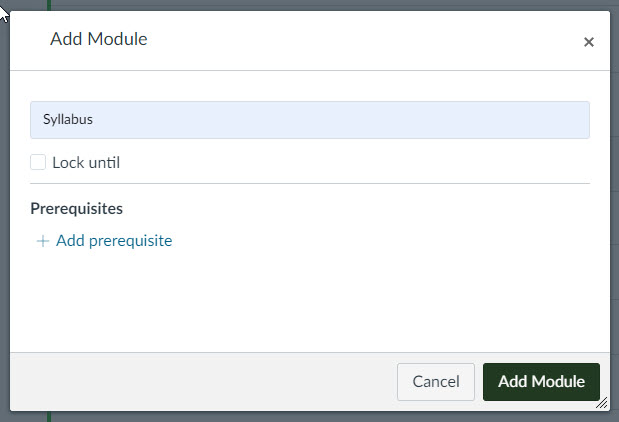
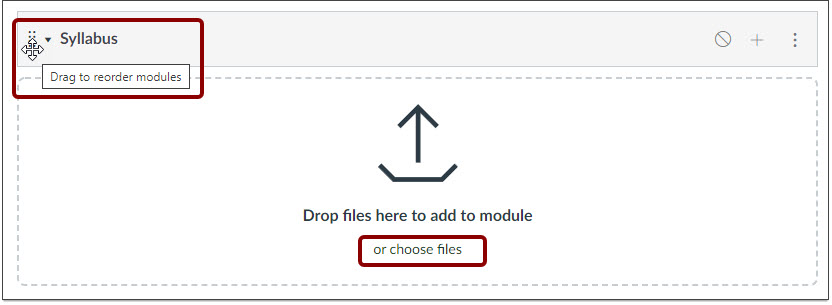
- New modules are added to the bottom of your module list. You can drag it up using the 6-dot grid in the upper left corner.
In a new module, you can upload files quickly by selecting the Drop files here… area. This opens your computer file directory.
- To add to an existing module, select the + icon to the right of the module heading.

- In the Add item menu, select the menu first labeled Assignments to view the full menu. Select File.
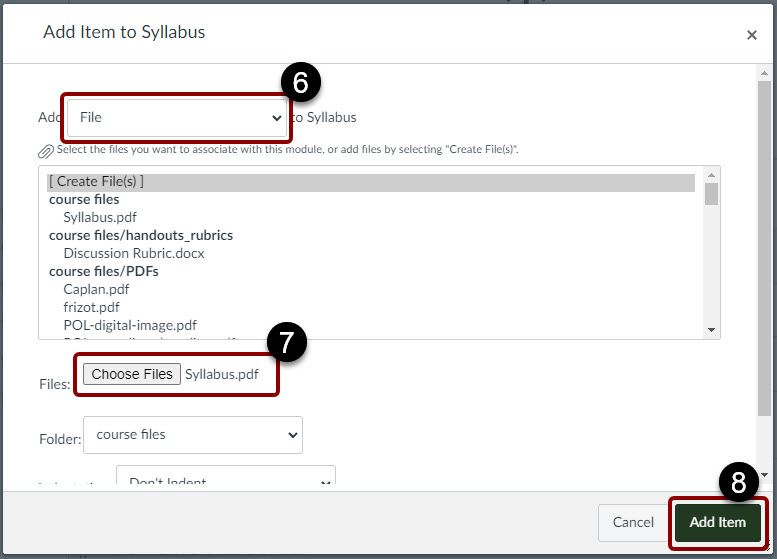
- Your computer’s file directory will open. Select the syllabus file.
- Select the Add Item button to insert the syllabus file in this module.
- In your modules list, publish both the module and the file by selecting each empty circle to make them green check-marks.

Link your uploaded syllabus file to your home page
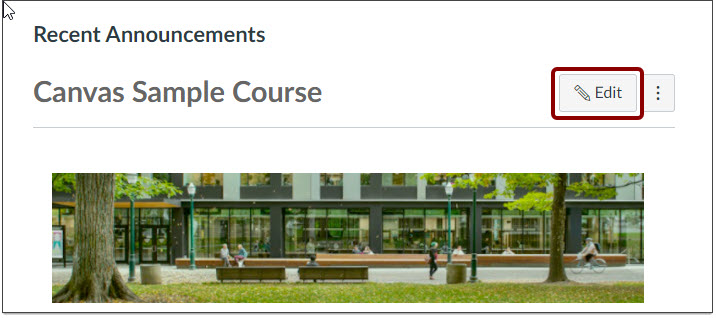
- On your home page, select the Edit button in the upper right corner.
- Scroll down in the edit window or drag it from the lower-right corner to resize.
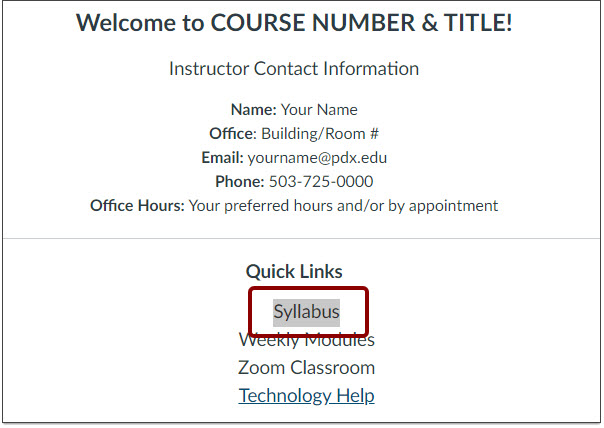
- Position your cursor at the beginning or end of “Syllabus,” click and drag to highlight the word.
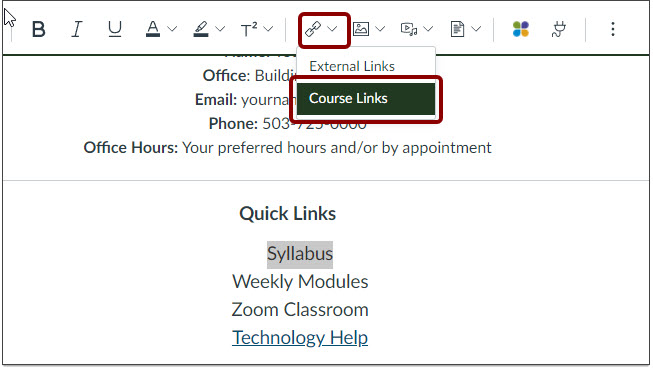
- In the top menubar of the editor, find the Link icon and select the “down” carat on the right. Then select Course Links.
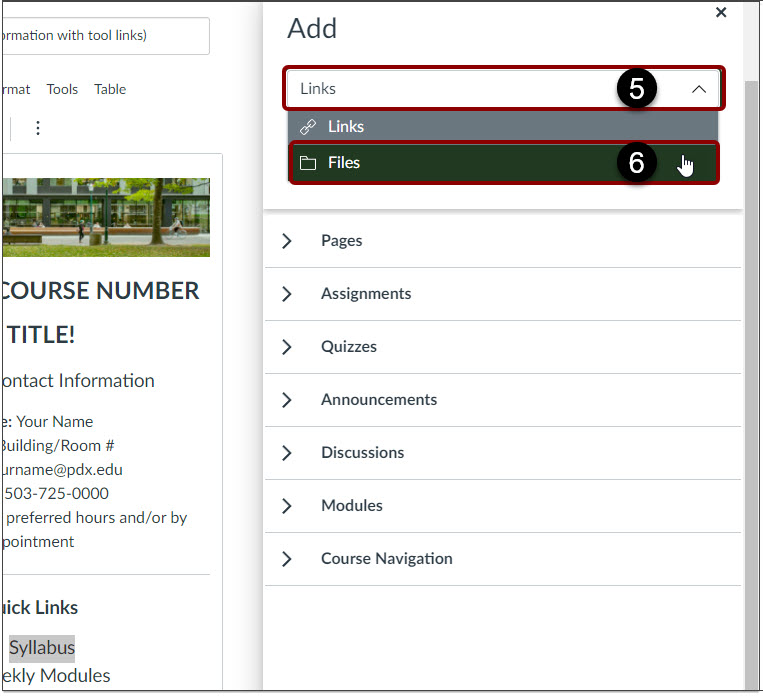
- In the Add menu, select the top menu labeled Links to open it.
- Select Files.
- In the Files area, select the Course Files directory and find your syllabus file. Click the syllabus file once. (Double-clicking will add two links.)
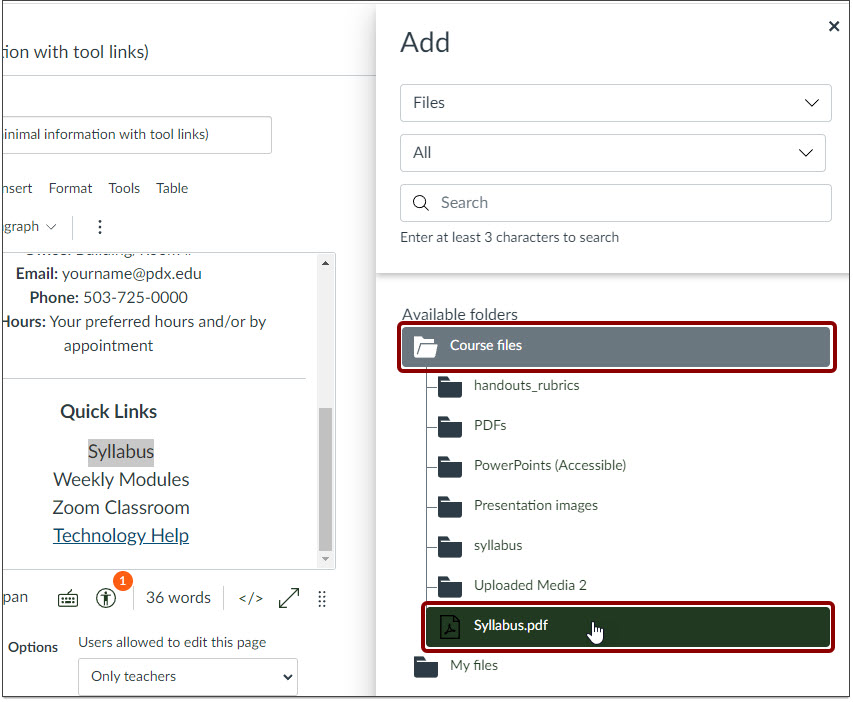
- The “Syllabus” text on this page will now link directly to that file. (Alternatively, you could link to the module containing the syllabus.) Select the Home page Save button.


- To add more quick links, repeat these steps.
Note: for the Weekly Modules quick link, select the top module to display the full list.
Note: to link directly to your Zoom meeting, first go to the Zoom area, select the meeting and copy the meeting URL to your clipboard. Then repeat the steps above but select External links instead of Course links. Enter the Zoom meeting URL and Save.
This article was last updated on .