
Schedule a Meeting in Canvas
If you teach in Canvas we recommend scheduling your course Zoom Meetings from Canvas. Doing so automatically creates course meeting and recording links for your students. The Canvas scheduler has abbreviated settings, however. To access security preferences and other advanced functions, log into pdx.zoom.us. Only Canvas users with the Teacher or TA roles may schedule Zoom meetings in Canvas.
If you record a meeting, the Zoom Cloud recording link will appear shortly after the meeting ends. These are hosted by Zoom and expire after 90 days. Zoom recordings in your account will also be saved to your My Media account in MediaSpace (if you have activated it by logging in at least once).
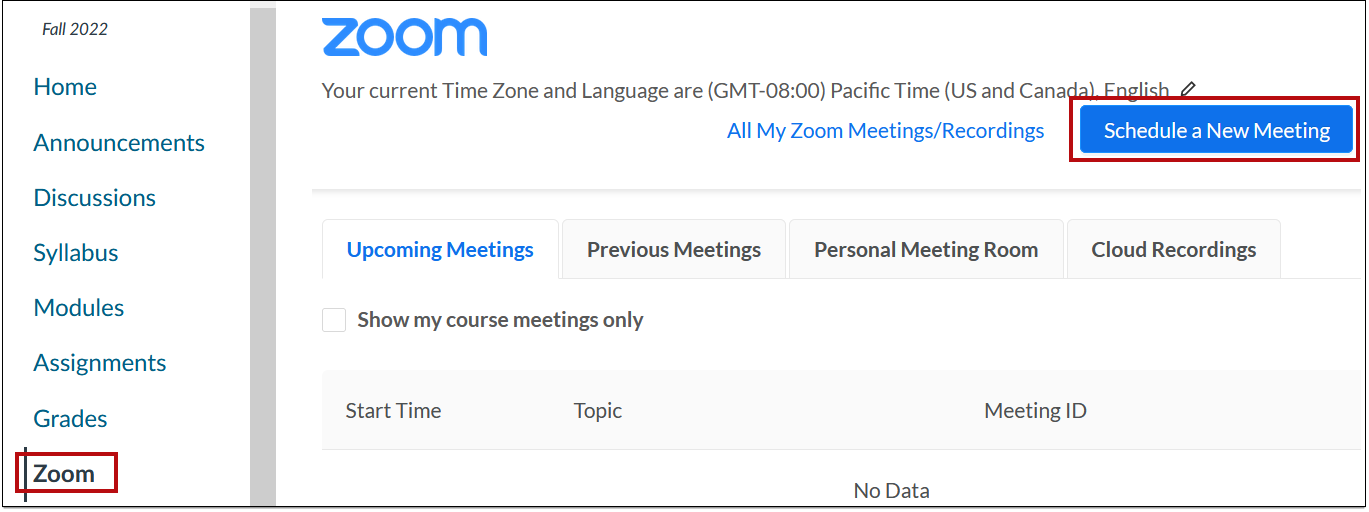
- In Canvas, select Zoom from the navigation menu. Authorize Canvas to access your Zoom account if you have not already done so.
- Select the blue Schedule a New Meeting button in the upper-right corner
- Enter meeting details:
- Topic: enter a descriptive title. This is helpful for finding recorded meetings in your MediaSpace My Media list.
- Description (optional): Enter an optional meeting description.
- When: select a date and time for the meeting to start.
- Duration: enter your planned duration. This will not cut off the meeting if you run over.
- Time Zone: confirm or select the correct timezone.
- Recurring Meeting: select this option to create a recurring meeting. Once selected, you’ll have the option to choose how often the meeting recurs, and when to stop repeating. Each occurrence will be listed in Canvas, but they will use the same meeting URL. You can edit a specific session of a recurring meeting if needed.
- Registration: select if you need detailed attendee information from external guests.
- Security: options are Passcode, Waiting room, and Only authenticated users can join meetings. Passcodes are easily shared, so we recommend activating a waiting room and/or requiring PSU authentication.
For non-PSU attendees, you can select Sign in to Zoom and Add Authentication Exception. This registers your guest's email address. They must sign in to the meeting with the Zoom account associated with the email address entered. This can be a free, noncommercial account. - Video: choose whether you, the meeting host, and participants will join the meeting with video enabled or disabled.
- Audio: to accommodate students with limited internet access select Telephone and Computer Audio.
- Meeting Options: Recommended settings for class sessions:
- Do not enable Join before host.
- For large classes, select Mute participants on entry.
- For easier name recognition, you may want to Allow host to save video order.
- If you have set up assigned breakout rooms in your Zoom settings, select Breakout Room pre-assign.
- Do not select Use Personal Meeting ID unless you want guests to have ongoing access to your personal meeting link.
- Select Record the meeting automatically in the cloud to share a recording link with students.
This article was last updated on .
Allow Non-PSU Guest Access to Your Zoom Meeting
The global setting for your PSU Zoom account should always be set to require PSU authentication. This ensures that meeting guests will have full access to Zoom features like breakout room pre-assignment. When students are able to join with any Zoom account, they can unintentionally log in with a personal account and be excluded from necessary Zoom features. Instructions on allowing a non-PSU guest into a meeting are below.
Limit meetings to authenticated users
- Sign in to the Zoom web portal at zoom.pdx.us
- Schedule a meeting.
- In Settings, select the Meetings tab and scroll down to Require authentication to join. Select the toggle button so it is on (blue).

- Below this toggle button, check to see if Signed in with a Portland State account (Odin) is your current default setting. If it is not, select Edit.
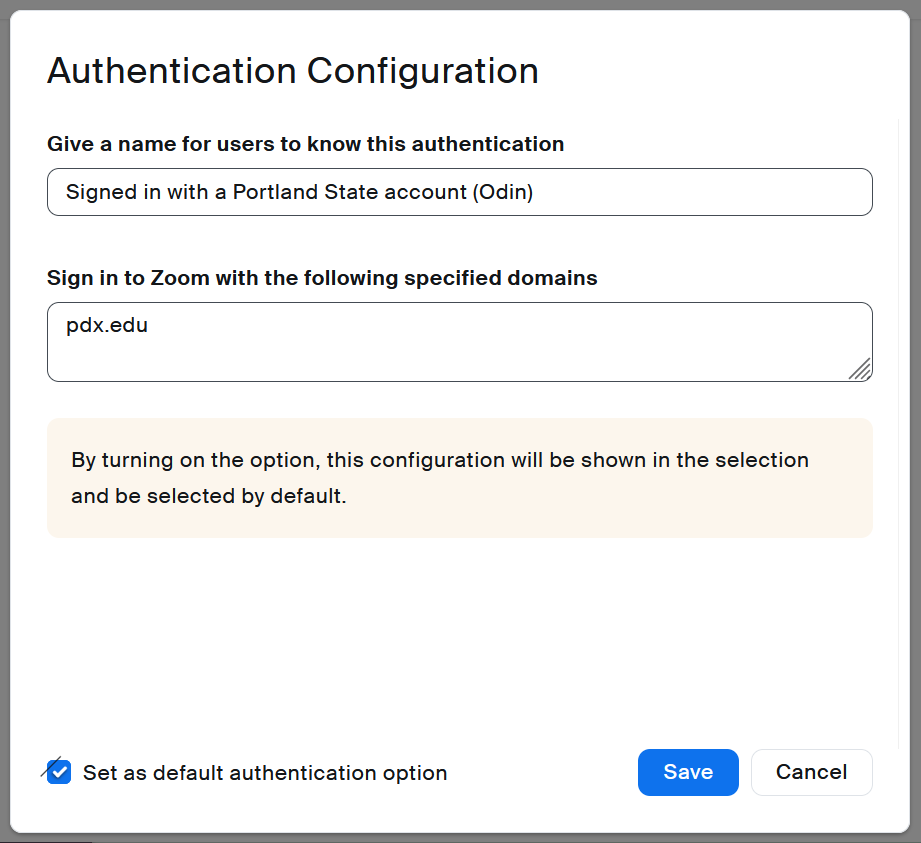
- Select the checkbox to Set as default authentication option.
- Select Save.
In the past, allowing a non-PSU guest into your meeting required you to temporarily change your settings to allow anyone with a Zoom account to join. This creates a security risk. The new security standard is to create an authentication exception for a specific non-PSU guest. You can add authentication exceptions to a single meeting, all instances of a recurring meeting, or a single instance of a recurring meeting.
Note: You can’t add authentication exceptions to meetings that use your personal meeting ID. You must select “generate a meeting ID automatically.”
Add a non-PSU guest to a new meeting
- Sign in to the Zoom web portal.
- Schedule a meeting.
- Under Meeting ID, select Generate Automatically.
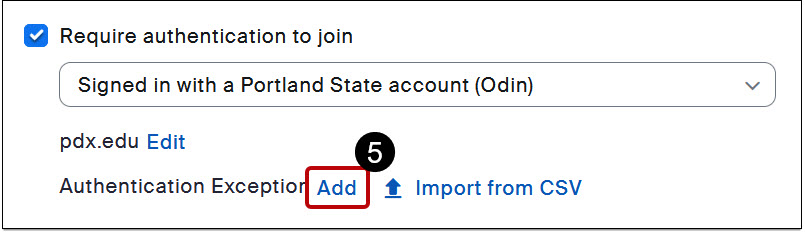
- Under Security, select the check box next to Require authentication to join.
- Next to Authentication Exception, click Add.
- Enter the guest participant’s name and email address.
(Optional) Click Add Participant to add more exceptions.
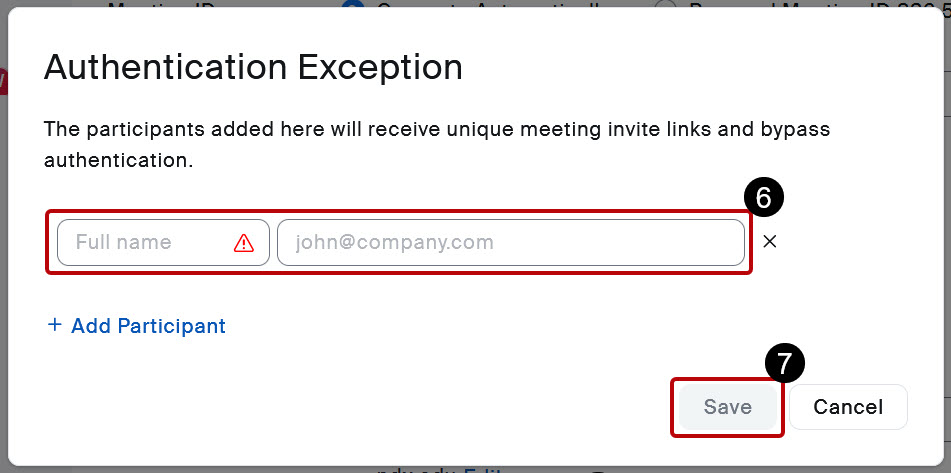
- Click Save.
- Choose your other meeting settings, then click Save to schedule the meeting.
Add to an existing meeting
- Sign in to the Zoom web portal.
- In the navigation menu, click Meetings.
- Locate the meeting you want to add an authentication exception to, then click Edit.
- In the Edit Recurring Meeting dialog, click either Edit This Occurrence or Edit All Occurrences.
- Next to Authentication Exception, click Add.
- Click Add Participant.
- Enter the guest participant’s name and email address.
(Optional) Click Add Participant to add more exceptions. - Click Save.
- Modify any other meeting settings as needed, then click Save.