

People: Student Inactive and Observer Roles
At the beginning of term you may see two new student designations in your People course roster.
- Inactive. This means the student has withdrawn from the class after the start of term. You can “conclude” their enrollment (see the tutorial for this), but we strongly advise leaving inactive students in your roster if they’ve submitted any coursework. If a student uses financial aid or the GI Bill, they may need to request a record of their enrollment and activity in your course, even after they’ve dropped it.
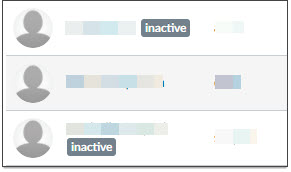
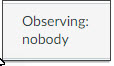
- Observing: nobody. This means the student is waitlisted and has “read only” access to the course. As in the classroom, students trying to get into a waitlisted class need to keep up with course activity during the add/drop period in case they get in. When that period is over, students not admitted will no longer be in your roster with this role.
This article was last updated on .

Add media to Canvas
Media maybe added to a Canvas in several ways, depending on the source and how you want it displayed. When sharing media from Kaltura MediaSpace you must publish that file to unlisted rather than private.
Important: options 1 & 2 below are for uploading or recording media directly in Canvas. This should be done only for short video or audio files, such as feedback or a brief announcement. Any media longer than a minute or two should be hosted in MediaSpace. Even if a large media file uploads to Canvas successfully, students will likely have problems with playback.
For longer media files, first upload them to your MediaSpace account and then use options 3, 4, 5, or the Kaltura LTI option.
- Upload a media file to play in a Canvas page.
- Record a media file to play in a Canvas page.
- Link to an external media source in the Rich Content Editor (note that the YouTube “App” option is not available).
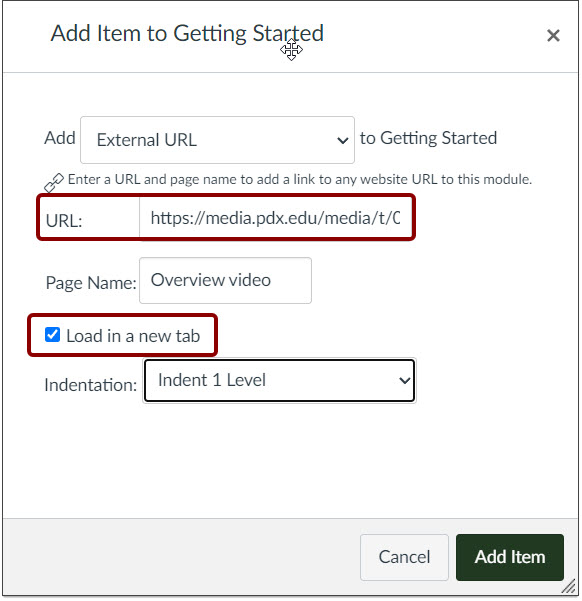
- Link to an external media source from a Module.
Note: for MediaSpace files and most other media hosts, select the “Load in a new tab” checkbox.
- Embed external media by inserting embed code into the Rich Content Editor. (This works for MediaSpace videos with the same results as the next option).
Embed a MediaSpace video or audio with the Kaltura LTI menu option
- In your course, navigate to the Rich Content Editor (editable text box) or page or tool (quiz, assignment, etc) where you want to embed audio or video (make sure the file is published to unlisted).
- In the top toolbar of the Rich Content Editor, select the Apps icon (an electrical plug) and select Embed Kaltura Media.
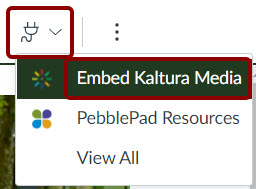
- Search for the media file you want, position your cursor in the Rich Content Editor where you want the media, and select the blue </>Embed button.
- Save and publish your page, quiz, assignment, or discussion.
Note: the Kaltura Media Gallery option is not recommended for use in Canvas. Kaltura Video Quizzes may be used, but because browser settings can prevent some students from being assessed, it’s not recommended as a graded activity.
This article was last updated on .

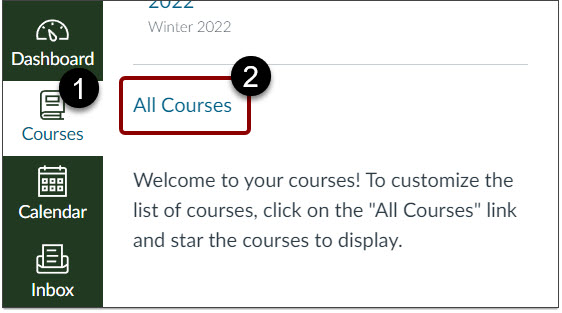
Select courses to show or hide on your Dashboard
- Select Courses in the left Global navigation (green vertical bar).
- Select All Courses.
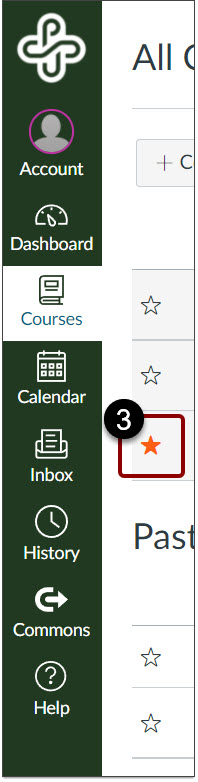
- Select the star icon for each course you want to show. Deselect the star icon for any course you don’t want to show.
- Return by selecting Dashboard in the global navigation bar.
If you are unable to star a course: - Open the course and make sure it’s published.
- Go to Settings and set the Participation menu to Course.
- Set an End date for the course that’s in the future, beyond your current need for it on the Dashboard.
Note: leaving the End date empty isn’t an option — this makes the original term End date active by default.
This article was last updated on .
Add PSU Canvas users to your course
You can add anyone with a Odin ID to your Canvas course, as long as it is published and doesn’t have an End date in the past. If the course is concluded and you can’t add anyone, see How Do I change the start and end dates for a course.
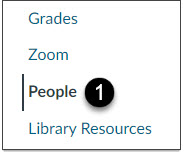
- In Course Navigation, click the People link.
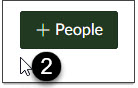
- In the upper right corner of the class list, select the +People button.
- Enter the PSU email address of the person you want to add. To add multiple users, enter their email addresses on a single line separated by commas.
- In the Role drop-down menu, assign the user(s) role.
- If necessary, assign the user(s) a course section. When adding multiple users at once, only one role and section can be assigned.
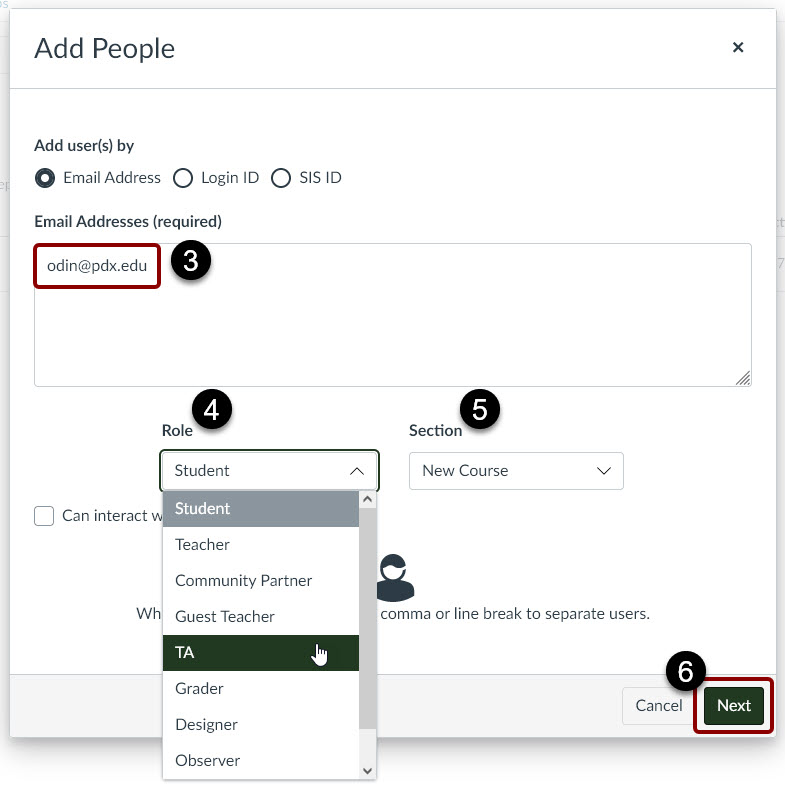
- Select Next.
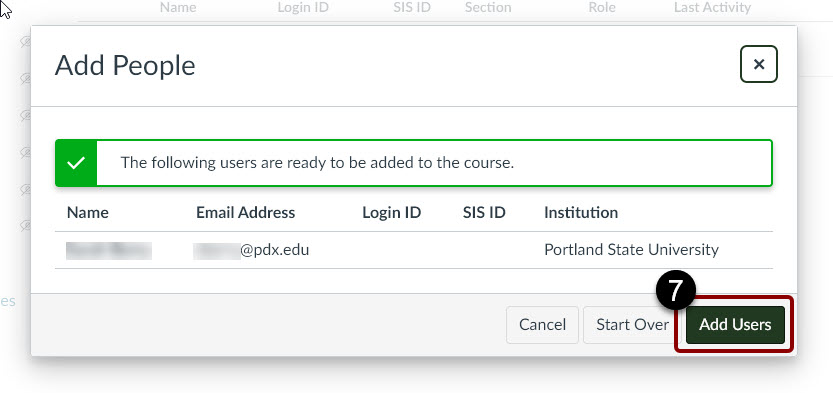
- If located, the user’s name displays. Select Add Users to finish.
This article was last updated on .

Copy or send items to a Canvas Course
Copy or send a course item to another Canvas course
Every Canvas index page (list of items in Modules, Assignments, Discussions, Pages, etc.) gives you the option to “push” a copy of an item to a different Canvas course in your account, or send it to another Canvas user at PSU. These options are found in the 3-dot menu to the right of the items listed. The example below is from the Modules index, but the Copy To… and Send To… options are the same in each area.
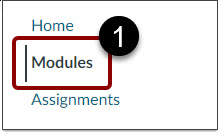
- In the course you want to copy materials from, select Modules from the left navigation menu.
- On the right side of the list, select the three vertical dots aligned with the item you want to copy.
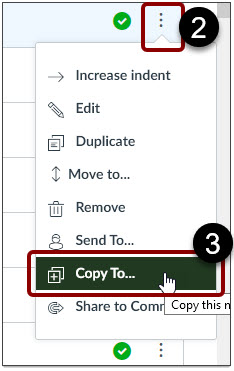
- Select the Copy To… menu item.
- Select the course you want to copy this item to. You can also select a specific module to copy it into.
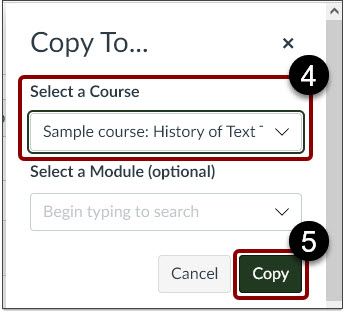
- Select Copy.
Note: if you copy the same material twice without changing the filename, the first copy will be overwritten.

Log in to Canvas
Log in to Canvas at Portland State by navigating to canvas.pdx.edu. You will be prompted to authenticate with your PSU Odin name and password.
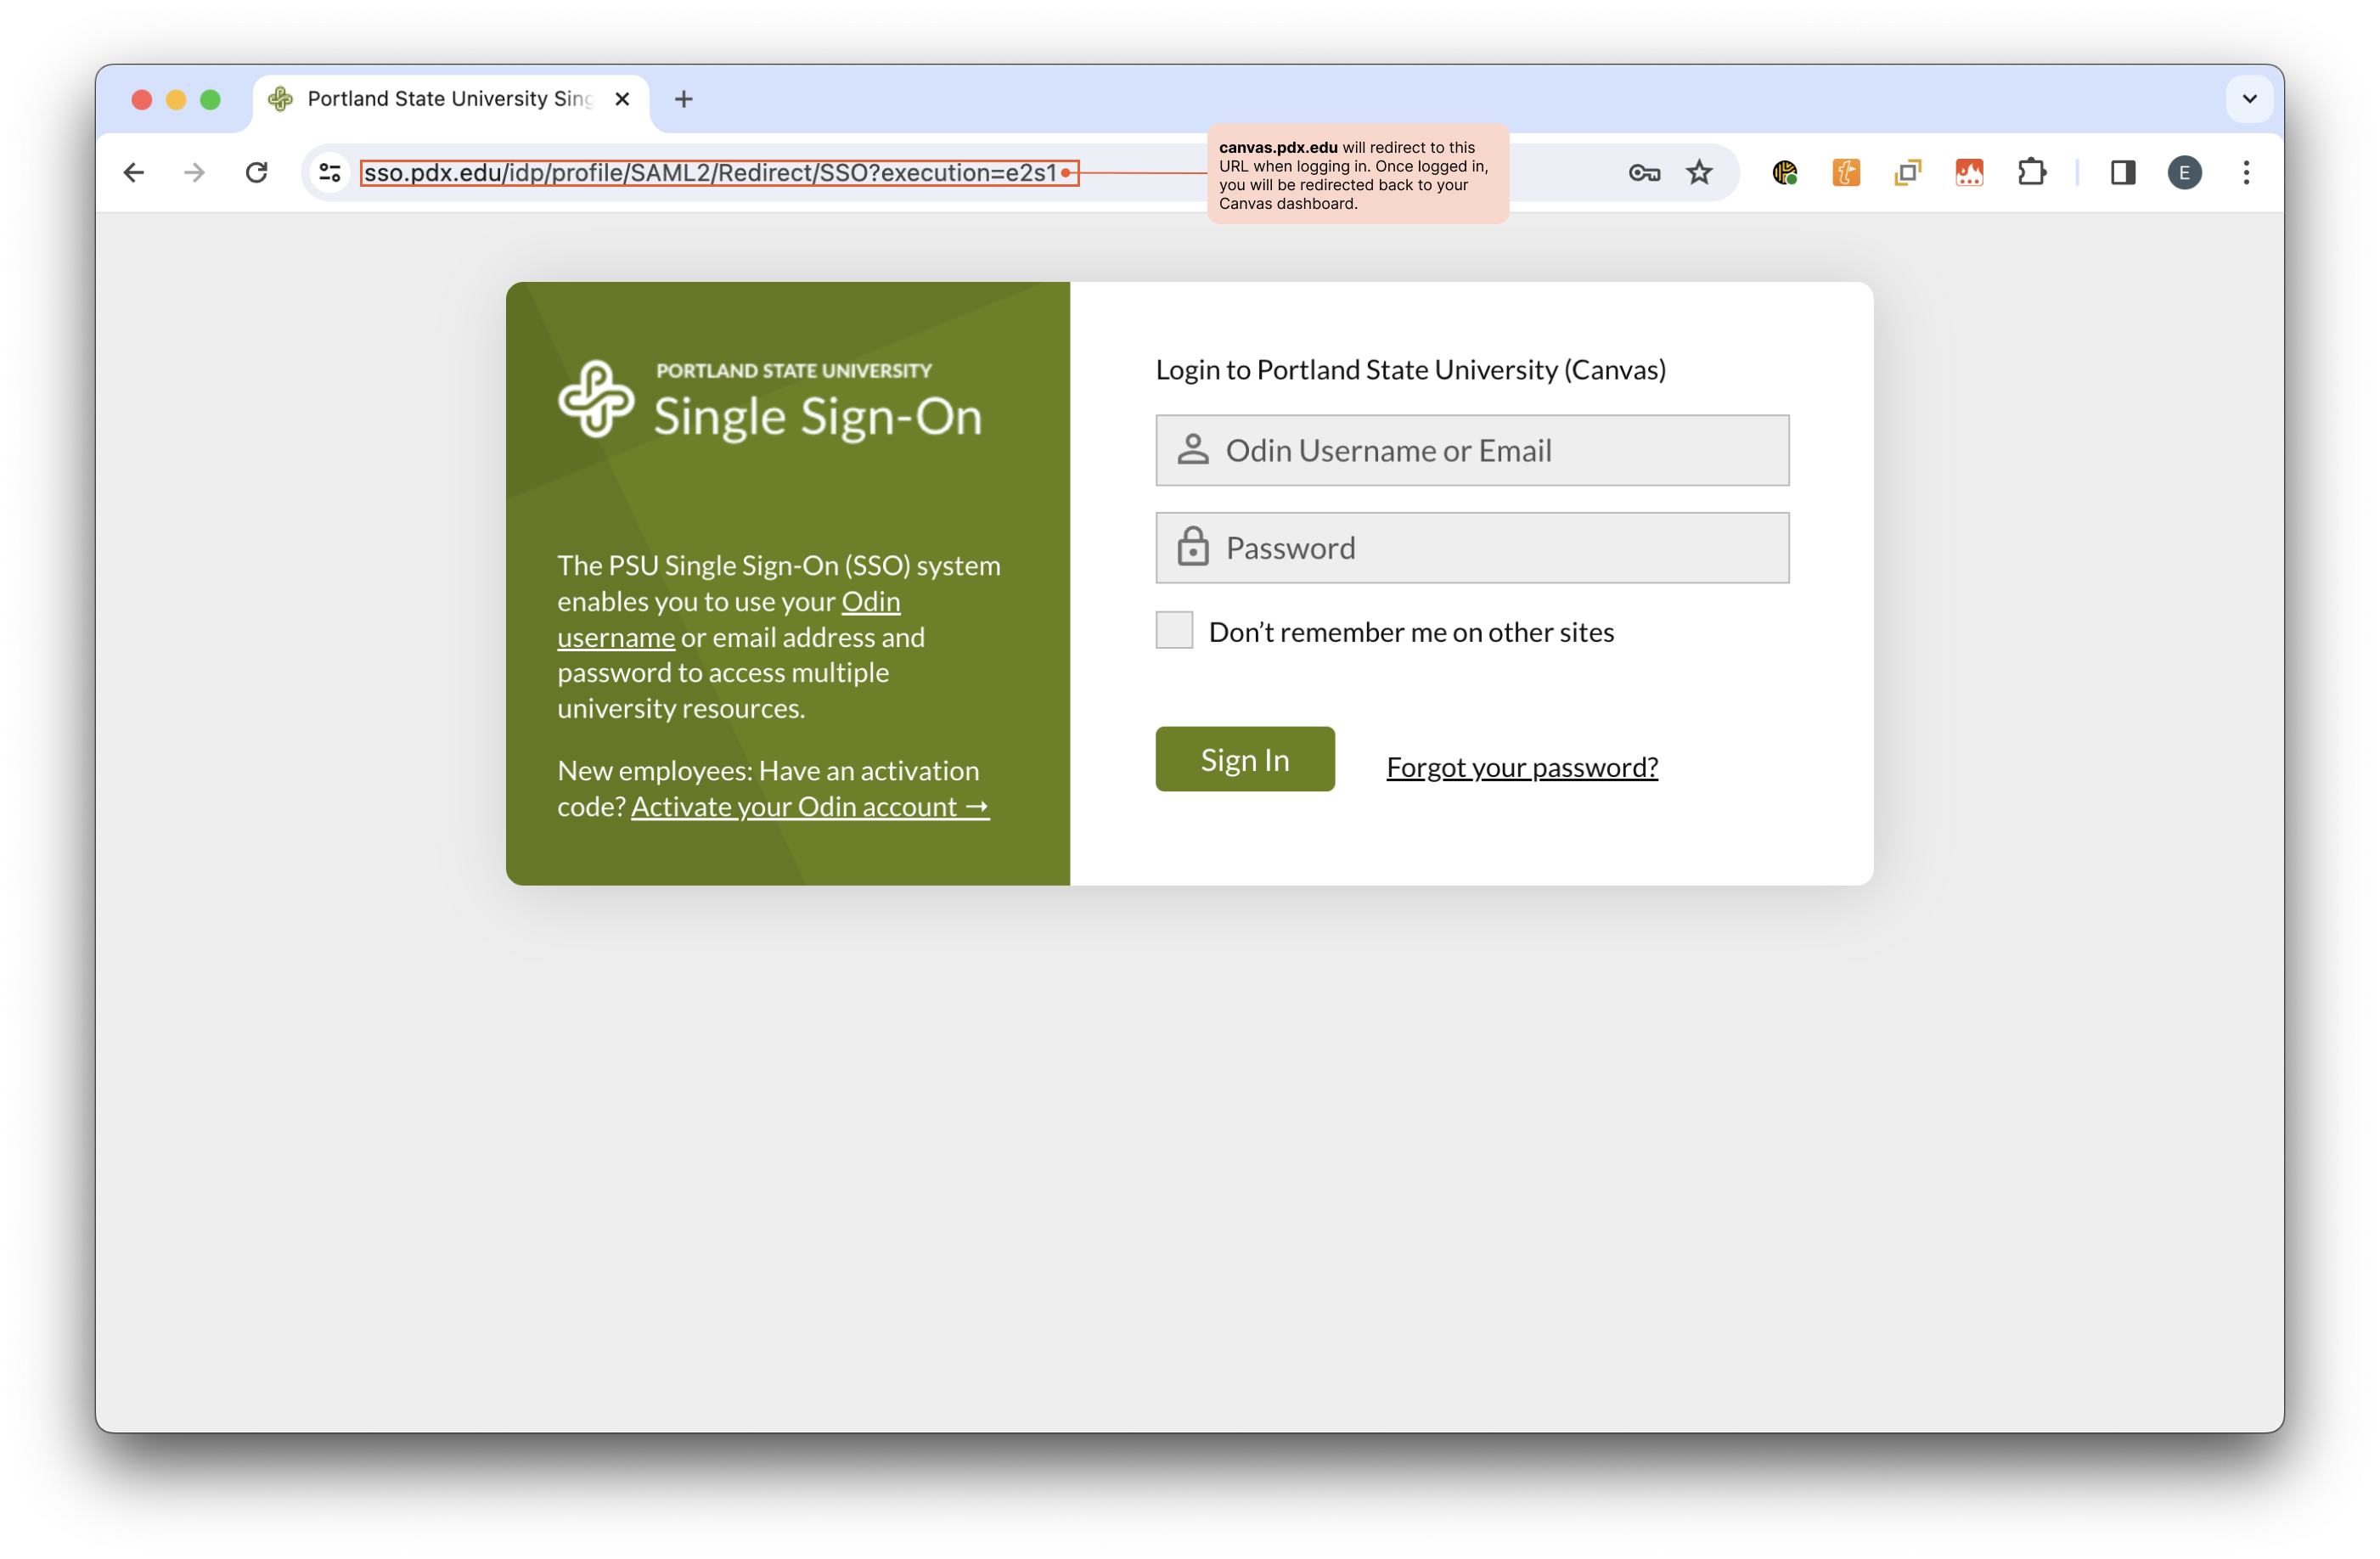
Note: When logging in, you will be prompted to complete Duo Two-Factor Authentication. For additional information, please refer to OIT’s resource on Duo Two-Factor Authentication.
Use Google Docs for Student Collaboration
When students work in groups for an activity, you’ll often want them to document their work. You can facilitate this by creating shared Google Docs for students to use.
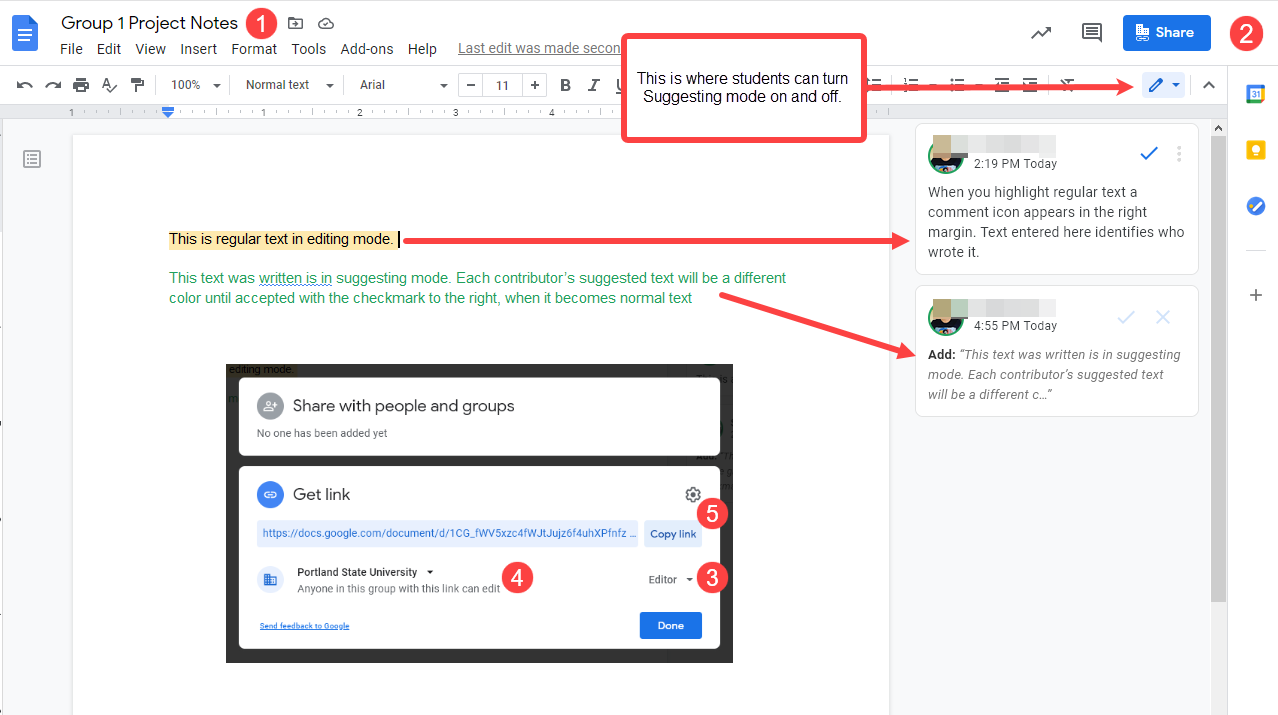
There are two ways to identify each collaborator in a Google Doc. One is to have students write in suggesting mode, which creates colored text and names each author in the margin. Edits are shown with strike-through text. This option is selected in the small menu with a pencil icon located in the upper right corner of the open Google Doc screen.
Another method is to have students use comments to annotate the main text. Comments are made by highlighting a portion of text. This creates an icon in the right margin, which becomes a text-entry field when you click it. Comments are identified by author, and others can reply. Comments that include @StudentUsername will also send an email of the comment to the person named, which is helpful for asynchronous collaboration.
Steps to set up docs and sharing permission
- Create and name a Google doc for each student group.
- For each doc, click the blue Share button in the top right corner.
- In the Get link area of the share pop-up, click View and change it to Edit.
- From the sharing menu, select Portland State…anyone in this group with this link can edit.
- Copy each document link and save them in your class prep notes, labeled with the group name/number.
You can now post the doc links for students in Canvas, or share them in the chat of a Zoom meeting. Clarify for students whether you want them to identify each collaborator’s work, and whether they should use suggesting mode or comments for this. You can also share this tutorial with them. As owner of the docs, you can always change the sharing settings later to prevent further work in them.
Google Docs auto-saves regularly, and past versions can be viewed and restored. Nevertheless it’s good to remind students to save a local copy of any text they don’t want accidentally changed or deleted. For more information, check out Google’s support site for Google Docs.
Zoom Recording and Student Privacy
You may have Zoom class recordings you’d like to share with students in a subsequent class. This is possible under FERPA as long as no students from your earlier class appear in the recording. There are two ways to avoid recording students in Zoom. These depend on whether you record to the Zoom Cloud or locally to your computer.
Note: to control a meeting’s recorded layout, you must be the host or participant who starts the recording. You should also make sure your Zoom desktop client is up-to-date. Check for updates by clicking your profile image in the upper right corner of the Zoom desktop app. Toward the bottom of that menu, select Updates.
For Zoom Cloud recordings
For recording to the cloud, use the “Spotlight” option. This lets you choose up to 9 participants to appear in the recording, so it’s great for when you have guest speakers. Learn more about the Spotlight option in the Zoom Help Center. For student discussions, you can either pause the recording or use breakout rooms. You can also edit out student discussion segments from the recording later, by uploading it to MediaSpace. Once you’ve logged into your Kaltura MediaSpace at least once (at https://media.pdx.edu/ ) all your Zoom Cloud recordings are backed up there. This makes it convenient to use the MediaSpace video editor.
For local recordings
If you record locally to your computer, the “Pin” function allows you to select specific video thumbnails to display. Other participants may see the full gallery, but your recording will show only the video(s) you pin. Learn more about the Pin options in the Zoom Help Center. You’ll still need to pause recording for student discussions, move them to a breakout room, or edit them out later.
The Zoom Help Center also has a FAQ list about local and cloud recording layouts.
Recorded videos are most effective when short, so look for key presentations, demonstrations, or explanations to share in later courses rather than following a “lecture capture” model.
This article was last updated on .
Share Zoom Recordings
When you set a Zoom Cloud recording settings to Share, it generates a link you can make public or restrict to PSU users.
- Sign in to your Zoom web portal at pdx.zoom.us
In the navigation menu on the left, click Recordings.
Click the Share button on the right of the recording you want to make available.

- This displays setting options:
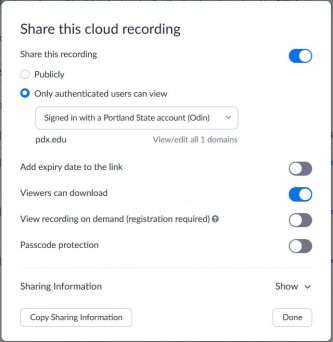
- Share this recording: Allows the recording to be shared publicly or internally. Switch the toggle off if you want the recording to be private. If you share the recording, Zoom will create a web page where visitors can view the cloud recording.
Add expiry date to the link: Allows you to set number of days or specific date when the link will expire for viewers.
Viewers can download: Allows viewers to download the video in addition to viewing it online.
Viewers can see transcript: Allows viewers to see the auto transcript if Zoom was able to process one.
On-demand(Registration Required): Requires users to enter their name and email address before viewing or downloading the recording. The host will be able to download a report with this information.
Password protection: Requires users to enter a password before viewing or downloading the recording. After toggling this to on, enter a custom password and click Save.
Copy sharing information to clipboard: Copies the link and password (if enabled) to your cloud recording. Share this information to allow others to view the cloud recording. - Click Done to save these settings.
This article was last updated on .
Change Your Zoom Display Name and Add Pronouns
You can change your preferred name and add accurate pronouns to your Zoom display name manually in your Zoom profile settings.
To do this,
- Log in to your PSU Zoom account at https://pdx.zoom.us/
- Select Profile in the left navigation panel
- In the upper right corner, click the small blue Edit link to update your profile data
- In the First Name and Last Name fields, update your name(s). In the Display Name field, make the same adjustments and add your preferred pronouns.
- Click Save Changes.
In addition, it’s possible to change other PSU system display names, but this is inconsistent across platforms. See the Registrar’s First Name Override option information to get started.
This article was last updated on .