
Remove Video From a Channel
- Browse to your name > My Channels from the upper right corner.
- Click on the channel you want to manage.
- Find the video in the list, and click the “+” symbol beneath the title.
- Click Remove.
- Confirm Remove in the pop-up window.
This article was last updated on .

Change Channel Owner
The user who creates a channel is automatically the owner. There is only ever one owner. However, ownership can be transferred to another user. For co-management of a channel by multiple users, the Manager role is used.
- Click on your name > My Channels from the upper right corner.
- Under the channel name, click the Edit link.
- Click the Members tab at the top of the page.
- Find the member in the list to whom you want to transfer ownership.
- In the Actions column, click the Set as Owner Link for that member.
- Click Yes when you see the pop up message:
“Only one owner can be assigned. This change will make the selected user the new owner and you will be set as a manger for this channel. Would you like to proceed?”
NOTE: You are now a channel manager, and no longer own the channel.
This article was last updated on .

Upload video or other media to a channel
Upload video or other media to a channel
Use these instructions to upload a video, audio file or image directly to a channel. For private materials that you don’t want to publish, upload to My Media and adjust individual media permissions as needed.
You will need to create a channel before you can upload media to that channel.
- Log in to MediaSpace at media.pdx.edu .
- Select your name and then select My Channels from the upper right corner.
- Select a channel.
- Select the + Add To Channel button.
- Select Add New (1) and then select Media Upload (2)
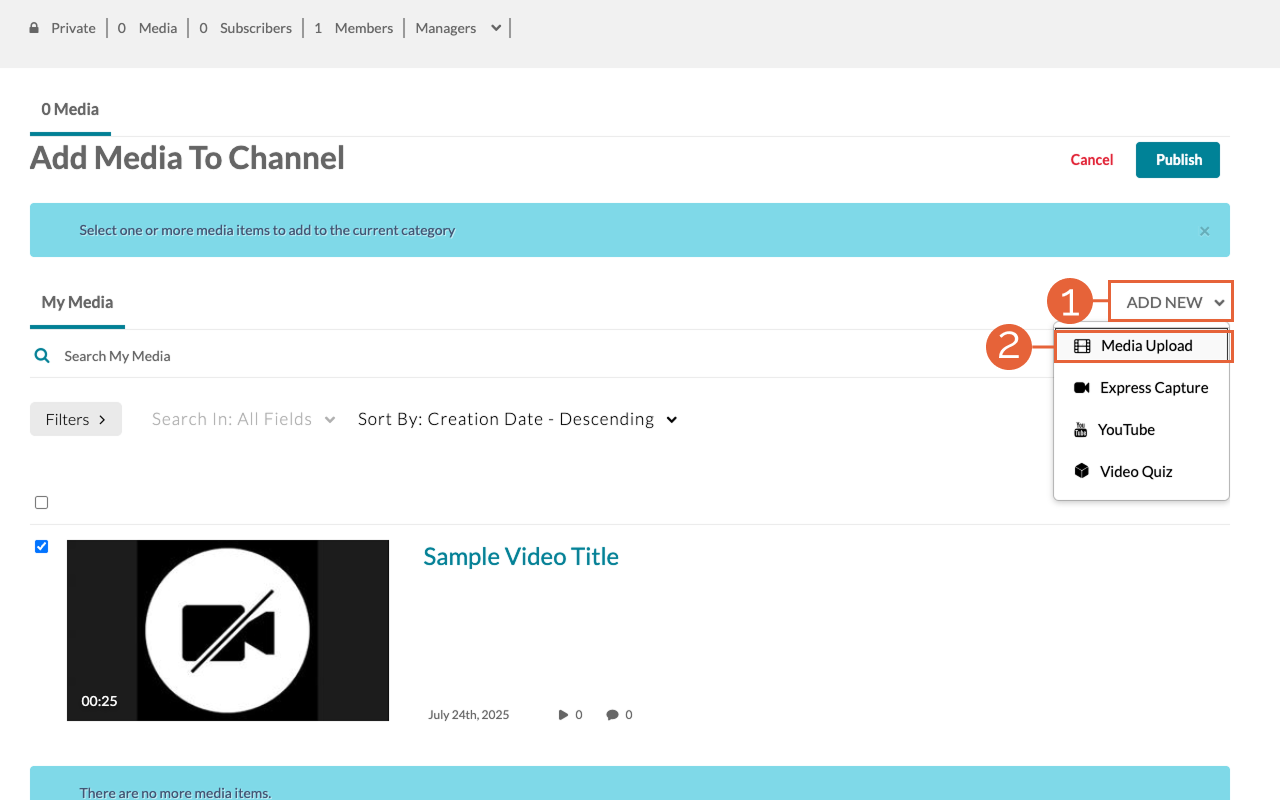
- Read the notice and check the box to agree to terms and conditions for PSU’s copyright policy.
- Select the Choose a file to upload button.
- Find your video and select add or open.
- Once the upload completes, enter a Name for the media.
- Enter a brief Description as needed.
- Optionally, enter Tags. Tags are not required, but can make searching for your media easier.
- Select Save.
- Select Go To Media, and make sure everything looks ok.
This article was last updated .

Create a New Portfolio
Create a New Portfolio in Pebblepad
A Pebble+ portfolio is made of a collection of pages, images, and other assets that tell a story about you and the work that you do. Combine existing assets or start from scratch to make your portfolio.
Note: Editing and adding content within a portfolio page is just like working on any page in Pebble+, so it's not covered here. If you need help, check out our additional tutorials, or use the Help button in the lower right corner of any Pebble+ page.
Create a Portfolio
- Log into PebblePad at pebblepad.pdx.edu
- Click on the burger menu (three stacked lines like a hamburger) in the upper left corner of your screen, and click Asset Store from the home page.
Get used to using this menu; it’s the quickest way to jump from place to place in Pebble+.

- Click Get Creative and then Create a portfolio.

Create structure
You have lots of options when it comes to putting the structure of your portfolio together. This section will show you how to create two different structures: Menus that include other assets that expand top to bottom and menus that can be added from left to right.
Top to Bottom
- Click the + (plus) icon on the New page tab.
- Click the Add a new page here or Add an existing asset button to include pages and other assets in the top to bottom menu.
- Once you have your pages added, you can click the gear icon next to each item to rename. Click Confirm.
Left to Right
You can add additional top to bottom menus, starting from the left to right. You can think of each of the top to bottom menus as a mini “portfolio,” organized by topic, or whatever makes sense to you.
- Click the stand-alone + icon to the right of the last portfolio tab.
- Click Add a new page here.
- From here, you can add additional pages in the menu under the new page you just added, following the top to bottom instructions above, or you can just have a single page linked to the navigation bar.
Note: These instructions will only work for brand new portfolios; if you're working with an existing portfolio, settings will vary. Use this as a basic guide, but feel free to try options that aren't described below.
Reuse pages
If you create a page or portfolio within your new portfolio, it’s not automatically available in your asset store. You will need to allow the page to be reused in order for it to be available in your asset store.
- Open your portfolio, and navigate to the page you want to reuse.
- Click the Properties button, from the top right.
- In the Reuse Pages section, check the boxes to include the current page, and/or current portfolio in the asset store.
Note: You're working within a 'portfolio,' but the top to bottom menus we talked about in the last section are also called 'portfolios.' Think about the top to bottom menus as 'sub-portfolios.' These 'sub-portfolios' will only exist as a separate object in your asset store if you follow the steps we just outlined to reuse pages. The same goes for pages that you create directly in a portfolio. Pages you create independent of a portfolio will already be available for reuse in your asset store.
This article was last updated on .

View Video Quiz Scores and Analytics
Once students have taken your quiz, use the following instructions to view results.
- Open My Media from the button in the top right corner.
- Click the video quiz for which you want to view results.
- Click Actions > Analytics.
- From the Dashboard tab, use the column on the right to view a summary of results. The Average Score displays in the General Metrics area on the left of the page.
- Use the Quiz Questions tab to view, print or export results by question.
- Use the Quiz Users tab to view, print or export results by user.
This article was last updated on .
Log in to MediaSpace
Log in to PSU MediaSpace
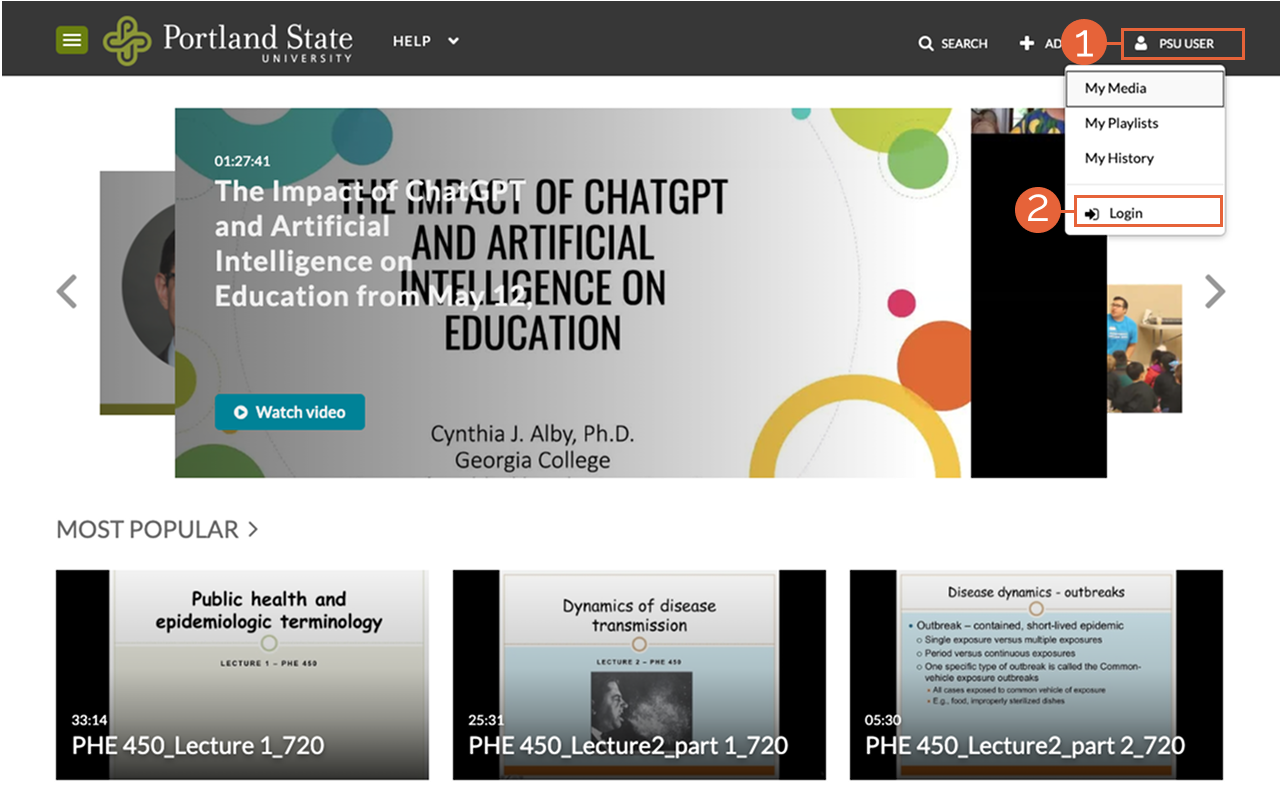
- Select PSU User.
- Select Login.
- On the PSU Single Sign-On page, enter your Odin username and password, then confirm with Duo.
This article was last updated .
Create a Playlist
- Find a video or media item that you want to add to a playlist.
- Click the Actions menu beneath the video player and click Add to Player.
- Enter a name in the Create a New Playlist field and click Create.
- Click Save to add the video to your new playlist.
This article was last updated on .

Create a Channel
Create a Channel
A channel is a collection of videos, images and/or audio files that is created by an owner, and managed by the owner and any delegated managers.
- Click the button that says your name in the upper right corner.
- Click My Channels from the list.
- Click the Create Channel button.
- Enter a Name.
- Enter a brief Description and Tags as needed.
NOTE: Tags add searchable text for public channels
- Select Privacy settings:
Select Restricted so that the channel can be viewed by non-members with PSU accounts, but only members can add videos.
Select Private to create a channel for members only. - Select Options as needed.
Check the first box to moderate content.
Check the second box to enable comments. - Click Save.
- Click Back to Channel to view your changes.
This article was last updated .
Upload video or audio to My Media
Upload video or audio to My Media
In this article, you will learn how to upload video or audio files to My Media in Kaltura MediaSpace for storage and to use in courses.
Log in to MediaSpace before continuing with the steps below.
How do I upload video or audio to My Media in MediaSpace?
- From the MediaSpace homepage, select Add New (1), then Media Upload (2).
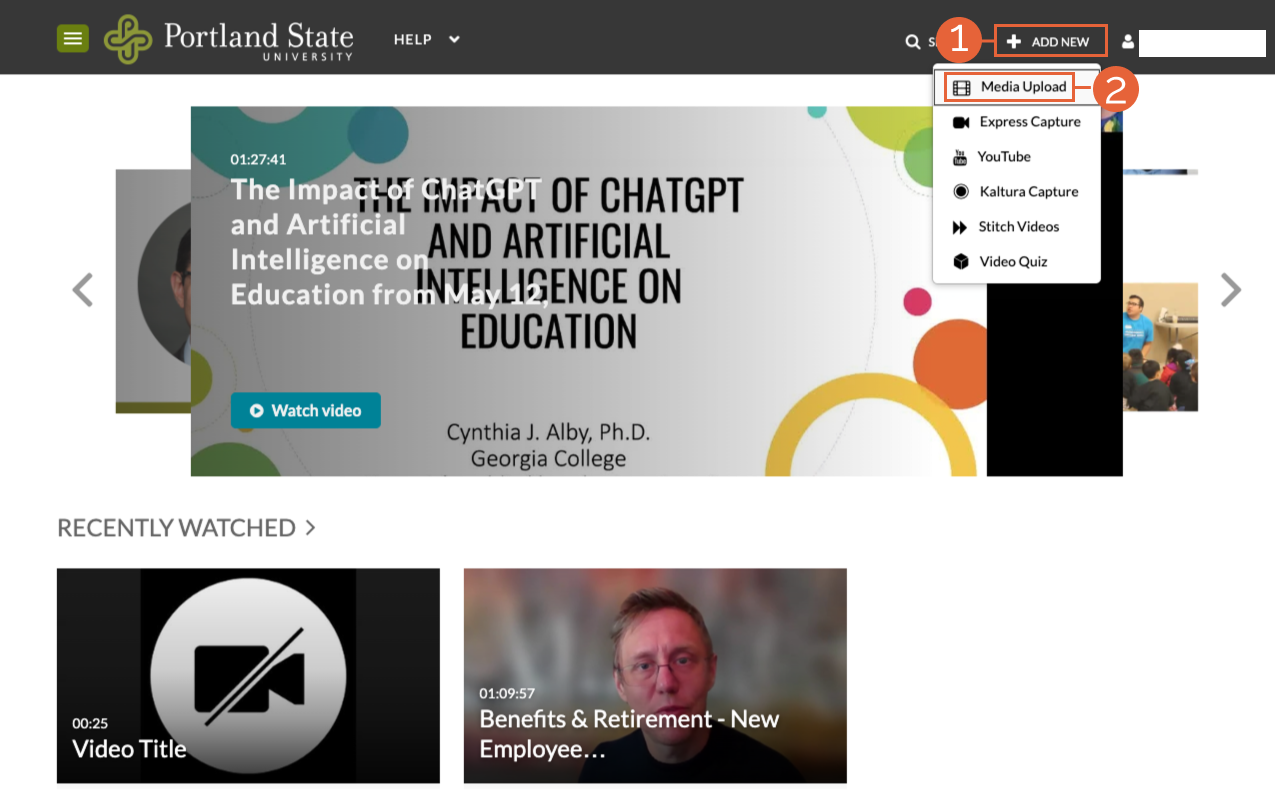
- If you agree to the PSU terms of service and copyright policy, check the “I agree to the above terms and conditions” box to continue.
- Select the Choose a file to upload button.
- Select the file you want to upload from your computer.
- Once the upload completes, enter a Name for the video.
- Enter a brief Description as needed.
- Enter Tags as needed.
- Choose a Publishing Status. MediaSpace allows users to select a Publishing Status to decide how they want their video viewed. There are three options:
- Unlisted: Anyone with the link can access the media. Users do not have to log in to view Unlisted content. This option is recommended if you want to share your content with students as a link.
- Private: Only the owner has access.
- Published: Users with specified access to the media’s location can access it. If published to a channel, then the users added to that channel must log in to view the content.
- Select Save.
- Select Go To Media, and verify that your media behaves as expected.
Once you’ve uploaded your media, remember to Add Captions to MediaSpace Videos. You must enable captions for media manually uploaded to MediaSpace.
This article was last updated .
Create a Video Quiz
Use the quiz tool to add quiz questions to your MediaSpace videos.
NOTE: Scores from video quizzes are only available from MediaSpace. They can be downloaded as a CSV or printable file, but they do not automatically export to Canvas or other software. Important: ad-blocking browser extensions can result in anonymous quiz submissions. To be safe, advise students to open the video quiz in a private/incognito browser window, which will disable their extensions.
Create a Video Quiz
- Log in to media.pdx.edu.
- Click Add New > Video Quiz.
- On the Media Selection page, click the Select button from a video in your My Media list.
- Ensure the cube icon is selected on the new page that opens.
Overview of the Quiz Editor
The Quiz Editor has three main parts:
- Under Details, you can modify the quiz name, welcome message, allow download of question list, and turn instructions on or off.
- Under Scores, you can set or modify scoring options.
- Under Experience, you can set or modify the quiz taking options. This is where you can choose whether or not to allow users to change their answers, skip and come back to questions and “seek forward” in the video.
Add Questions
- Click the play button in the video player, and pause the video where you would like to add a question, or move your cursor though the timeline below the video.
- Click the hexagonal plus icon in the player screen to add a question where the video is paused.
- Select the type of question. Mediaspace offers:
-
Multiple Choice – Question with only one correct answer
- Enter your question in the Add a Question Here box.
- Add the answer to the Add the CORRECT Answer Here box.
- Enter at least one incorrect answer in the Add Additional Answer Here box.
- Click the hexagonal plus icon to add additional incorrect answers.
- Click the light bulb icon to add a Hint to the question or an explanation to Why the answer is correct.
- Click the white icon of two arrows in the upper left corner to shuffle the question answers. Otherwise, the correct answer will always appear first.
- Click the Save button when you are finished creating your question.
-
True/False – A question with only 2 options
- Enter your question in the Add a Question Here box.
- Add the answer to the TRUE box.
- Enter an incorrect answer in the FALSE box.
- Click the light bulb icon to add a Hint to the question or an explanation to Why the answer is correct.
- Click the Save button when you are finished creating your question.
-
Reflection Point – A video pause combined with text, but no response required
- Enter your text in the Add a reflection point text here box.
- Click the Save button when you are finished creating your reflection point.
-
Open-Ended Question – Answer the question with your own words
- Enter your text in the Add an Open Question Here box.
- Click the Save button when you are finished creating your question.
-
- Click the blue cube icon in the timeline if you need to edit your question.
- Click the eye icon below the video player to preview your quiz.
- Click the blue Done button when you have finished creating the quiz.
- Click Go to Media to view your finished video quiz.
Move a Question
- Click and drag the question icon in the toolbar to move a question.
- Click Save in the question editor to save the new location.
Preview a Quiz
- From the Quiz Editor, click the eye icon.
- In the window that pops up, begin the quiz by clicking the play button in the video player.
- Read the instructions, and click Continue.
- When you reach a question, click an answer and Continue. Click Skip for Now as needed.
- Click Submit once you are finished.
- Click Done
- Click the Close button to exit the quiz previewer.
This article was last updated on .