
Contributors:Misty Hamideh
When using images in digital documents, it is important to ensure that the information conveyed by those visuals is also accessible to students who may be visually impaired or use screen readers. This guide describes how to write effective alternative text and use images in ways that help ensure all students can benefit from the images being presented.
What is alt text?
Alternative text, commonly known as alt text, is a short, hidden text description embedded within a digital image. We add alt text to images in digital documents to convey meaning and context for blind or low-vision students. When a screen reader encounters an image with alt text, it reads the description aloud, allowing the student to process the visual information.
What is included in a good alt text description?
Writing alt text is less about describing exactly what an image looks like and more about explaining what the image means to your lesson.
Consider the context
The same image requires different alt text depending on how it is being used. For example, if you use a photo of a feather in a physics class, you might describe the features that help birds fly. If you use the same photo in an art class, you might instead focus on its visual aspects, such as its colors, shadows, and texture.
Example feather image:
Alt text for a physics class
A white feather with a flat vane made of tightly packed barbs.
Alt text for an art class
A photo of a single white feather emphasizing line and texture, with repeating parallel lines of the barbs against a muted background of green leaves.
Note: There are many factors to consider when writing alt text for a specific discipline. Review the resources in the Discipline-specific alt text section to learn more.

Inclusive alt text
If your image includes people, carefully consider how you describe their physical appearance in your alt text. Ask yourself: Does omitting a person’s visual identity change the context or representation of the image? If the answer is yes, follow these guidelines:
- Be consistent. If you describe the physical characteristics of one person, describe everyone in the image with the same level of detail.
- Use objective descriptors. For example, when describing skin tone, consider using one of the following: light, medium-light, medium, medium-dark, or dark.
- Don’t assume identity. A person’s appearance does not necessarily indicate their race, ethnicity, gender, or other identities. Unless subjects have self-identified, describe the subject’s appearance using observable, relevant characteristics, such as hairstyle, clothing choices, build, etc.
Learn more about Identity and Inclusion in Alt Text from the University of Colorado Boulder.
Keep it short.
A common rule of thumb is to keep alt text under 120 characters. If you feel like you have more to say about the image, you may need to use a long description instead. (See the Long descriptions section for more information).
Avoid redundancy.
Screen readers automatically identify images before reading the text, so avoid phrases such as “image of…” or “graphic showing…” (Exception: If you are using charts or graphs, start alt text with the chart type, such as “Pie Chart”.)
Also be aware of information provided in the surrounding text. If the image has already been described, use a more concise alt text that avoids repeating the same information.
Mark decorative images, too!
If an image is purely for aesthetics (such as a decorative line, background pattern, or stock photo that doesn’t contribute educational value), mark it as “decorative” instead of adding alt text. This tells the screen reader to ignore the image, allowing the student to move past the visual element without missing anything important.
Check out some of these discipline-specific guides!
STEM:
Art:
How do I add alt text to an image?
In Canvas (using Panorama)
- While editing a Page: Open the Rich Content Editor (RCE), select the image, and open the Image Options tab. A sidebar will open where you can either type your description in the Alt Text box or check the Decorative Image option.
- Using Panorama: Look for the small accessibility gauge icon next to your files or on your Canvas Pages. Selecting this indicator launches the Panorama Accessibility Checker. If an image lacks alt text, Panorama will flag it and allow you to type and save it directly through the accessibility interface.
In Microsoft Office (Word, PowerPoint, Excel)
- Right-click the image and select View Alt Text (or “Edit Alt Text,” depending on your version).
- A panel will open on the right side of your screen, where you can type your description in the text box.
- If the image is just for flair, check the Mark as decorative box.
In Google Workspace (Docs, Sheets, Slides)
- Right-click the image and select Alt text (or use the keyboard shortcut Ctrl + Alt + Y on Windows / Cmd + Option + Y on Mac).
- A window will pop up where you can enter your alt text in the Description field. Most screen readers use the description field rather than the title field, so focus your energy on providing a meaningful description there.
When alt text isn’t enough: Long descriptions
Some visuals are too complex to describe adequately in 120 characters, such as infographics and charts. In these situations, use a two-part approach to ensure all students can access the information:
- Provide a short alt text tag that identifies the graphic’s core concept and tells the student exactly where to find the granular details; and
- Provide a long description that provides a fully detailed explanation of the visual.
Where do I put long descriptions?
You have a few flexible options for where to put this text:
- Directly on the page: Insert the description or a data table directly below the image. This approach benefits all students, not just those using screen readers.
- Inside an accordion/collapsible dropdown: If your platform supports it (such as Canvas), place the long description inside an expandable text block to keep the page clean.
- In a linked document: Provide a hyperlink directly below the image, such as Text alternative for [Image Title], that opens the description in a separate, clean document.
Example of a long description for a complex image
The alt text:
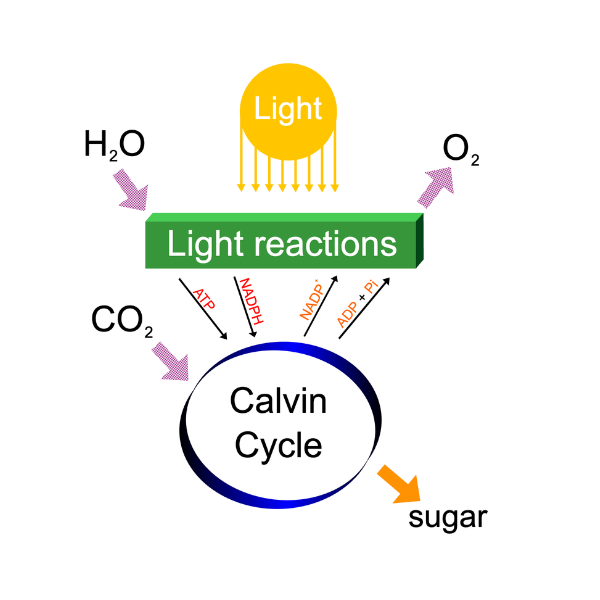
Flowchart illustrates the two interconnected stages of photosynthesis: light reactions and the Calvin Cycle. Full description available in the text below.
The long description:
The diagram illustrates the overall process of photosynthesis, divided into two main stages that feed into one another:
- Light Reactions: This top stage is driven by Light energy (depicted as a yellow sun). It takes in H2O (water) as an input and releases O2 (oxygen) as an output. To fuel the next stage, the light reactions send energy carriers—ATP and NADPH—down to the Calvin Cycle.
- Calvin Cycle: This bottom stage takes in CO2 (carbon dioxide) alongside the ATP and NADPH provided by the light reactions. The primary output of the Calvin Cycle is sugar.
- The Return Loop: After transferring their energy to the Calvin Cycle, the depleted carriers return upward to the light reactions as NADP+ and ADP + Pi to be recharged by sunlight.
Need help writing image descriptions?
Arizona State University’s Image Description Generator is very useful for suggesting alt text and long descriptions for uploaded images. Be sure to review the output carefully, as it may not get the text right on the first try.
You might also like





































👋Need more help?
Submit a support request through our Faculty Support portal for assistance.