Justice, Diversity, Equity, and Inclusion (JDEI) Teaching Toolkit
Justice, Diversity, Equity, Inclusion (JDEI) Teaching Toolkit
Resource type: Self-paced Canvas course
Intended for: New faculty, emerging practitioners, seasoned educators

The Justice, Diversity, Equity, and Inclusion (JDEI) Teaching Toolkit is a flexible resource to enhance your teaching practices. The toolkit is designed to be navigated freely, allowing you to jump between modules and topics based on your current needs and interests. While this toolkit can be quickly scanned in approximately 30 minutes, as with racial justice work, it is ongoing and not time-bound. It invites lifelong learning. Some of these resources are not quick fixes but rather parts of a greater whole to pause, process, and reflect. It invites conversation within yourself and a trusted community.
What's in the JDEI Teaching Toolkit?
This module explores how culturally-responsive curriculum utilizes the heritages, experiences, and perspectives of ethnic and racial groups to more effectively reach/teach students who are members of those groups.
In this module, you will explore three sub-topics:
- Representation
- Caring and Loving Pedagogy
- Universal Design for Learning
This module explores how to build an equitized syllabus that considers how to reduce barriers to equity for minoritized and poverty-affected students.
In this module, you will explore three sub-topics:
- The Inclusive Syllabus
- The Invigorating Syllabus
- The Intuitive Syllabus
This module explores the active involvement of students in their learning process, faculty, the content, and each other.
In this module, you will explore two sub-topics:
- Proactive Communication
- Addressing Student Trauma
This module explores how effective assessment practices not only measure student progress but also inform instructional decisions, support student success, and contribute to the overall quality of the course.
In this module, you will explore three sub-topics:
- Equity-Centered Assessment Design
- Student-Centered Assessment Design
- Alternative Grading Practices
This module focuses on the input, perspectives, and opinions of students in the learning process, allowing them to express their thoughts, ideas, and concerns.
In this module, you will explore three sub-topics:
- Student Voice
- Student Experience
- Student Feedback
Tools You'll Use

The Justice, Equity, Diversity, Inclusion (JDEI) Teaching Toolkit is built within PSU’s learning management system, Canvas by Instructure. You can learn more about how to use Canvas with our Canvas Tutorials.
About the Toolkit Creators
The JDEI Teaching Toolkit Project Team created this resource, guided by the OAI inclusion charter (part of the Office of Global Diversity & Inclusion’s Time to Act Plan), with significant input from both Portland State University faculty and students.

How to cross-list in Canvas to combine multiple sections into one course shell
Cross-listing in Canvas occurs when multiple Course Reference Number (CRNs) sections of the same course are combined into a single course shell in Canvas. This process is not able to be completed by instructors.
Instructors cannot cross-list Canvas courses directly. Most cross-listing requests are processed before course shells are released to instructors, typically by your department’s scheduler. These combined courses appear as a single unified shell within Canvas and may share the same schedule, location, and/or instructor.
However, in some cases, cross-listing cannot be completed prior to Canvas shell release, and a manual cross-list will need to be created on your behalf.
How can instructors see if their course has been cross-listed in Canvas?
In Canvas, there are two main indicators that may show your course has been cross-listed.
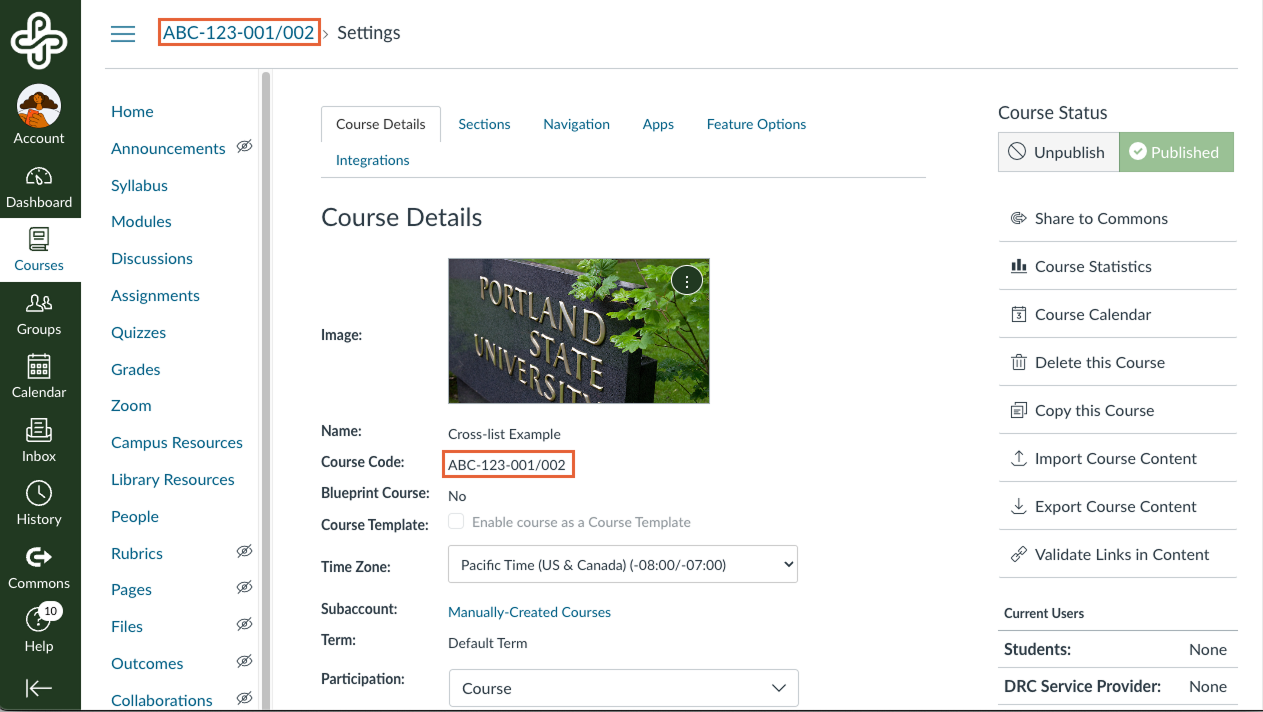
- In most cases, cross-listed courses will have all Sections listed in the Course Code. The Course Code is displayed at the top of your Canvas course and listed on the Settings page within Course Details.
- In all cases, cross-listed courses will have each Section listed within the Sections tab. Instructions for accessing the Sections tab are listed below.
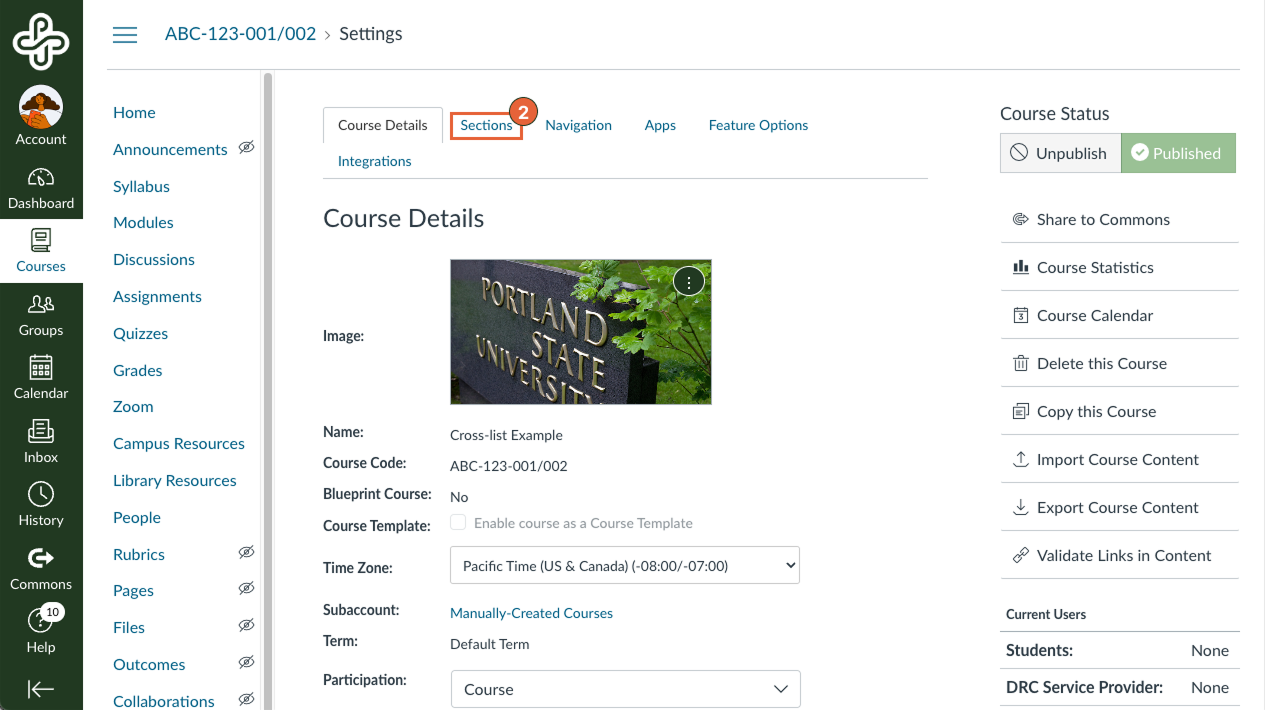
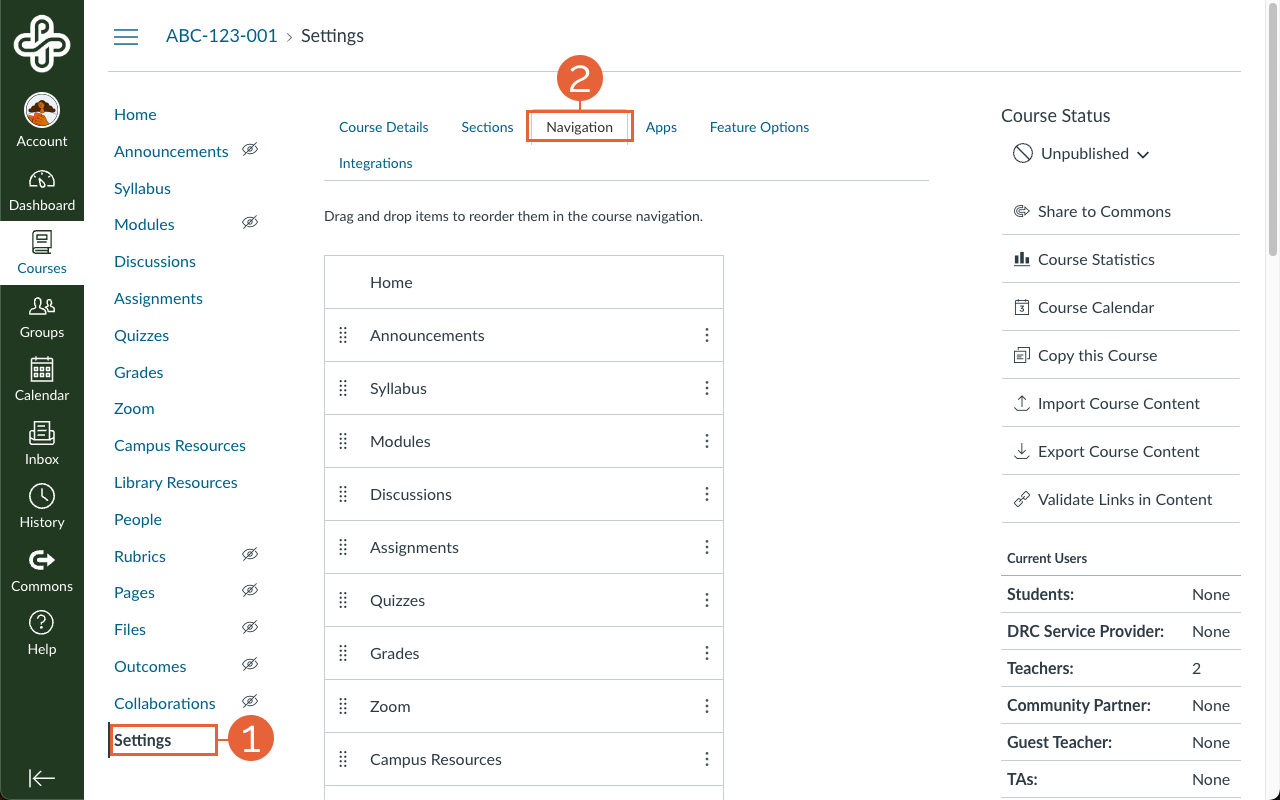
From the Course Navigation menu within your course, click the Settings link [1].

Click the Sections tab [2].
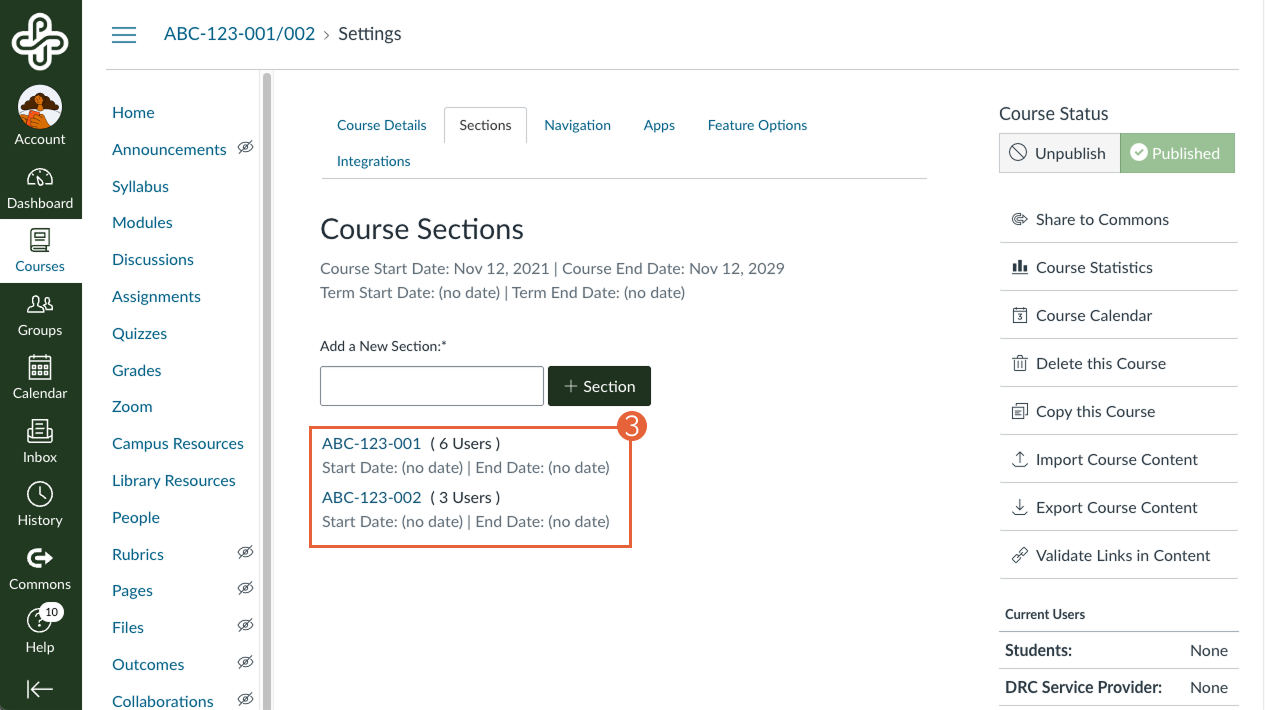
Under Course Sections, view your sections [3] and the number of users within each section.
When to request a manual cross-list
Instructors primarily request cross-listing in order to improve course management efficiency. Not all courses can be cross-listed, though. The requirements for cross-listing are that all course sections must have the same content and occur within the same term.
Common cross-list request situations:
- An instructor is teaching ABC-460 and DEF-460; these courses share identical content but use different department codes.
- An instructor is teaching ABC-543-001 and ABC-543-002. This course is listed as two different sections due to class size, but the Canvas course content is identical.
- A special studies course, ABC-199, uses the same content as ABC-399.
- An undergraduate course, ABC-435, and a graduate course, ABC-535, share the same content, with only minor distinctions between assignments.
In a cross-listed course, by default, all students will receive the same content and assignments. For this reason, we recommend you consider using the Differentiated Assignments feature.
By using Differentiated Assignments, you can set different due dates and availability dates for quizzes, discussions, and assignments. You can choose if the assignment will be limited to specified students, sections, groups, or assigned to everyone in the course.
For step-by-step instructions, review: How do I assign an assignment to a course section?
How do I request a Canvas course cross-list?
To begin the cross-listing process, submit a cross-listing support request. Include:
- The course names and CRNs for all requested cross-listings.
- The corresponding Canvas URLs, if possible.
- Let us know if you have already begun adding content to one or more of the courses, so we can ensure your content is preserved.
If the request can be completed, our team will reply with a link to the new cross-listed course.
Custom cross-list notification
The Registrar’s Office requests that instructors with custom cross-listing in Canvas add this note to their syllabus or Canvas course:
“This Canvas course is shared by one or more course sections. This means that students enrolled in the other section(s) of this class will be able to see the Canvas course content, and may be able to view various activities such as discussion boards or any activities that are created by the instructor to be shared commonly among the different sections.”
This article was last updated .

Peer Review in Canvas
Peer Review in Canvas
Enabling Peer Review on your Canvas assignment gives students a way to provide feedback on their classmates’ work. The peer review process exposes students to different perspectives and approaches to the same task, and can often deepen their understanding of the material.
Peer review can be used for various types of assignments, such as:
- Writing assignments (essays, reports, research papers)
- Multimedia projects (videos, presentations)
- Problem sets or coding exercises
- Artistic or creative works (drawings, designs, compositions)
Setting up effective peer-reviewed assignments can be tricky. Consider scheduling a consultation with OAI staff to get help through the process!
How do I set up Canvas Peer Review?
Canvas supports peer review through the Assignments tool. When creating a new activity, you can enable the “Peer Review” option and configure settings like:
- Anonymous or named reviews
- Number of peer reviews required per student
- Instructions and rubrics for reviewers
Here are some things to consider as you set up your peer review assignment:
The first assignment will be for submitting the initial draft and completing the Canvas peer review portion of the assignment. The second assignment will be where students submit their final draft of the assignment and will not include Canvas peer review.
If you want to assign points for completing the peer review, you’ll need a third, no-submission assignment. Because you will need to enter these grades manually, you might consider keeping track of who completed peer reviews on a piece of paper as you go through the initial draft assignment.
Include due dates for both the submission of the initial draft as well as completion of the peer review in your assignment description. Because you cannot set separate due dates for the initial draft posting and peer review phases in a single assignment, communicating both due dates in the assignment description will make your expectations clear and help ensure that all students have a paper to review.
Set the due dates for each Canvas assignment in the following way:
Initial draft/peer review assignment
- Due Date (1): The date that the initial draft of the assignment is due.
- Available From/Until (2): The availability should be set from the first day initial drafts can be submitted through the final date the peer review can be completed.
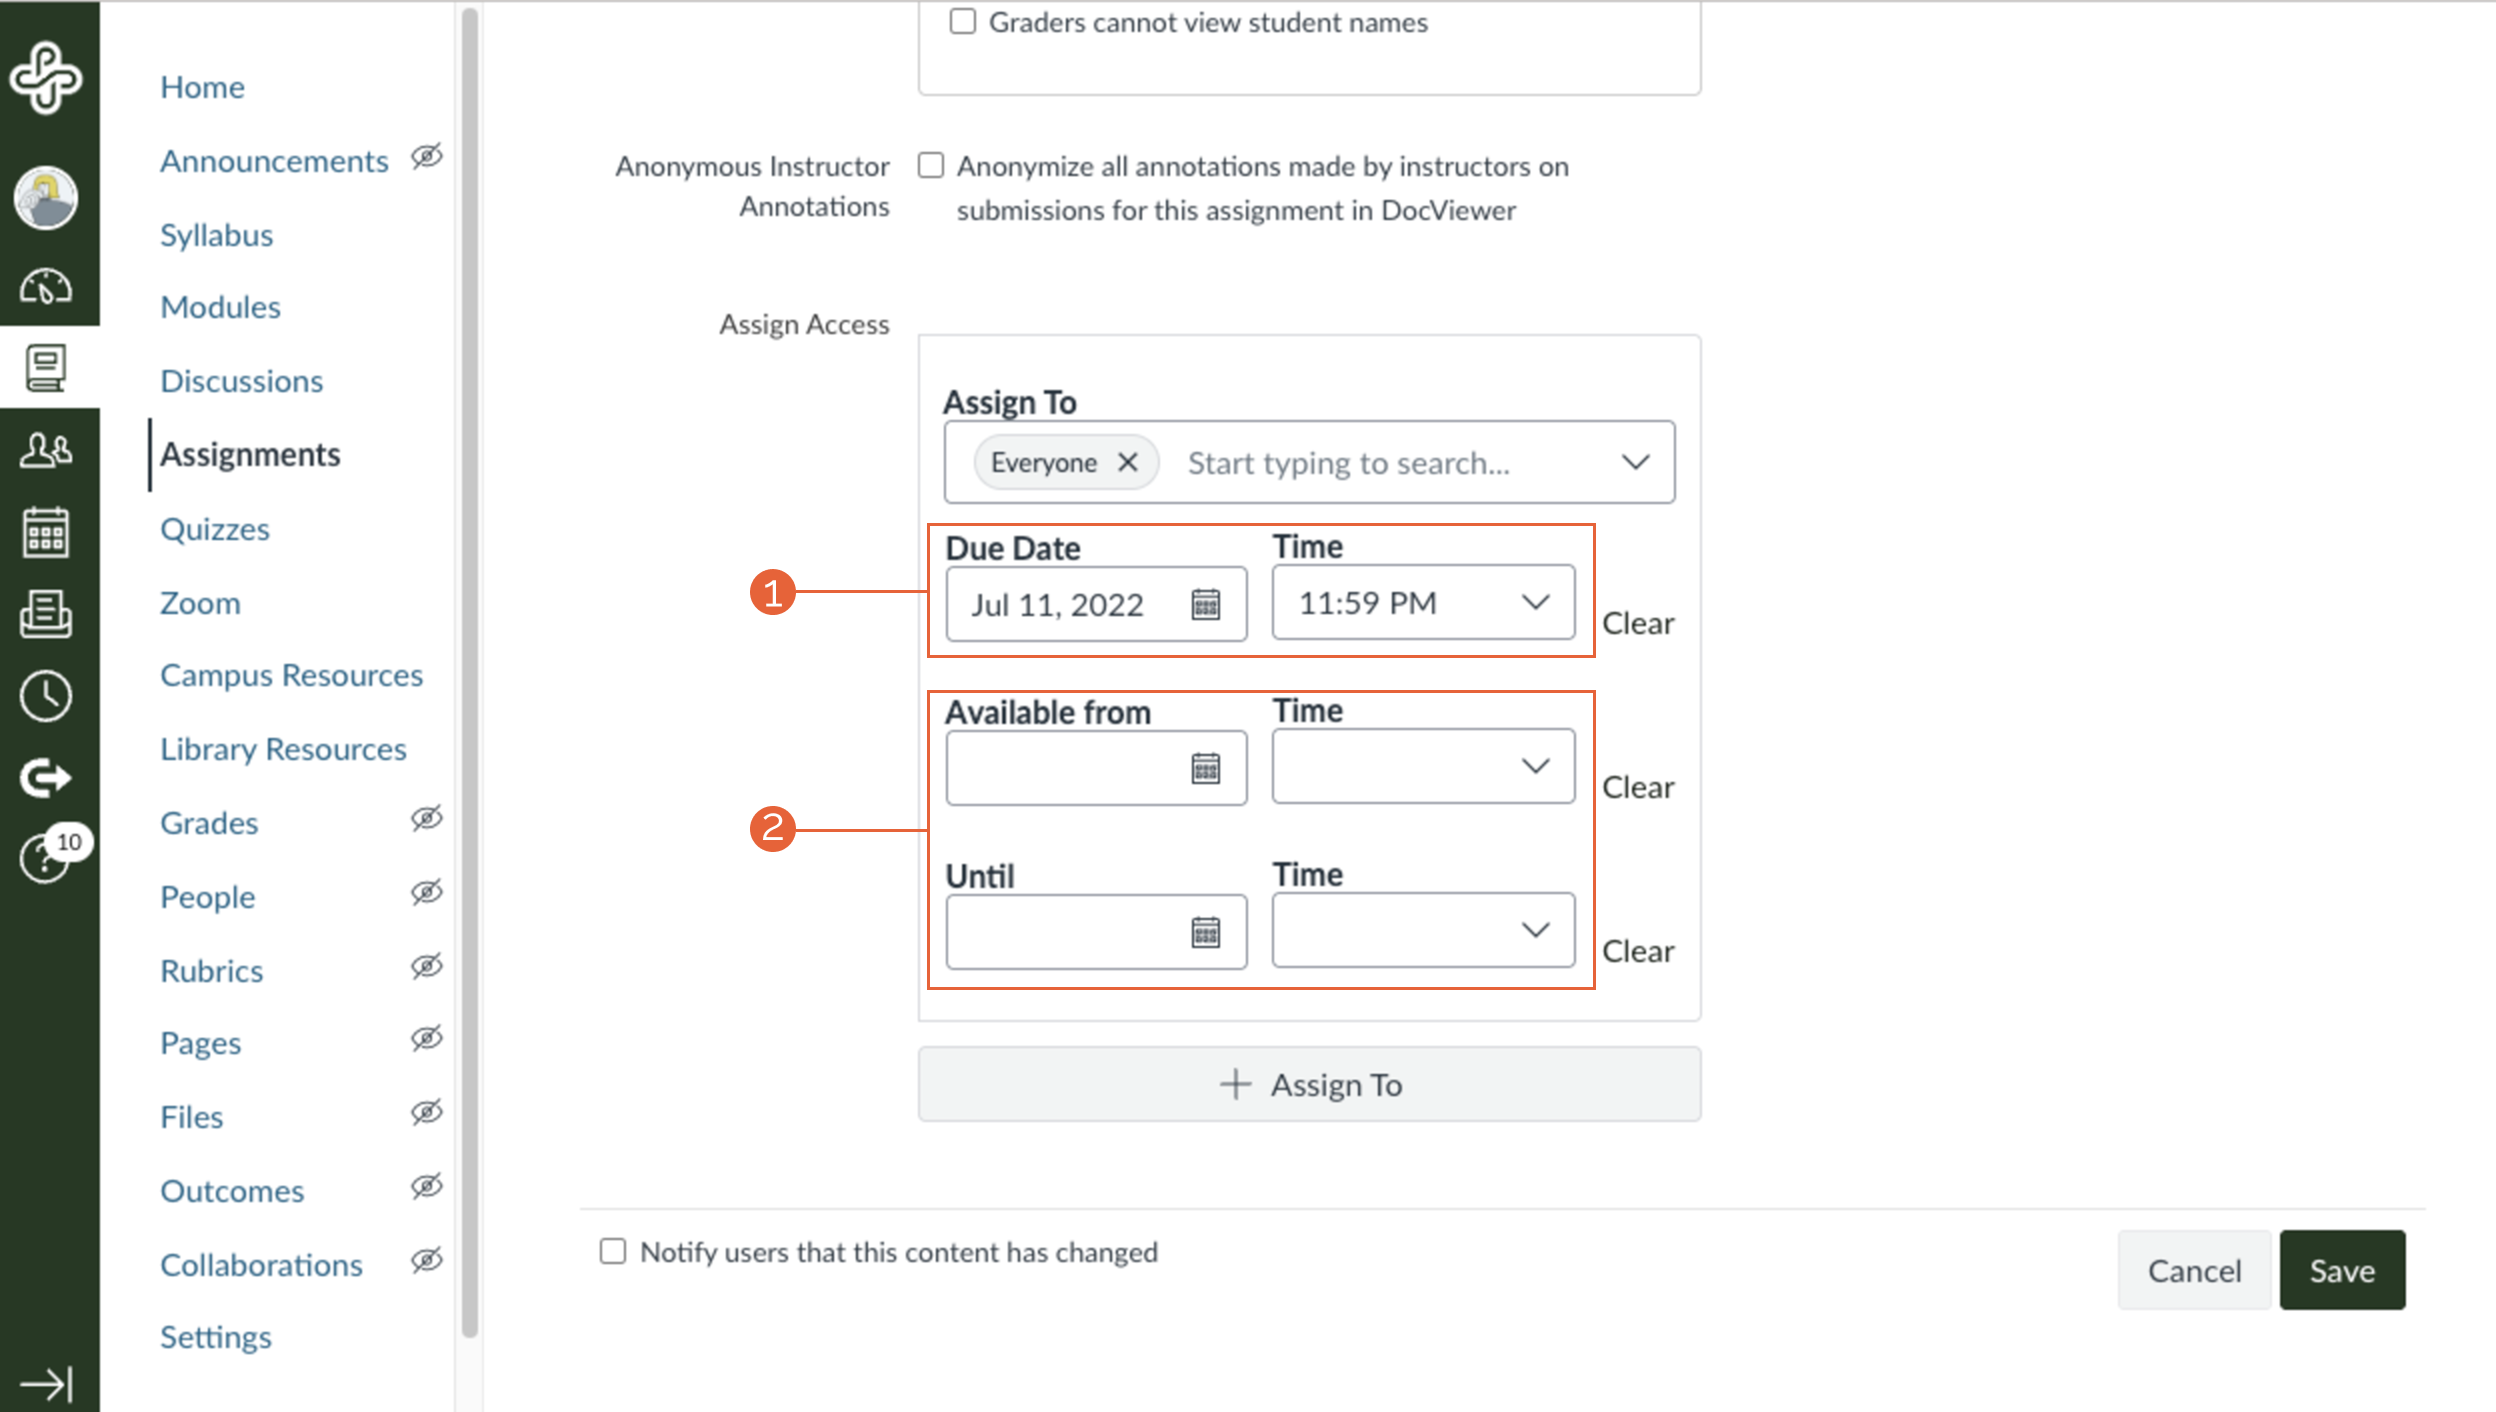
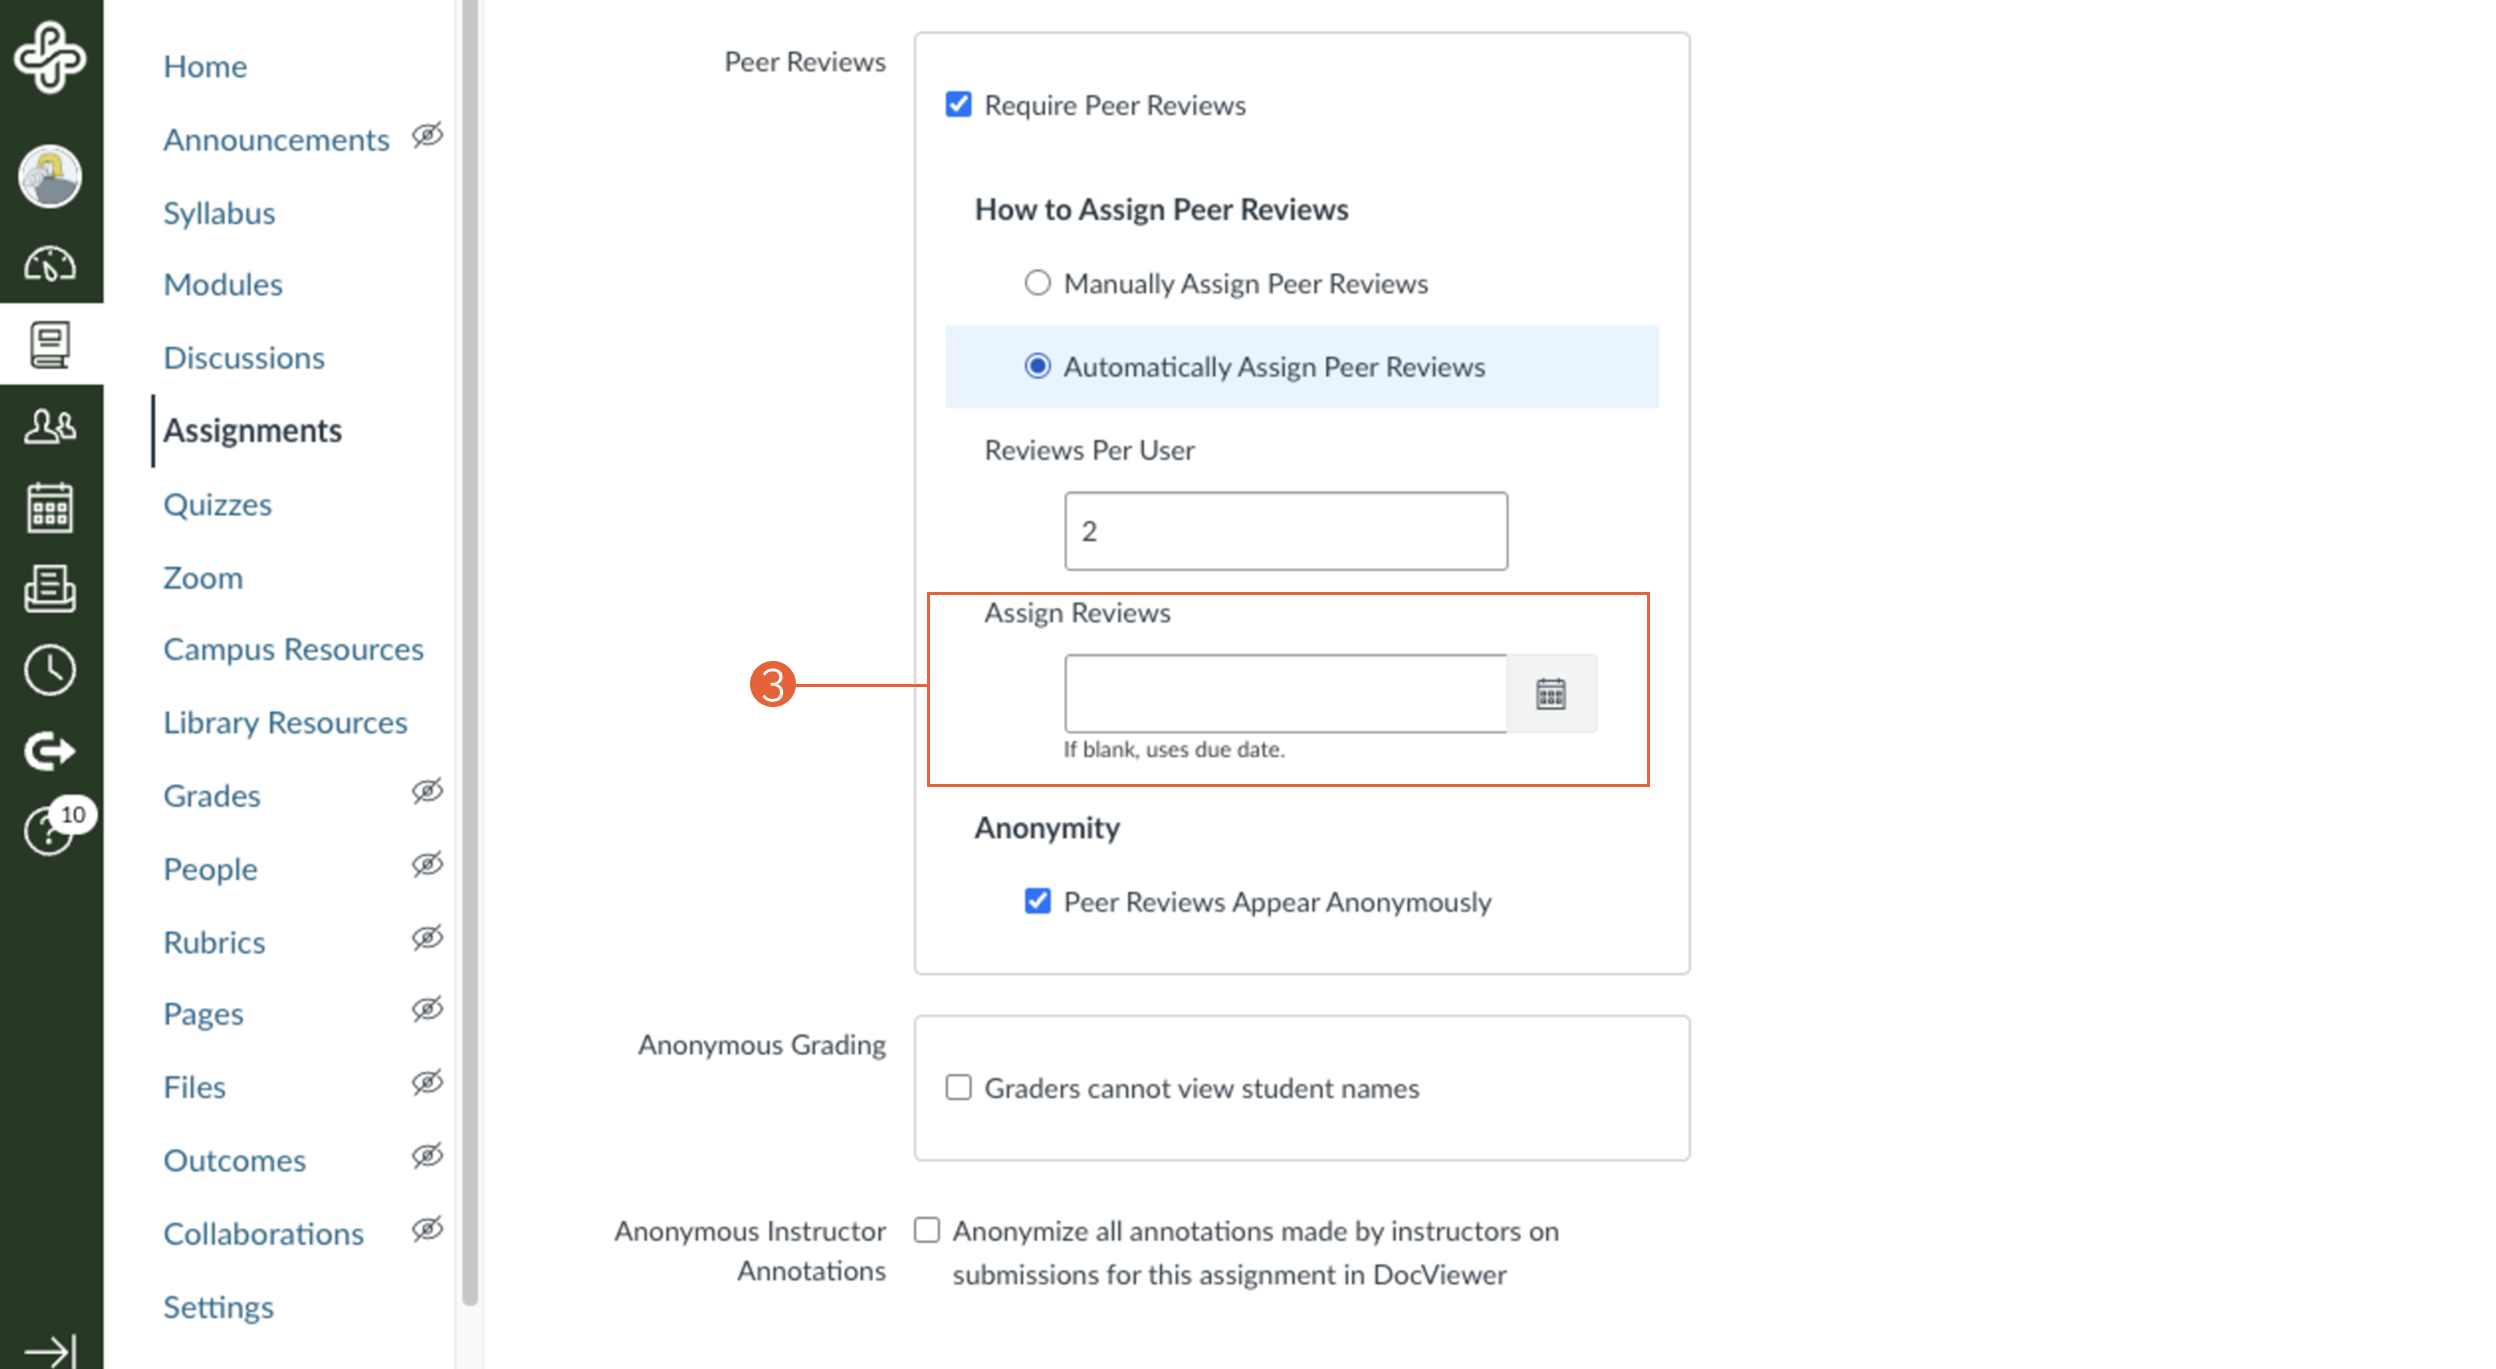
Assign Reviews date (3): A day or two after the initial draft is due. (If left peer review is set to assign automatically and this is left blank, students will be assigned their peer review partner(s) right after the due date. However, it may be best to give a small grace window to account for late submissions.)
In the assignment description: Add the due date for completing their peer review(s) to students manually, in the assignment description.
Final draft assignment
- Due Date: The date that the final draft of the assignment is due.
- Available From/Until: Optionally, set the availability dates from the first day final draft can be submitted through the final date the final draft can be submitted.
Students who don’t submit an initial draft cannot be assigned another’s work to review. Therefore, it’s important for students to submit their initial draft on time so that everybody can participate in the peer review process. (Note: If you have chosen to “Automatically Assign Reviews”, students who did not submit the assignment by the due date will not be automatically assigned a classmate to review and thus will need to be added manually.)
Tip: Adding a manual entry to the Canvas course calendar or using announcements to remind students of due dates for different phases of the peer review assignment may help students stay on track!.
Peer review may be new to some students. Consider sharing a model and/or rubric that gives students a framework for providing feedback. (Note: If you attach a rubric to the assignment, peer reviewers are also able to access this rubric. Rubrics used by peer reviewers for feedback are not included in the final grade.)
Group Assignments and Peer Review
Peer review can also work with group assignments. By creating group set, you can assign students to specific groups and distribute peer review tasks accordingly.
Some important things to know about using peer review for group assignments:
- Peer reviews are assigned to individuals, not groups. Each group only needs to have one member submit the assignment, but this submission will show up for every student in the group. When the peer reviewer makes comments on their assigned classmate, these comments are compiled with other comments from reviewers who were assigned the same submission. In this way, each member of the group will see comments from all the peer reviewers in their feedback.
- By default, automatically assigned peer reviews will not be assigned to members of the same group. If you would like to allow group members to review their own group’s work, be sure to check the option to “Allow intra-group peer reviews”. This will randomize the peer review assignments, not paying attention to group membership. (Note: The only way to ensure that students are assigned only to members of their own group is to set peer reviewers manually.)
Managing the Peer Review workflow
Once the assignment is published, you can monitor the progress of submissions and peer reviews through the Assignments page. Canvas provides an overview of the peer review status, allowing you to see which students have completed their reviews and which ones are still pending. If needed, you can extend deadlines or reassign peer reviews to ensure each submission receives the required number of reviews. There’s also a Reminder tool you can use to send a notification to students who have not completed their assigned reviews!
What Should Students Expect?
Peer reviews are not assigned until:
- The student has submitted their own assignment, AND
- The date set by the instructor to assign the reviews has passed (if you choose to assign reviews automatically) or the instructor assigns the peer reviews manually.
Until both of these things have happened, the peer review assignment will not show up on the student’s To Do list or on the original assignment. As many students rely on the To Do list to keep track of their assignment due dates, be aware that this may cause some confusion.
Note: Peer review details do not show up in Student View.
It may be helpful to ask students to watch this overview video of the peer review process in Canvas:
Providing Feedback on Peer Reviews
As the instructor, you may want to provide feedback to the students on the peer reviews. Canvas allows you to view and comment on the peer reviews themselves, offering feedback on the quality and accuracy of the reviews. You can also use SpeedGrader to view each student’s work alongside the peer reviews they received, making it easier to assess their overall performance and provide your own feedback.
Canvas does not have a way to automatically assign a grade for completing a peer review. However, if you would like to assign points for peer reviews, you can create a No Submission assignment in the Gradebook and assign points manually. The Peer Review page for the assignment will show the names of students who have completed the peer review. (Note: You can find a link to the Peer Review page on the main Assignment page under Related Items.)
This article was last updated .

Teaching during disruptions
Teaching during disruptions
A guide for Portland State faculty

Contributors:Megan McFarland
Whether it’s due to severe weather-related closures or individual circumstances, missing one or more instructional days can feel stressful for faculty and students alike. Explore the following responsive and proactive strategies to learn how instructors can limit the impact of unexpected disruptions and keep teaching during campus closures.
In all cases, it’s important and helpful for you to communicate course expectations to concerned students. You can send your entire class an email through your PSU Gmail account.
During inclement weather
When PSU remains open: Exercise normal flexibility and make reasonable accommodations for students who miss class, miss an exam, or don’t submit coursework as a result of inclement weather — including effects from other community closures.
When PSU is closed: Don’t require or even suggest that students be on campus. This includes early closures. When a closure occurs during a class or exam, release students immediately.
During campus closures
1. Communicate
Communicate as quickly and clearly as possible with students about class closures. Use email, Canvas Announcements, or even a separate module to share updates to due dates, assignments, and independent work expectations. Consider opening a separate Canvas Discussion to avoid answering the same question multiple times.
2. Extend care
Unexpected disruptions, cancellations, and closures often come as a result of significant emergency events. While instruction is important, the human needs of faculty and students come first. These kinds of events–such as severe weather, natural disasters, or illness–impact our functioning in a variety of ways. This means that our ability to think and behave might be different than we are used to.
Learn more about how to implement Trauma-Informed Teaching practices in our latest teaching guide:
3. Connect
Connect students and colleagues with resources to support basic needs, such as food, water, shelter, and healthcare:
During technology outages
Communicate as quickly and clearly as possible with students about disruptions. Use email to share updates to due dates, assignments, and independent work expectations.
Stay informed so you can plan accordingly and pass along accurate information to students. Check the OIT Status Page for current service availability and updates on progress toward restoring systems
Once technology becomes available again, you may need to clear your browsing cache to access the system:
Flexible teaching strategies to consider during disruptions
Communicate as quickly and clearly as possible with students about disruptions. Use email to share updates to due dates, assignments, and independent work expectations.
Contact your department or school for any specific requirements and guidelines around instruction during a disruption.
-
- Identify the most crucial learning outcomes for your course as well as the assignments that assess them.
- Consider eliminating assignments and activities that don’t directly assess the most essential learning outcomes. Determine if there are any learning outcomes that are assessed by multiple assignments, and reduce duplications.
Example: Eliminating a weekly in-person reading quiz when students are already submitting a reading reflection to Canvas
-
- Collaborate with your department and colleagues for guidance on how to prioritize a course’s learning outcomes.
-
- When possible, offer asynchronous alternatives to missed course content. Consider recording lectures, offering supplemental readings, or even self-paced learning modules
- Set aside office hour time to answer questions and review material
Plan ahead for how you might accommodate Canvas disruptions, power outages, or other weather-related impacts. This could include:
-
- Extending deadlines
- Rescheduling exams
- Recording class meetings
- Not requiring students to have cameras on
- Alternative learning activities instead of
- scheduled class meetings
No matter how you adapt teaching plans for your online class during disruptions, remember to clearly and quickly tell students your expectations and any changes. Email and online course announcements (in Canvas) are two good options for communicating with students.
For campus closures or inclement weather: Because online courses don’t require campus attendance, they may continue — at your discretion. Although your virtual class may remain open, the library and most other university buildings will be closed. Please exercise normal flexibility and make reasonable accommodations for weather-related impacts such as:
-
- Loss of access to Internet connections and devices, or even electricity
- Changes in students’ and instructors’ work hours, childcare schedules, and more
Both faculty and students carefully plan their work, courses, and other responsibilities around listed class schedules. This means that it is often an undue burden to require participation outside of typical class meeting times. Avoid these practices in order to best respect student and faculty time:
-
- Holding an additional class session on a day and time the class does not typically meet.
- Extending class meeting time.
- Rescheduling finals or adding a class session during finals week.
- Asking students to do the same amount and kind of work the syllabus initially expected them to do while compressing the work into a shorter time period and/or reducing their access to instructor, peer, or campus resources.
How to teach in a condensed or accelerated format
For more ideas on how to adjust your course format following a disruption, check out the following resources from our colleagues across the U.S.:
Plan for instructional continuity during disruptions
When you have the option, proactively planning ahead will help ease some of the stressors of having to quickly pivot during the term.
Create and share a communication plan in advance
-
-
- Add information in your syllabus and Canvas about what students can expect in case of an unexpected disruption or inclement weather event. Be sure to include the University Closure Policy and Inclement Weather Procedures and any alternative plans or instructions.
- Clearly articulate your communication plan in your syllabus and Canvas, as well as how often students are expected to check those communication channels.
- In all cases, it’s important and helpful for you to communicate course expectations to concerned students. You can send your entire class an email through your PSU Gmail account.
-
Design with flexibility in mind
-
-
- Offer low- or no-internet alternatives for assignments and course materials at the beginning of the term.
- Offer asynchronous or make-up alternatives for in-person requirements, such as community partnerships.
- Examples: Establish a policy that allows students to make up participation points by demonstrating mastery of that week’s learning objectives via a written reflection, slide deck, or short video.
- Consider inserting a designated buffer week around Week 7 or another strategic point in the term. You can use this week as a catch-up period in case of unforeseen disruptions. If catch-up is not needed, you can use this week to present a special topic based on student interests! (Note: Be sure to communicate the purpose of the buffer week to students in advance.)
-
More ideas for planning ahead for course disruptions
Check out the following resources from our colleagues at the University of Washington:
By utilizing both proactive and responsive teaching strategies, you can enhance your ability to navigate unexpected disruptions while maintaining a supportive and effective learning environment for your students. We recommend regularly revisiting and updating your strategies based on feedback from your teaching experiences and your students to help you arrive at the best balance for you and your classroom.
Learn more elsewhere
Place-Based Engagement: Featuring KSMOCA
Contributors:Harold McNaron, Megan McFarland
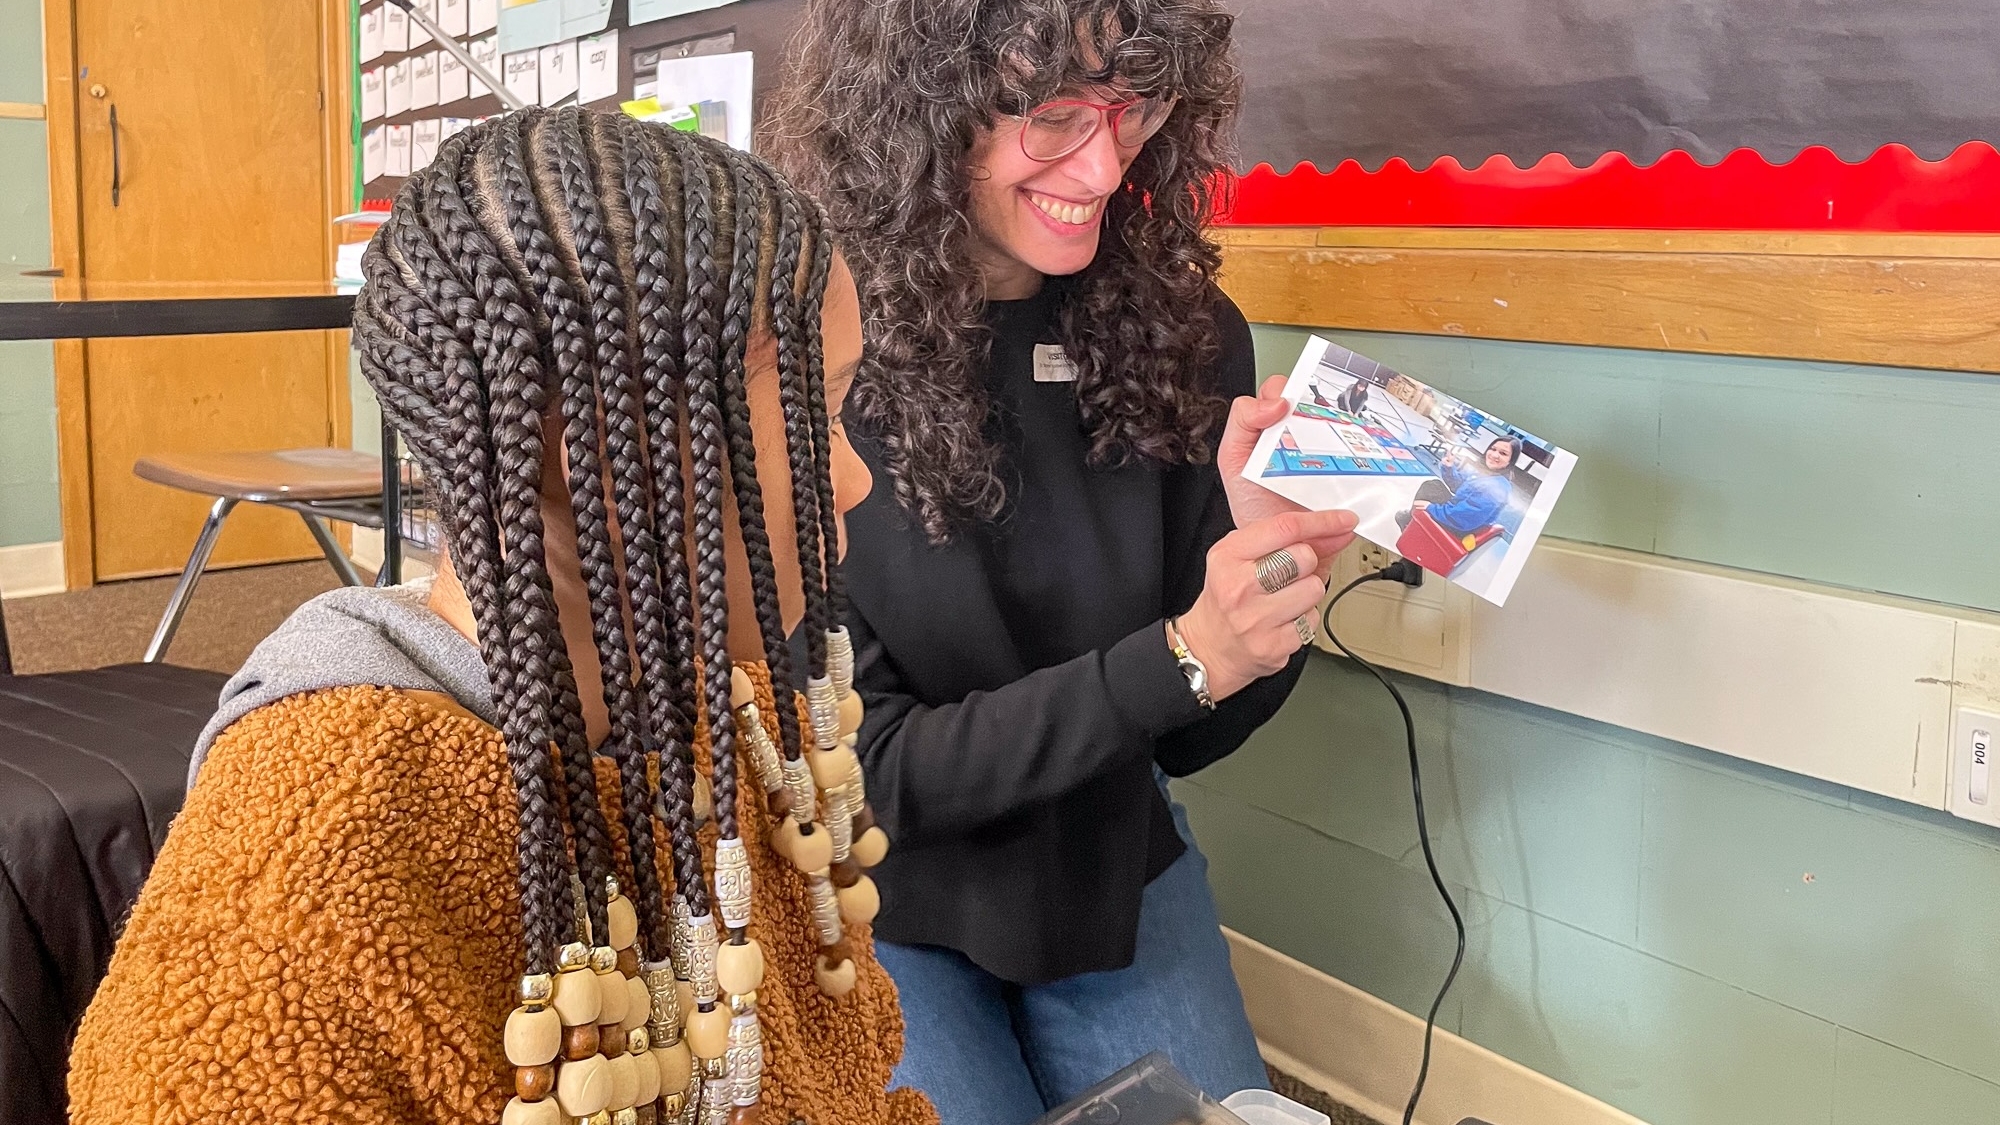
Place-Based Engagement: Featuring KSMoCA
At PSU, we “let knowledge serve the city”, but how? To what end? Who benefits? What does it mean to center community interests at PSU? The place-based engagement strategies utilized as part of PSU College of the Arts’ (COTA) partnership with Dr. Martin Luther King, Jr. Elementary (Dr. MLK, Jr.) School provides a helpful example.
Who
PSU College of the Arts (COTA)
Where
Dr. Martin Luther King, Jr. Elementary (Dr. MLK, Jr.) School
According to the Place-Based Justice Network, place-based engagement is “a long-term university-wide commitment to partner with local residents, organizations, and other leaders to focus equally on on-campus and community impact within a clearly defined geographic area.” But how does that relate to pedagogical techniques and classroom activities? It starts with community.
Forming a Community Partnership
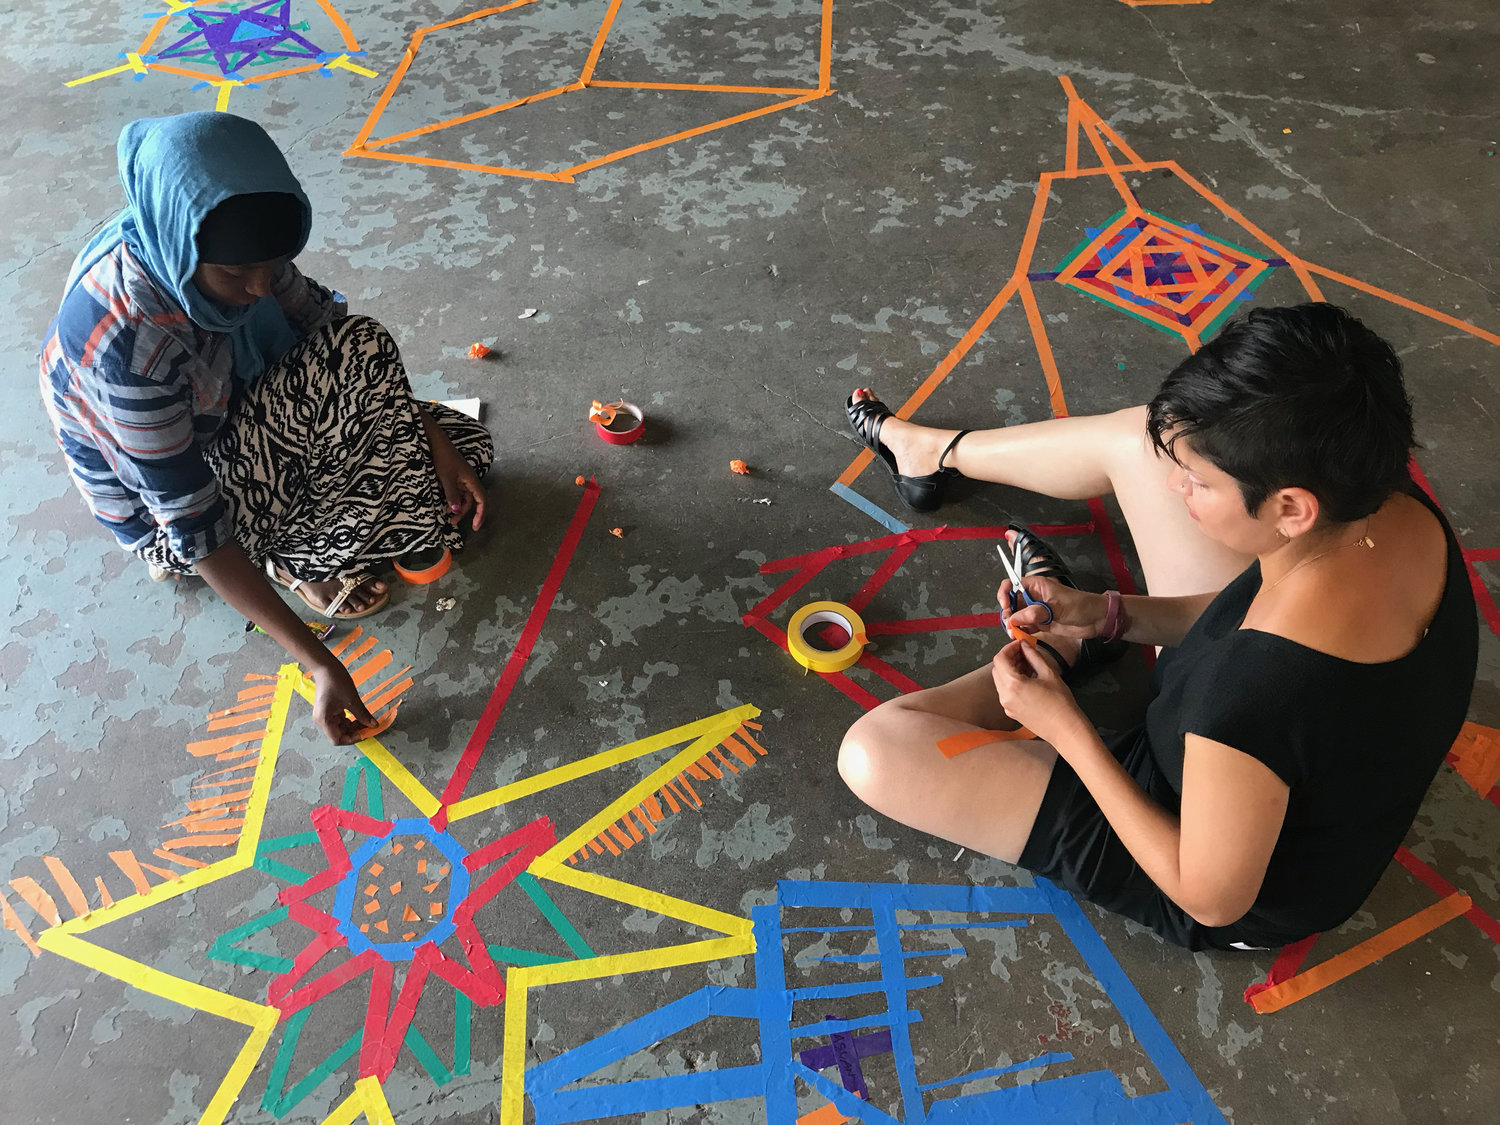
In 2014, administrators at Dr. MLK, Jr. School reached out to neighborhood residents and COTA faculty members Harrell Fletcher and Lisa Jarrett to explore a potential partnership. Specifically, the administrators and the PSU faculty members were mutually interested in increasing art access for the young students of Dr. MLK, Jr. School. Out of this collaboration, the King School Museum of Contemporary Art (KSMoCA) was born. Since its founding, KSMoCA has hosted collaboratively-designed gallery exhibits, artist talks, a student-produced podcast, publications, an artist-in-residence program, and more.
Through the KSMoCA partnership, Dr. MLK, Jr. School students gain access to local artists, PSU faculty members, and PSU students for shared learning experiences, art-making, mentorship, and generative exploration. In turn, participating PSU students benefit from off-campus, authentic art practice experiences in a public school setting. PSU students also enjoy connections to Dr. MLK, Jr. students, school administrators and professional artists—local, national and international.


What roles do PSU students play?
Currently several graduate students in the Art and Social Practice program serve in leadership roles for art projects within COTA’s interdisciplinary course “Museum in a Public School”, involving everything from a visiting artist to even student safety patrols. The undergraduates taking this course come from a variety of areas of study and, as part of their participation in the course, mentor Dr. MLK, Jr. students one-on-one and support them in creating their own art projects.
“This is a key element of impactful place-based community engagement: challenging traditional and current disparities of power and privilege via more equitable, mutual and generative strategies.”
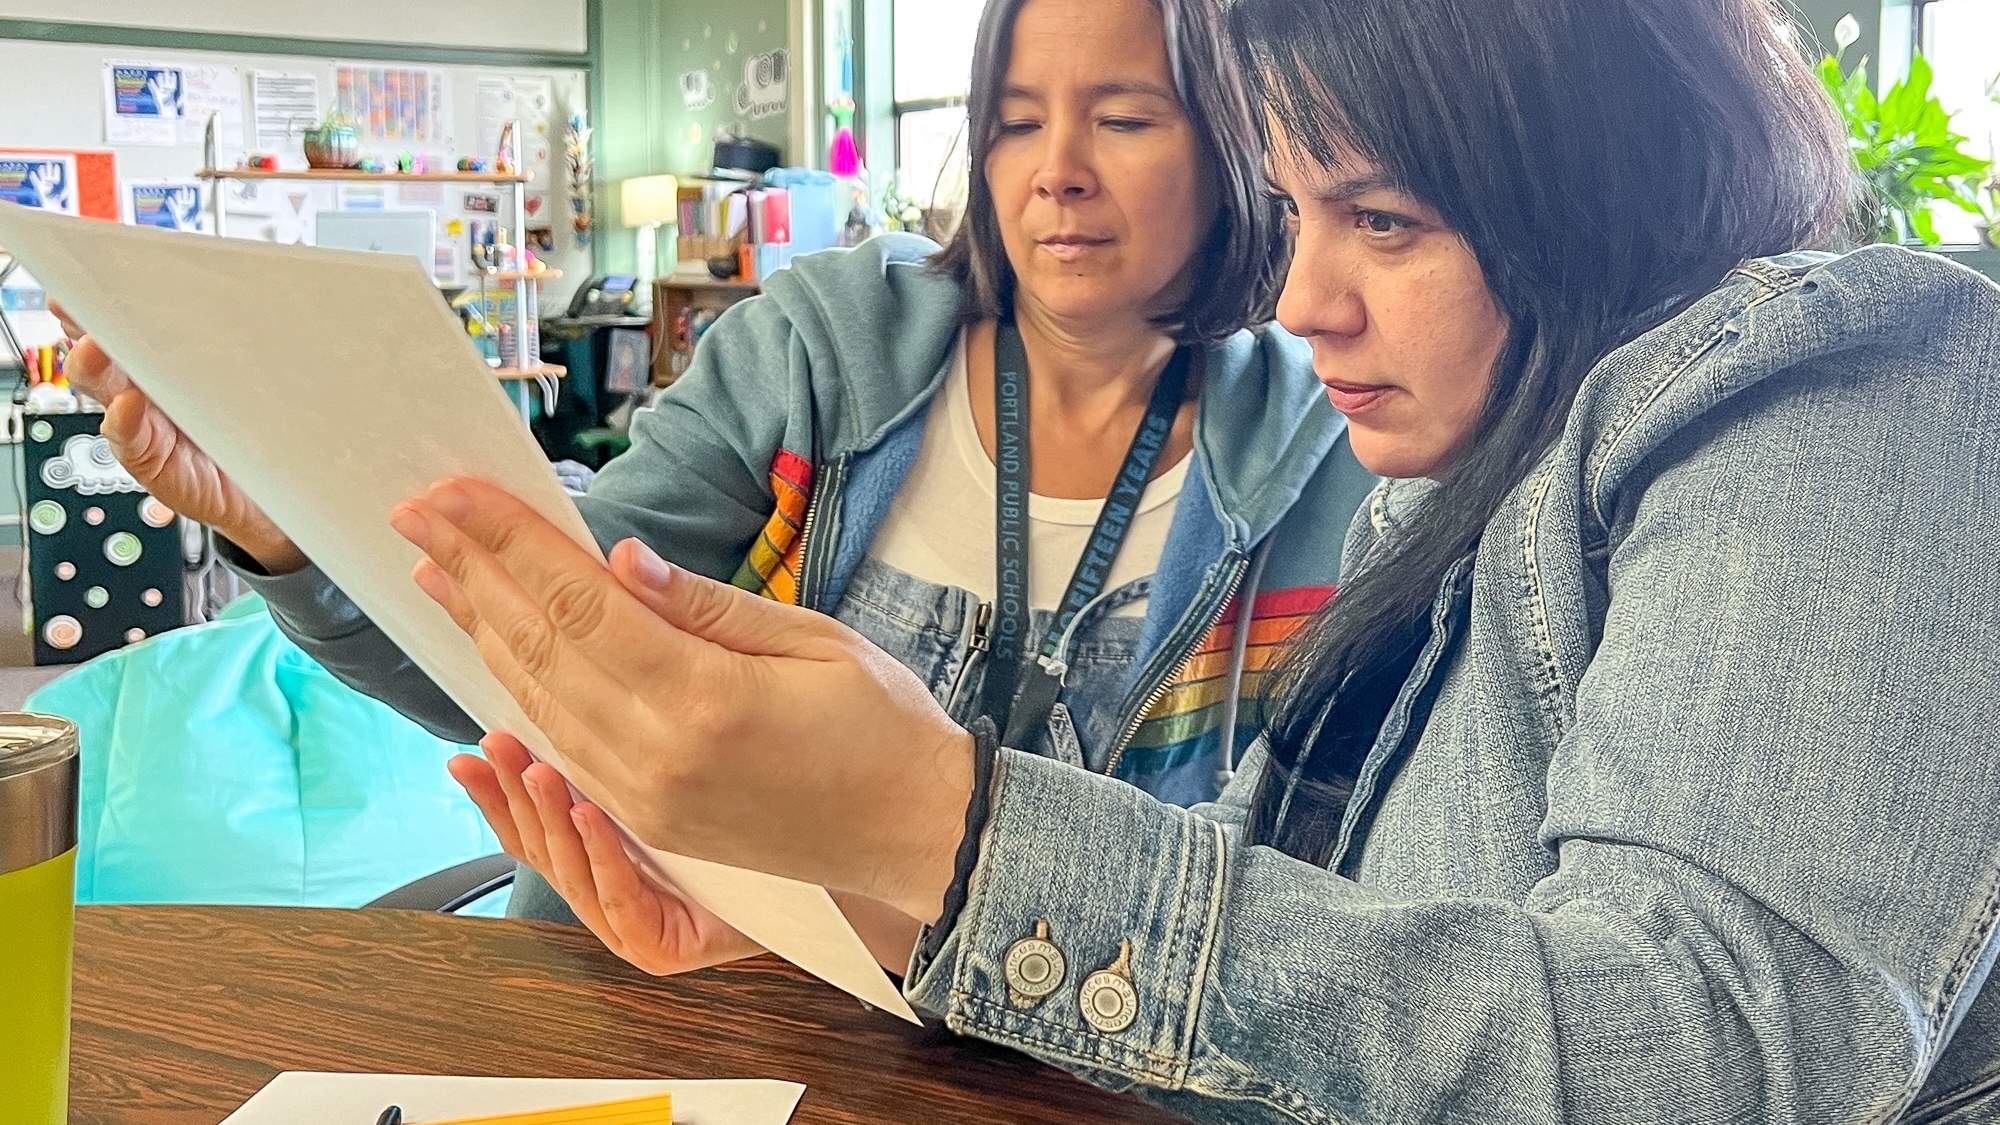
Rather than centering the partnership on any one product or outcome, KSMoCA’s success is attributed, in large part, to the relationship between and mutual commitment of the Dr. MLK, Jr. School community and PSU. Professors Fletcher and Jarrett, along with KSMoCA’s Program Director and current MFA student, Laura Glazer, use an iterative process to frequently query and return back to the interests and needs of Dr. MLK, Jr. students, their teachers and their families in program-planning efforts. This is a key element of impactful place-based community engagement: challenging traditional and current disparities of power and privilege via more equitable, mutual and generative strategies. Based on community input, KSMoCA organizers develop themes, program ideas, and student engagement plans as mechanisms of progress towards shared interests and goals. While specific projects and funders may vary, it is this common bond–authentic relationships between neighbors–that sustains the community-engaged learning efforts at KSMoCA.
Activate Your Teaching
To engage with current community partners:
-
- Start course-based, annual or other planning efforts by querying and centering the interests and energies of area residents, activists and partner organization staff
- Explore new ways of connecting PSU’s assets with community partner interests and vice versa (e.g. providing HRAC report data to support a grant they are writing or sharing a previous webinar recording aligned with community partner professional development interests)
- Consider if one or more of PSU’s current community partner organizations seems to align with your goals. Your course/initiative might be an opportunity to expand or deepen the PSU-community partnership (e.g. Latino Network’s partnerships with University Studies’ capstone program as well as GDI’s Latine Futures initiative)
To foster new community partner relationships:
-
- Check in with with OAI staff Harold McNaron about potential or current partnerships that might be a good fit
- Review PSU’s current community partners via University Relations’ Community Impact Team
- View the Community Engagement Toolkit from PSU's Student Community Engagement Center about strategies for successful community engagement strategies.
- Explore off-campus groups and individuals using the on-campus resources above whose work aligns well with departmental and course-based learning outcomes and themes (e.g. governmental water safety teams or entrepreneur support networks)
- Take time to understand key elements of the community-engaged context of any potential partnership (e.g. history of their organization; current goals and areas of focus; current funders, collaborators) and to share key contextual elements with your new partner, especially if they are not accustomed to partnering with colleges or universities (e.g. academic calendars; PSU student demographics; potential for sustained partnership, funding)
- Reach out to OAI staff Harold McNaron to assist with designing meeting agendas, partner agreements and other resources to help your new partnership set a firm foundation

How can I use third-party tools for teaching?
How can I use third-party tools for teaching?
This article was last updated .
The Office of Academic Innovation (OAI) consistently explores new teaching and learning platforms, applications, and resources to serve the PSU community. This article provides an overview of what tools are available, how new digital tools become available, and what to consider when deciding if a tool is right for your course.
What is the Digital Learning Environment?
The Digital Learning Environment (DLE) is the collection of PSU’s digital teaching and learning tools, including our central platforms and third-party tools. The central tools are available to all current PSU faculty and students.
Central tools in the digital learning environment are:

Canvas
Learning Management System
Canvas by Instructure is PSU’s learning management system (LMS). Canvas features may be used to support in-class, hybrid, or for fully-online teaching.
Google Workspace
Email, documents, and calendar (Google Docs, Gmail, Google Sheets, etc.)
In addition to Gmail, Google’s Workspace suite of applications include: Docs, Slides, Sheets, Drive, Forms, Jamboard, Classroom, Assignments (a plagiarism checker), and Calendar.

MediaSpace
Video editing and publishing
MediaSpace is where you can upload, create, and edit video and audio resources. Your Zoom recordings are also backed up there once you activate your account. Multimedia production support is available by request from OAI.
Zoom
Videoconferencing
Zoom is PSUs primary videoconferencing platform for teaching. All PSU faculty, staff, and students have an account. For full features, download the Zoom desktop “client” app and keep it updated.
Note: Faculty and students are not required to use these tools. However, opting to use the provided tools comes with distinct benefits, such as support from the Office of Academic Innovation and the Office of Information Technology (OIT).
What third-party tools are available to use in my Canvas course?
You can use the third-party tools listed in the DLE integration list. Some tools may only be available to specific colleges or departments, so be sure to check this list before requesting a new tool be added.
We welcome you to access an up-to-date list of 3rd party tools currently integrated with Canvas at PSU. You must be signed in to your PSU account to access this list.
How do I request a new third-party tool?
To request a third-party tool to be integrated within the Digital Learning Environment, submit a request using the New Teaching Tool Request form.
Note: Please submit your request at least one term before you would like to use the tool to allow enough time for the review process.
What should I consider when using a third-party tool?
Security, Accessibility, and Data Privacy
When using a new tool, it’s important to think about security, accessibility, and student privacy. Staying up to date with technology is great, but you also need to follow PSU’s rules about keeping student records private. Tools that haven’t been checked for security and accessibility compliance could put student data at risk because there might not be an agreement in place to ensure FERPA requirements are met.
Tools that haven’t been reviewed for accessibility, usability, and support can also make things harder for students. OAI and OIT have formal processes for reviewing digital learning tools. They’ll work with you and the company that developed the tool to ensure they follow the rules and protect everyone’s data.
Note: If a tool hasn’t been reviewed for security and privacy, you should only use it if students are permitted to opt-out. If a student cannot participate fully in the course without the tool, contact OAI to discuss available alternatives in the DLE.
Affordability
Student costs for educational tools are rising, so it’s crucial to consider the price of any tool you want to use. Ask the developer how much the tool costs per student so you can share that information with students upfront. Try to keep costs low and use free alternatives when possible. We encourage you to visit PSU Library’s collection of information on Open Educational Resources. If you have questions about how to meet your teaching goals without adding extra costs, contact OAI for advice.
Student Support
If you introduce a new tool to your course, department, or college, it is your responsibility to manage supporting it. OAI and OIT staff are not guaranteed to know how to use the tool or have the necessary access to troubleshoot problems.
Here are some tips to help support your students:
- Look at the support materials on the tool’s website. You can usually find these by searching for “support” or “help.”
- Think about what questions students might have and prepare answers ahead of time.
- Add the tool’s support contact information to your syllabus.
- Try using the tool yourself before assigning it to students. This will help you foresee problems they might face and allow you to prepare to mitigate them in advance.
- Check if the company offers student support materials, like guides or tutorials. Sharing these resources can make things easier for everyone.
Student Experience
Make sure the tool is easy for students to use and won’t cause confusion. If the tool doesn’t have a “student view” feature, contact the tool’s developer to learn more about what students will see. You can also check user forums to find out what problems others have faced and whether they were able to get help.
If the support materials for students or instructors are not very good, be careful about using the tool. Addressing technical problems during the term can be stressful, especially if using the tool is required for graded activities.
If you decide to use the tool, start with low-stakes activities. Let students know it’s a “trial run” and share instructions and support resources with them.
Note: OAI and OIT are unable to help with third-party tools.
Consider how adopting this tool might impact the individual student across a program or degree. As more tools are adopted in various individual courses, be mindful of how many tools a student may be required to use for their other courses. Ask other faculty in your department what tools they use to meet the same objectives or contact OAI to assess currently available tools.
Upload to MediaSpace from a mobile device
You can share media recorded on your phone or tablet using Kaltura’s KMS GO application. The app is available for Android and iOS mobile devices. It allows you to upload audio, video, and images from your device to your PSU Kaltura MediaSpace account. Once uploaded and published as Unlisted, you can share that media in Canvas or via email.
Download and install KMS GO app (first use only)
- To begin, open the Apple Store or Google Play Store, and search for “Kaltura MediaSpace GO – Education” (do not select “KMS GO for regions“).
- Install and open the app to continue. If the app asks if you want to allow notifications, select Don't Allow or Allow. Note: This may not happen., If you don’t see this, then move to step 3.
- When prompted to enter your URL, enter https://media.pdx.edu. This connects the application to the PSU Kaltura platform, but you're not yet logged in to your own MediaSpace account.
- You may see a prompt asking if you want to allow KMS GO to "make and manage phone calls." We recommend you select Don't Allow.
- Your display will now show that you're connected to PSU MediaSpace. To log in, select the Profile icon. If you're uploading media, you may select the Upload icon, which will also prompt you to log in.
Upload media with KMS GO
- Open the KMS GO app
- Select the Upload icon.
- Sign in to MediaSpace with your PSU Odin and password, and authenticate with Duo. You'll now see Settings and Profile icons. Select Profile to see your current media list. You'll also see icons for:
- Home – returns you to the homepage.
- Upload - select to upload media.
- Inspire me - shows publicly available media.
- Explore - lets you search shared PSU videos on MediaSpace.
- Select the Upload icon and choose the type of media you want to upload: video, audio, or image.
- When prompted to allow KMS GO to access media on your device. Select Allow.
- From the options shown, select the area of your device where the media is stored.
- Enter a title for your media and select Upload.
- Agree to the copyright protection prompt.
- When the upload is complete, you'll be prompted to publish the media now or later. To share the video, select Yes. If you want the video to remain private, select Later.
- The media will display three publishing options: Private (default), Unlisted, and Public. To share your media in a Canvas course or via email, select Unlisted. This makes the media viewable by those with the link.
- Select Update.
- You'll be prompted to copy the media's URL to your device’s clipboard. To share, select Yes.
- Open your email or Canvas course account to share your URL. To paste the URL, press and hold within your email or Canvas text field.
For more information on how and where you can share media links in Canvas, please review Add media files to Canvas.
This article was last updated .

Set up your gradebook
Regardless of whether you teach in person or online, using Canvas to collect and assess student work can help to support student success and streamline your teaching. By taking a little time before the term starts to set up your assignments and gradebook, you can avoid confusion and frustration for both you and your students.
Why should I use Canvas Assignments and the Gradebook?
Using Canvas Assignments and the Gradebook together creates a clear, streamlined workflow for both you and your students. Collecting student work through one of the Canvas assignment tools keeps everything relevant and organized in one central location, allowing students to focus on learning rather than finding their assignments.
- Streamline your grading. You can use SpeedGrader for faster review, clickable rubrics, and personalized feedback. Grades and feedback for Canvas assignments can be automatically posted to the Canvas Gradebook. You can also message students directly from the Gradebook (e.g., “remind everyone who hasn’t submitted yet”).
- Give students real-time feedback. Students can see their progress throughout the term, not just at midterms or finals. Transparent grading helps them make informed decisions about effort, study habits, and participation.
- Keep grades accurate and consistent. Canvas has tools to calculate totals, apply weighting , and drop the lowest scores , ensuring that grades align with your syllabus.
All of this together can help alleviate frustration for both you and your students.
How do I set up my gradebook properly?
The first step to making sure your Gradebook is set up properly is to spend some time building your assignments. The Assignments page in your Canvas course is the blueprint for your gradebook; anything that needs to be in the gradebook must first be added to the Assignments page.
For help with creating your Assignments, check out the Canvas Assignments tutorials.
Once you have all your assignments created, make sure that your assignment groups and gradebook settings are configured properly. Consider each of the following settings:
- Assignment groups
- Calculating missing assignments
- Grade display options
- Grade posting policy
After you review each of the recommended settings, you can check to make sure grades are displaying as expected by using the Test Student account. This is the last “student” listed in your Grades class roster. In that row, enter the maximum point value for each graded activity. Then select Test Student and Grades to see a student’s view of your current grade visibility and display settings.
In Canvas, assignment groups allow you to organize assignments into logical categories (such as quizzes, papers, homework, etc.). Every graded activity must be placed into an assignment group. Each group creates a new subtotal column in your gradebook that displays each student’s percentage of total points earned for that particular group.
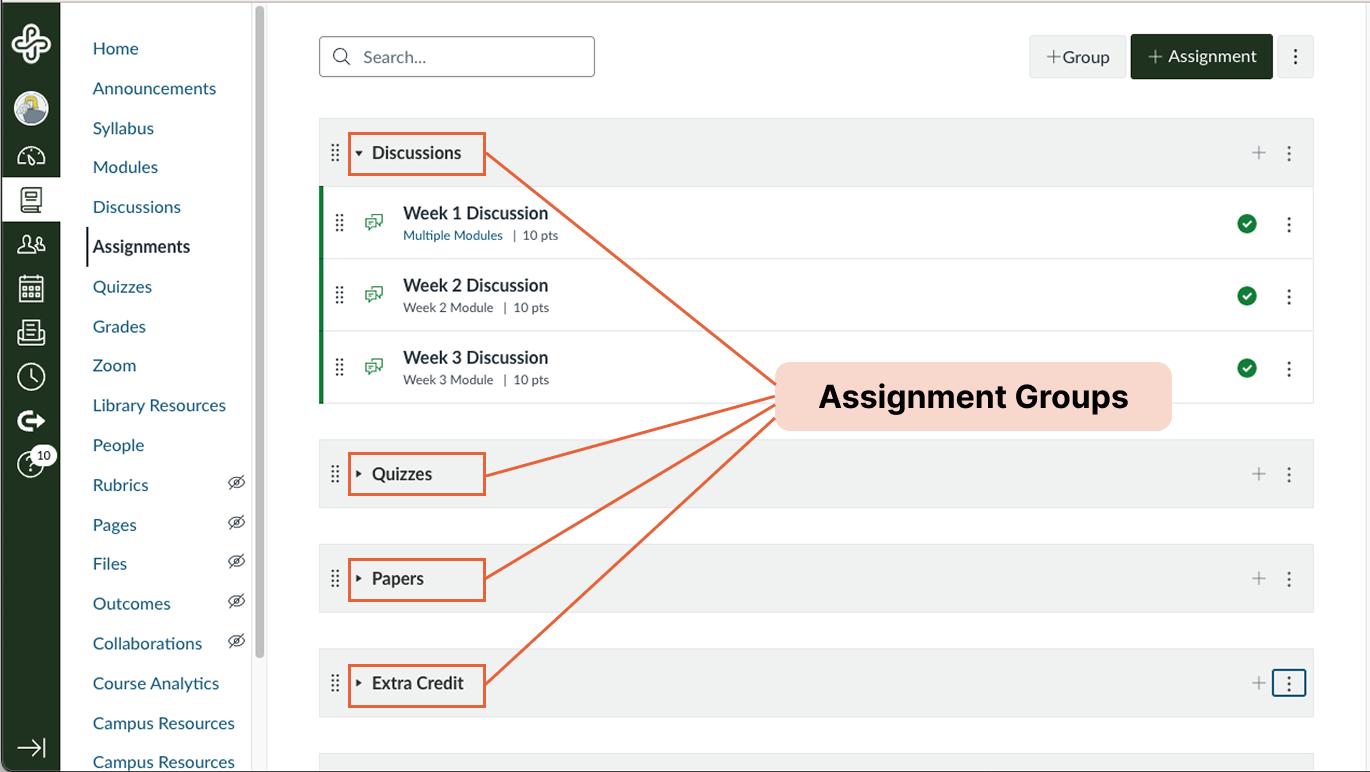
Adding assignment groups to your Canvas Gradebook can be especially useful for:
- Keeping your gradebook organized
- Weighting grades by category
- Applying rules such as dropping the lowest score
If you are copying a previously offered course into a new Canvas shell, you will notice an extra, empty assignment group at the top of the Assignments page. This group is part of the default template and will create an empty subtotal column in the gradebook. To reduce student confusion, delete this extra assignment group before publishing your course.
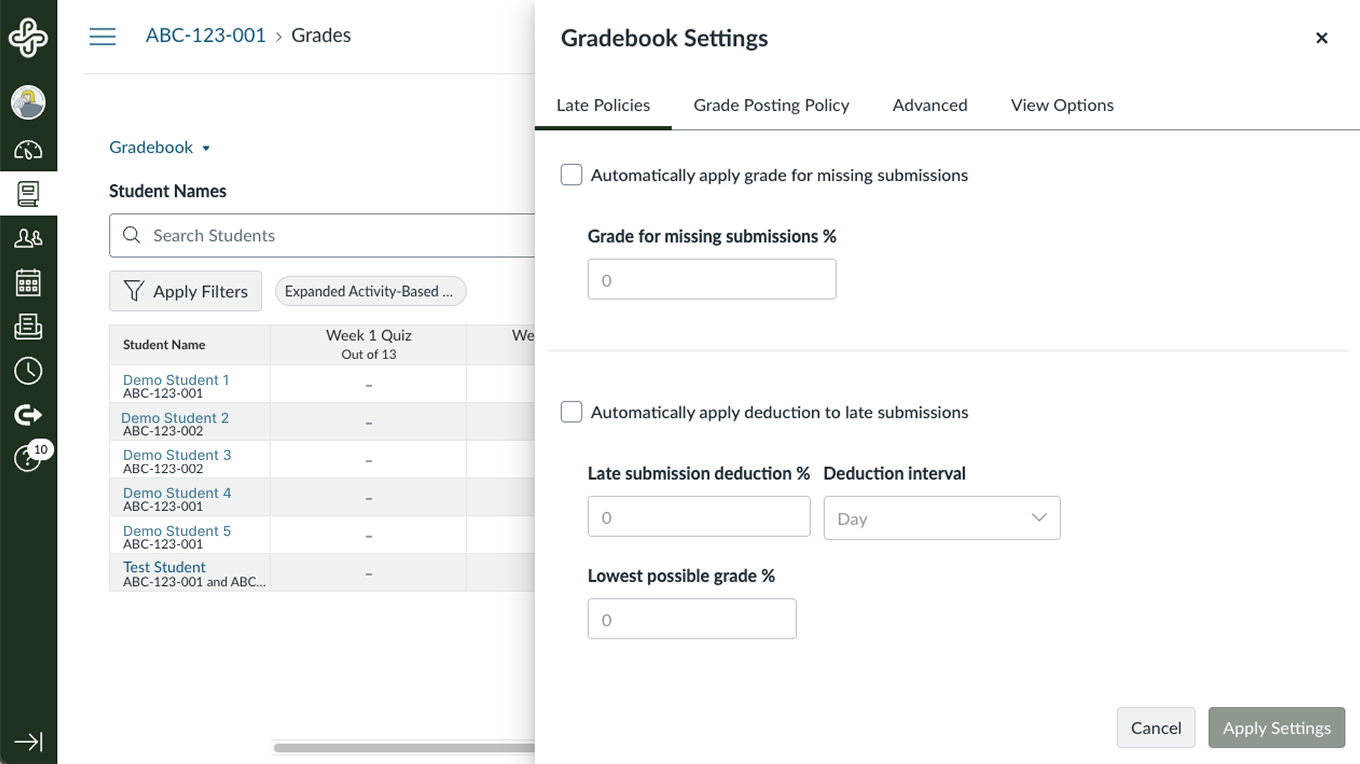
By default, the Canvas gradebook totals only positive scores. Missing assignments are not automatically calculated as zero. This can cause students to think they have a higher grade than they actually have if you do not manually enter zeros where necessary.
To ensure that your gradebook accurately reflects students’ work, consider applying a grade of 0% for missing assignments. This setting will affect all assignments in the course, but will only be applied once the due date for an assignment has passed. If a missing assignment is later submitted, the new submission must be updated in the gradebook for the grade to change.
Apply a missing submission policy for all course assignments
In Canvas Grades, student scores are shown by default as percentages. If you want to display assignment scores as a letter grade, you must select a grading scheme. You can enable the default grading Canvas scheme or create your own in Course Settings, as long as it conforms with the Portland State grading scale .
Selecting a grading scheme will display a letter grade in the course Total column but not in the individual assignment columns.
Individual grade display options
Each graded assignment you create automatically generates a column in the gradebook. You can select how you want the grade for each individual assignment to be displayed. By default, it will be displayed as a point value. However, you can also change this to:
- Points – Default setting shows actual points received out of the total possible points.
- Percentage – Displays grade as a percentage.
- Complete/incomplete – Uses checkmarks or X’s to indicate completion status. Canvas will add the total possible points for that item into the students’ final grade total. You can set the total points to zero if you do not want students to receive a grade for this assignment.
- Letter grade – Requires a grading scheme to be enabled for the assignment .
- Not graded – Useful for practice activities, for preparation work, and for allowing an activity to appear in the course flow but not count toward grades.
Instructor view

Student view

Grade distribution statistics
By default, students can also view grade distribution statistics for a course. To hide that data from students, follow these steps: How do I hide grade distribution scoring details from students ?
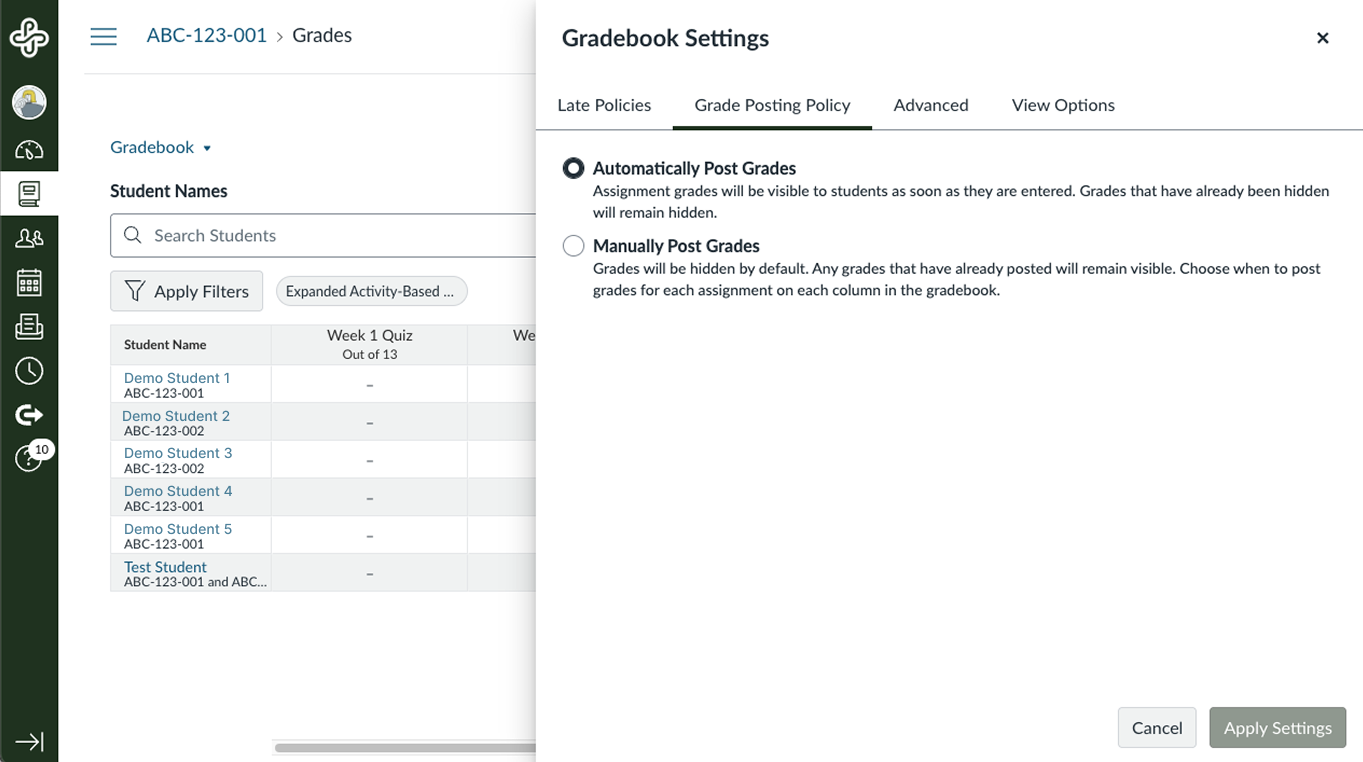
By default, Canvas automatically posts grades to students as you enter them. However, you may prefer to grade an assignment for all students before releasing the grades. In this case, you may want to change the grade posting policy setting so that grades are posted manually. Changing this setting allows you to choose when to make assignment grades visible to students. This setting can be made at the gradebook level (the policy affects all assignments) or the individual assignment level.
If you copy an entire course the course posting policy from the original course will be copied into the new course. This will override any grade posting policy settings you have in the new course. Additionally, imported assignments will retain their assignment posting policy from the original course.
This article was last updated .
Canvas media recorder troubleshooting
Canvas Media Recorder Troubleshooting
When attempting to record media in Canvas using the Rich Content Editor , you may encounter problems with your browser or operating system. Follow the steps below to troubleshoot common Canvas recording issues.
Check your browser
The solution can often be using the correct web browser or adjusting the settings.
Safari will not work with the Canvas Media Recorder.
Ensure the browser is up to date by checking the links below:
OAI recommends clearing your browser cache at least once each term. This may clear saved passwords, so be sure to keep a record of them elsewhere. Follow the links below for guidance on clearing your cache in Chrome and Firefox:
On first use of the recorder, a pop-up message appears requesting access to your camera and microphone.
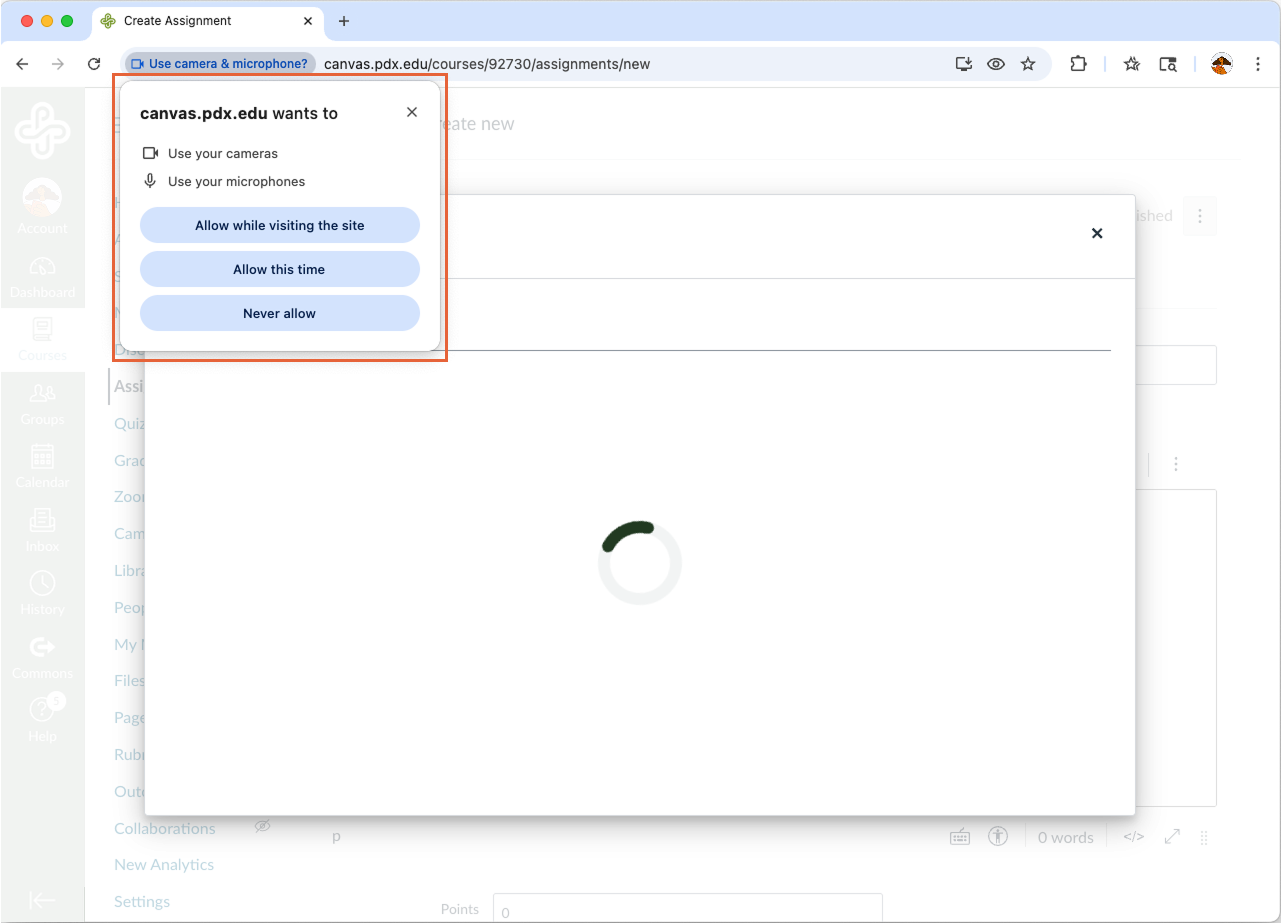
It’s easy to dismiss this alert instead of allowing access. To correct that, follow these steps:
Check your operating system
Make sure your computer’s operating system is up to date.
For PSU-managed computers
- Check for operating system updates by launching the “Self Service Software” or “Software Center” application: https://www.pdx.edu/technology/self-service-software .
- If your computer is managed by your area’s TAG or OIT, contact them directly.
For non-PSU-managed computers
If you’ve gone through all the steps above and are still experiencing issues with the Canvas media recorder, please submit a request to OAI Support with a brief description .
This article was last updated .

Add an extra credit question to a New quiz
Canvas Quizzes do not have a true extra credit option for automated grading. Extra credit is possible, but this requires manual grade input. For large classes that need a mostly automated option, see the workaround outlined in Creating an Extra Credit Quiz (requires using Classic quizzes).
To create an extra credit question, set the question’s point value to zero. When you manually grade the question, any points assigned are added to the quiz total. The quiz score can exceed 100%. Once extra points are manually entered in SpeedGrader, the updated total automatically transfers to Grades.
How do I create a New Quiz with an extra credit question in Canvas?
Create your quiz as normal. For quizzes with extra credit questions, we recommend ensuring that the assignment total and the sum of point values match to avoid student confusion.
When you are ready to add an extra credit question, do the following:
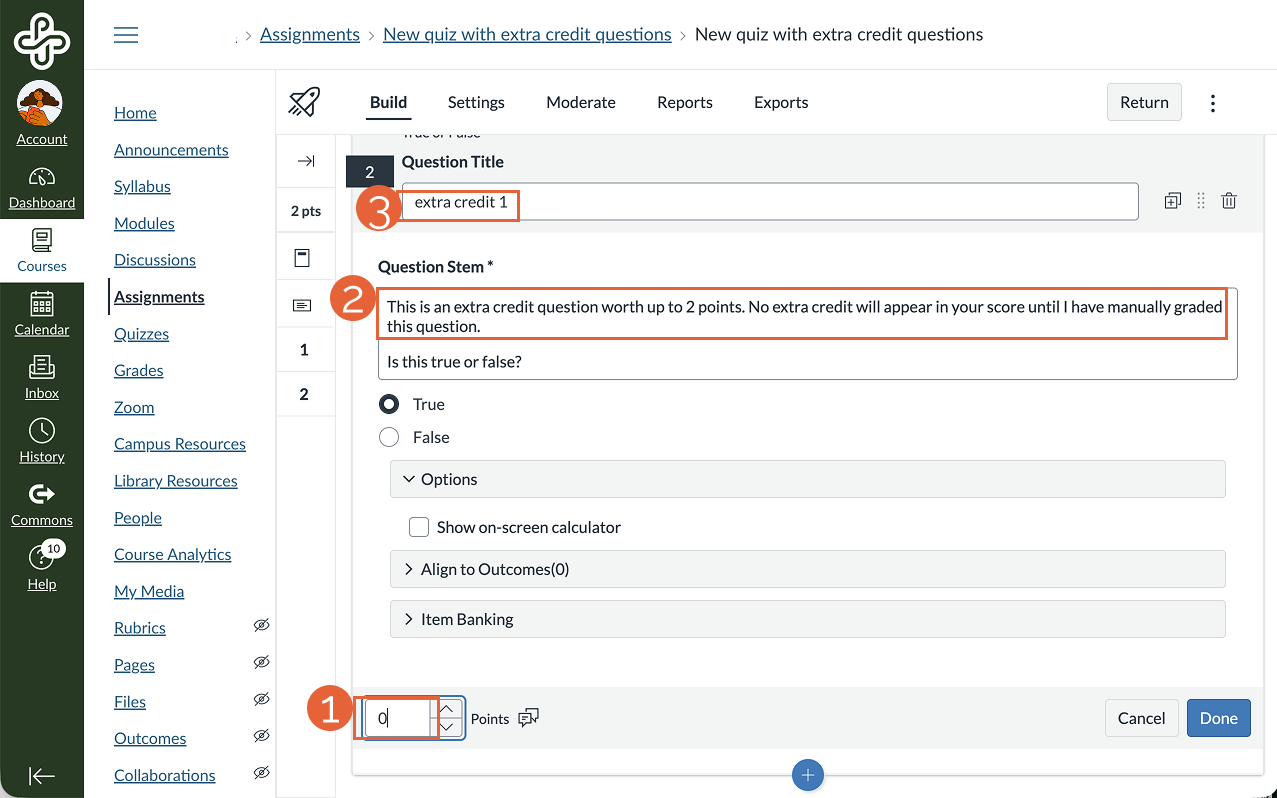
- Create a question and enter the point value as zero (1).
- In the question prompt, we recommend letting students know that extra credit points must be manually graded and will not appear immediately in their score (2).
- Optionally and for your own reference, you can give the question a title (3). Question titles are only visible to instructors.
- Select Done when the question is complete.
- Repeat as needed for additional extra credit questions.
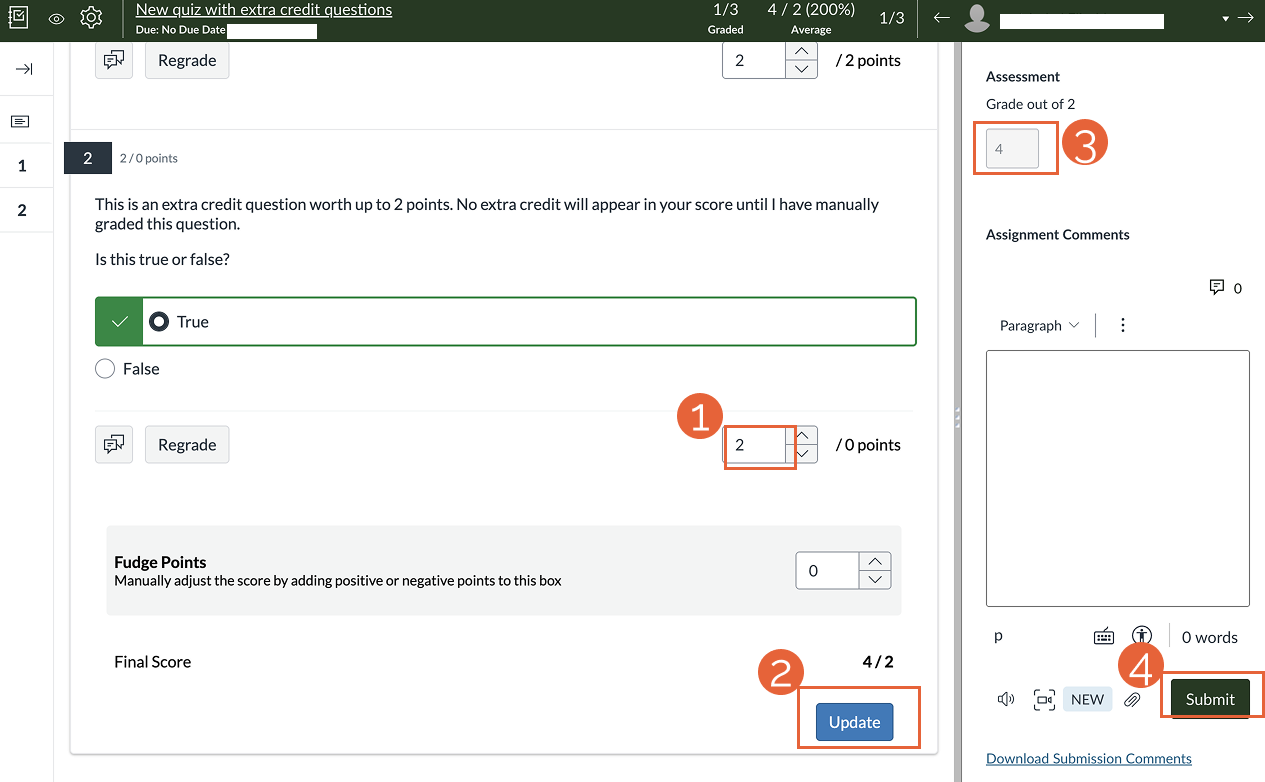
How do I grade extra credit quiz questions in New Quizzes?
- Open SpeedGrader from the Grades column for this quiz.
- Manually add points for a correct extra credit question (1).
- Select Update (2) to save these scores to Grades.
- Confirm the total Assessment Grade (3). The score can exceed 100%.
- Enter any optional feedback in the Comment field and select Submit (4).
This article was last updated .