
Minimize connection issues in Google Hangouts
Lost or dropped internet connections are a common problem when using Google Hangouts. Here are some tips to keep in mind before you begin your Hangout.
- Avoid using a high traffic WiFi area. On campus, the library, the Smith Memorial Student Union and other high traffic areas at peak times may not provide sufficient bandwidth for a steady connection. Coffee shops and other public networks may have similar issues.
- Test your connection first. If you can play this NASA YouTube video in high definition in full screen mode this should approximate the amount of bandwidth you’ll need to join a Hangout.
- Close non-essential running applications on your computer. This will reduce the amount of work your CPU has to do.
- Limit the number of participants in your Hangout. The bandwidth needed for a hangout is variable, and increases per user. For more information on bandwidth requirements, see the System Requirements Google Support article.
This article was last updated on .

Create a New Page in Pebble+
Create a New Page in Pebble+
An easy way to start working on your portfolio in Pebble+ is by creating a page. Pages can be shared or submitted for assessment individually, or added to a portfolio.
- Log into PebblePad from pebblepad.pdx.edu.
- Click on the burger menu (three stacked lines like a hamburger) in the upper left corner of your screen, and click Asset Store from the home page.
Get used to using this menu; it’s the quickest way to jump from place to place in Pebble+.

- Click Get creative in the list, and select Create a page.
- Use the Add Content button at the top of the page to get started.
If you need any help during the editing process, click on the Help button in the bottom right corner of the window. This button can be found throughout Pebble+, and can help you whenever you get stuck.

Note: PebblePad provides additional in-depth help guides .
This article was last updated .

View Video Quiz Scores and Analytics
Once students have taken your quiz, use the following instructions to view results.
- Open My Media from the button in the top right corner.
- Click the video quiz for which you want to view results.
- Click Actions > Analytics.
- From the Dashboard tab, use the column on the right to view a summary of results. The Average Score displays in the General Metrics area on the left of the page.
- Use the Quiz Questions tab to view, print or export results by question.
- Use the Quiz Users tab to view, print or export results by user.
This article was last updated on .

Create a Playlist
- Find a video or media item that you want to add to a playlist.
- Click the Actions menu beneath the video player and click Add to Player.
- Enter a name in the Create a New Playlist field and click Create.
- Click Save to add the video to your new playlist.
This article was last updated on .
Create a Channel
Create a Channel
A channel is a collection of videos, images and/or audio files that is created by an owner, and managed by the owner and any delegated managers.
- Click the button that says your name in the upper right corner.
- Click My Channels from the list.
- Click the Create Channel button.
- Enter a Name.
- Enter a brief Description and Tags as needed.

NOTE: Tags add searchable text for public channels
- Select Privacy settings:
Select Restricted so that the channel can be viewed by non-members with PSU accounts, but only members can add videos.
Select Private to create a channel for members only. - Select Options as needed.
Check the first box to moderate content.
Check the second box to enable comments. - Click Save.
- Click Back to Channel to view your changes.
This article was last updated .

Upload video or audio to My Media
Upload video or audio to My Media
In this article, you will learn how to upload video or audio files to My Media in Kaltura MediaSpace for storage and to use in courses.
Log in to MediaSpace before continuing with the steps below.
How do I upload video or audio to My Media in MediaSpace?
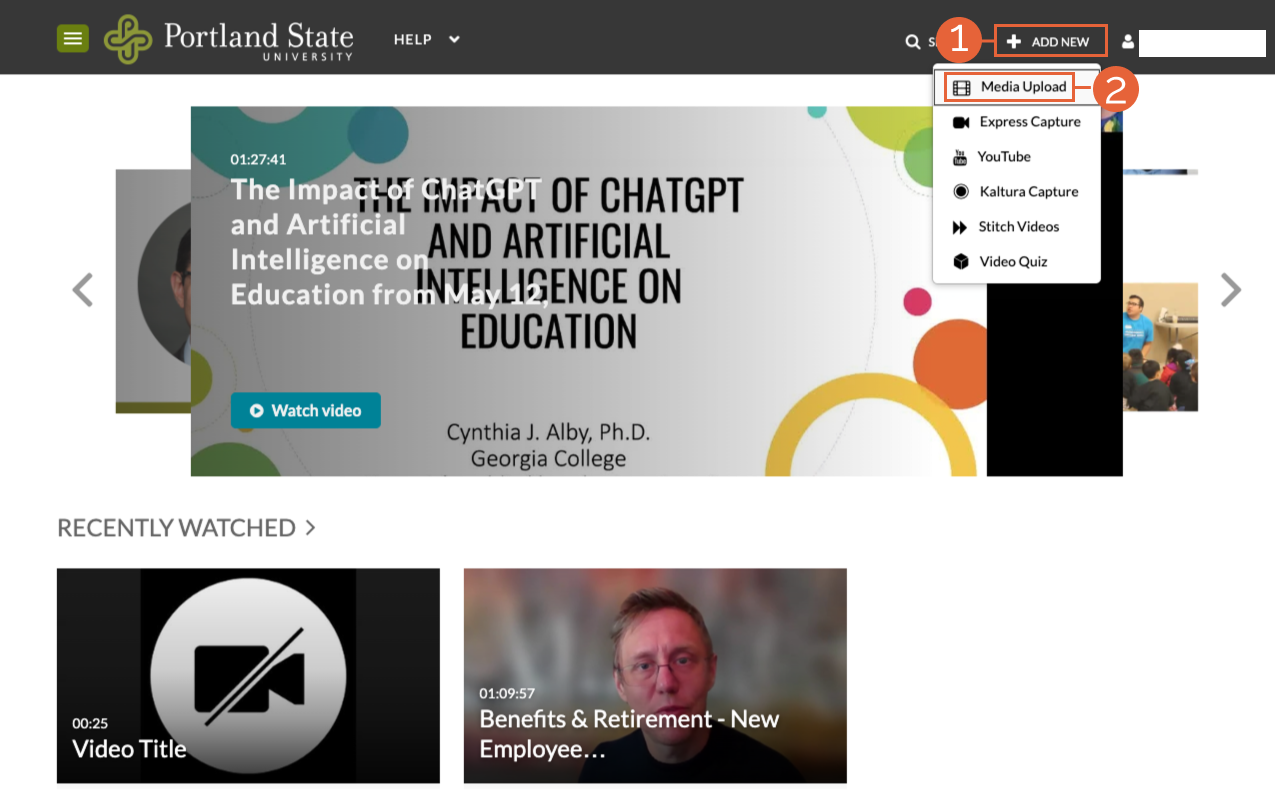
- From the MediaSpace homepage, select Add New (1), then Media Upload (2).
- If you agree to the PSU terms of service and copyright policy, check the “I agree to the above terms and conditions” box to continue.
- Select the Choose a file to upload button.
- Select the file you want to upload from your computer.
- Once the upload completes, enter a Name for the video.
- Enter a brief Description as needed.
- Enter Tags as needed.
- Choose a Publishing Status. MediaSpace allows users to select a Publishing Status to decide how they want their video viewed. There are three options:
- Unlisted: Anyone with the link can access the media. Users do not have to log in to view Unlisted content. This option is recommended if you want to share your content with students as a link.
- Private: Only the owner has access.
- Published: Users with specified access to the media’s location can access it. If published to a channel, then the users added to that channel must log in to view the content.
- Select Save.
- Select Go To Media, and verify that your media behaves as expected.
Once you’ve uploaded your media, remember to Add Captions to MediaSpace Videos. You must enable captions for media manually uploaded to MediaSpace.
This article was last updated .

Record Google Hangouts on Air via YouTube Live
Google Hangouts is being deprecated over 2018 as Google updates to Google Hangouts Meet. However, you can still record classic Hangouts via Hangouts on Air/Youtube live.
- Before you begin using Hangouts on Air, you will need to verify your YouTube account. Account verification takes 24 hours.
- Once your account has been verified, follow this link to create a Hangout on Air via YouTube live.
- Under Basic Info, create a Title, and pick a Start Time.
- Be sure that the Type option is set to Quick (using Google Hangouts on Air).
- In the privacy settings drop down menu on the right, select Public, Unlisted, or Private.
- An unlisted event is viewable to anyone with a link to the event, while a private event is viewable only by people you share the event with.
- Click the Go Live Now or Create Event button when you are ready to start or save your event.
- If you need to share a future Hangout’s details with participants, click the Start Hangout on Air button and add participants. You can then leave the Hangout and come back to it at its scheduled start time.
NOTE: Your recorded video will upload to your YouTube channel once you leave the Hangout on Air.
For more resources, visit Google Support.
This article was last updated on .
Create a Video Quiz
Use the quiz tool to add quiz questions to your MediaSpace videos.
NOTE: Scores from video quizzes are only available from MediaSpace. They can be downloaded as a CSV or printable file, but they do not automatically export to Canvas or other software. Important: ad-blocking browser extensions can result in anonymous quiz submissions. To be safe, advise students to open the video quiz in a private/incognito browser window, which will disable their extensions.
Create a Video Quiz
- Log in to media.pdx.edu.
- Click Add New > Video Quiz.
- On the Media Selection page, click the Select button from a video in your My Media list.
- Ensure the cube icon is selected on the new page that opens.
Overview of the Quiz Editor
The Quiz Editor has three main parts:
- Under Details, you can modify the quiz name, welcome message, allow download of question list, and turn instructions on or off.
- Under Scores, you can set or modify scoring options.
- Under Experience, you can set or modify the quiz taking options. This is where you can choose whether or not to allow users to change their answers, skip and come back to questions and “seek forward” in the video.
Add Questions
- Click the play button in the video player, and pause the video where you would like to add a question, or move your cursor though the timeline below the video.
- Click the hexagonal plus icon in the player screen to add a question where the video is paused.
- Select the type of question. Mediaspace offers:
-
Multiple Choice – Question with only one correct answer
- Enter your question in the Add a Question Here box.
- Add the answer to the Add the CORRECT Answer Here box.
- Enter at least one incorrect answer in the Add Additional Answer Here box.
- Click the hexagonal plus icon to add additional incorrect answers.
- Click the light bulb icon to add a Hint to the question or an explanation to Why the answer is correct.
- Click the white icon of two arrows in the upper left corner to shuffle the question answers. Otherwise, the correct answer will always appear first.
- Click the Save button when you are finished creating your question.
-
True/False – A question with only 2 options
- Enter your question in the Add a Question Here box.
- Add the answer to the TRUE box.
- Enter an incorrect answer in the FALSE box.
- Click the light bulb icon to add a Hint to the question or an explanation to Why the answer is correct.
- Click the Save button when you are finished creating your question.
-
Reflection Point – A video pause combined with text, but no response required
- Enter your text in the Add a reflection point text here box.
- Click the Save button when you are finished creating your reflection point.
-
Open-Ended Question – Answer the question with your own words
- Enter your text in the Add an Open Question Here box.
- Click the Save button when you are finished creating your question.
-
- Click the blue cube icon in the timeline if you need to edit your question.
- Click the eye icon below the video player to preview your quiz.
- Click the blue Done button when you have finished creating the quiz.
- Click Go to Media to view your finished video quiz.
Move a Question
- Click and drag the question icon in the toolbar to move a question.
- Click Save in the question editor to save the new location.
Preview a Quiz
- From the Quiz Editor, click the eye icon.
- In the window that pops up, begin the quiz by clicking the play button in the video player.
- Read the instructions, and click Continue.
- When you reach a question, click an answer and Continue. Click Skip for Now as needed.
- Click Submit once you are finished.
- Click Done
- Click the Close button to exit the quiz previewer.
This article was last updated on .
Log in to MediaSpace
Log in to PSU MediaSpace
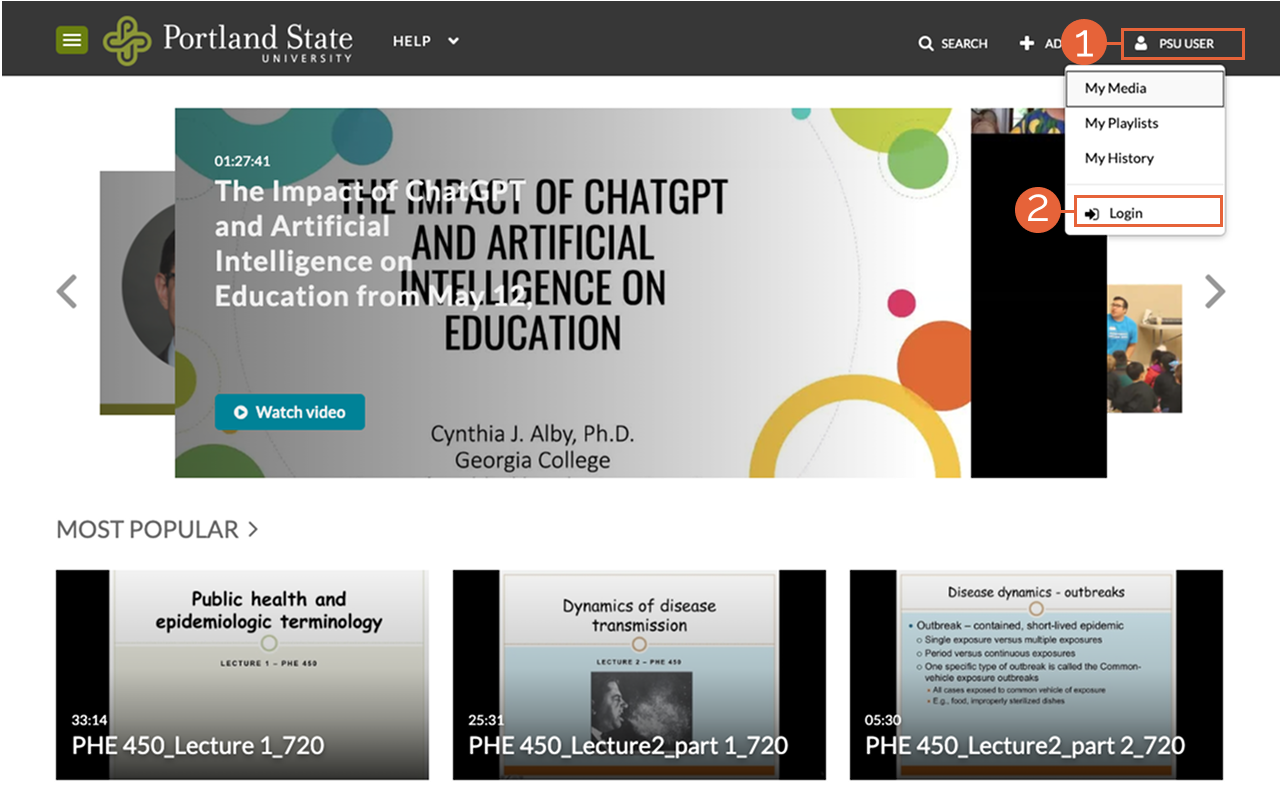
- Select PSU User.
- Select Login.
- On the PSU Single Sign-On page, enter your Odin username and password, then confirm with Duo.
This article was last updated .

Understanding Assessment Methods
Assessment refers to discovering students’ knowledge, skills, attitudes, competencies, and habits of mind and comparing them to the expected results of participating in your course. It is ideal to discover these things soon enough to redirect a course of study, if necessary. We call this analysis and redirection formative assessment.
Be transparent in your expectations for students by including learning outcomes in each course syllabus and by sharing program outcomes on all program websites.
Quality Learning Outcomes
A learning outcome must be measurable, meaningful, and manageable. It uses active verbs and specifies what you want students to know or do. A good outcome statement has three components—remembering them is as easy as ABC!
-
- Audience (A) = Person doing or expressing
- Behavior (B) = What audience will do or report
- Condition (C) = What audience needs to do to succeed
Examples of learning outcomes
-
- Students in an introductory science course will be able to recall at least five of the seven periods of the periodic table.
- Students in a psychology program will design a research experiment to carry out in their capstone course.
- Students in a service-learning leadership program will demonstrate increased leadership skills by completing a leadership skills inventory, as indicated by a score of at least 80 percent.
A helpful resource for writing learning outcomes is Bloom’s Taxonomy of Cognitive Skills. It associates verbs with a ranking of thinking skills, moving from less complex at the knowledge level to more complex at the evaluation level. Make sure to set the level of the outcome to match the level at which you teach the content.
Assessment Techniques
Angelo and Cross (1993) outline the following main characteristics of classroom assessment techniques.
- Learner-centered. Focus on the observation and improvement of learning — e.g prior knowledge, misconceptions, or misunderstandings students may have over course content.
- Instructor-directed. Decide what to assess, how to assess, and how to respond to what you find from assessment.
- Formative. Use assessment feedback to allow students to improve, rather than assigning grades. Feedback is ongoing and iterative, giving you and students useful information for evaluation and improvement.
- Mutually beneficial. Students reinforce their grasp of the course concepts and strengthen their own skills at self-assessment, while you increase your teaching focus.
- Context-situated. Assessment targets the particular needs and priorities of you and your students, as well as the discipline in which they are applied.
- Best practice-based. Build assessment on current standards to make learning and teaching more systematic, flexible, and frequent.
- Assessing before instruction helps you tailor class activities to student needs.
- Assessment during a class helps you ensure students are learning the content satisfactorily.
- Using classroom assessment technique immediately after instruction helps reinforce the material and uncover any misunderstanding before it becomes a barrier to progress.
Suggested Assessment Techniques
Try incorporating several of these techniques in your course.
- Course and homework assignments
- Multiple choice examinations and quizzes
- Essay examinations
- Term papers and reports
- Observations of field work, internship performance, service learning, or clinical experiences
- Research projects
- Class discussions
- Artistic performances
- Personal essays
- Journal entries
- Computational exercises and problems
- Case studies
Assessment Tools
The two most common assessment tools are rubrics and tests.
Rubrics are used to assess capstone projects, collections of student work (e.g., portfolios), direct observations of student behavior, evaluations of performance, external juried review of student projects, photo and music analysis, and student performance, to name a few. Rubrics help standardize assessment of more subjective learning outcomes, such as critical thinking or interpersonal skills, and are easy for practitioners to use and understand. Rubrics clearly articulate the criteria used to evaluate students.
You can create a rubric from scratch or use a pre-existing one (as-is or modified) if it fits your context. When creating a rubric, start with the end in mind. What do you want students to know or do as a result of your effort? What evidence do you need to observe to know that students understand course content? These questions lead to the main components of a rubric:
-
- A description of a task students are expected to produce or perform
- A scale (and scoring) that describes the level of mastery (e.g., exceed expectation, meets expectation, doesn’t meet expectation)
- Components or dimensions students must meet in completing assignments or tasks (e.g., types of skills, knowledge, etc.)
- A description of the performance quality (performance descriptor) of the components or dimensions at each level of mastery
Steps in rubric development
-
- Identify the outcome areas. Also known as components or dimensions. What must students demonstrate (skills, knowledge, behaviors, etc.)?
- Determine the scale. Identify how many levels are needed to assess performance components or dimensions. Decide what score to allocate for each level.
- Develop performance descriptors at each scale level. Use Bloom’s taxonomy as a starting point. Start at end points and define their descriptors. (For example, define “does not meet expectations” and “exceeds expectations.”) Develop scoring overall or by dimension.
- Train raters and pilot test. For consistent and reliable rating, raters need to be familiar with the rubric and need to interpret and apply the rubric in the same way. Train them by pilot-testing the rubric with a few sample papers and/or get feedback from your colleagues (and students). Revise the rubric as needed.
Pre-existing rubrics
-
- Texas A&M University rubrics for 15 leadership competency areas, including communication, delegation, and project management
- American Association of Colleges and Universities (AAC&U) value rubrics for areas such as information literacy, teamwork, and civic engagement
- PSU University Studies Rubrics for Inquiry and Critical Thinking, the Diversity of the Human Experience, and Ethics and Social Responsibility
There is no one way to develop a classroom-level test. However, there are commonly agreed upon standards of quality that apply to all test development. The higher the stakes of the test used for decision-making (e.g., grades in course, final exams, and placement exams), the greater attention you must pay to these three standards:
-
- Does the test measure what you intend?
- Does the test adequately represent or sample the outcomes, content, skills, abilities, or knowledge you will measure?
- Will the test results be useful in informing your teaching and give sufficient evidence of student learning?
In selecting a test, take care to match its content with the course curriculum. The Standards for Educational and Psychological Testing (1999), have a strict set of guidelines and apply “most directly to standardized measures generally recognized as ‘tests’ such as measures of ability, aptitude, achievement, attitudes, interests, personality, cognitive functioning, and mental health, it may also be usefully applied in varying degrees to a broad range of less formal assessment techniques” (p. 3).
General procedures for test development laid out in the Standards
-
- Specify the purpose of the test and the inferences to be drawn.
- Develop frameworks describing the knowledge and skills to be tested.
- Build test specifications.
- Create potential test items and scoring rubrics.
- Review and pilot test items.
- Evaluate the quality of items.
American Psychological Association, & National Council on Measurement in Education. (1999). Standards for educational and psychological testing. American Educational Research Association. https://search.library.pdx.edu/permalink/f/p82vj0/CP7195947060001451
Angelo, T. A., & Cross, K. Patricia. (1993). Classroom assessment techniques : a handbook for college teachers (2nd ed.). Jossey-Bass Publishers. https://search.library.pdx.edu/permalink/f/p82vj0/CP71104374450001451
Learn More Elsewhere