
Student-Faculty Partnerships in Curricula

Contributors:Kari Goin, Sophia Ryker
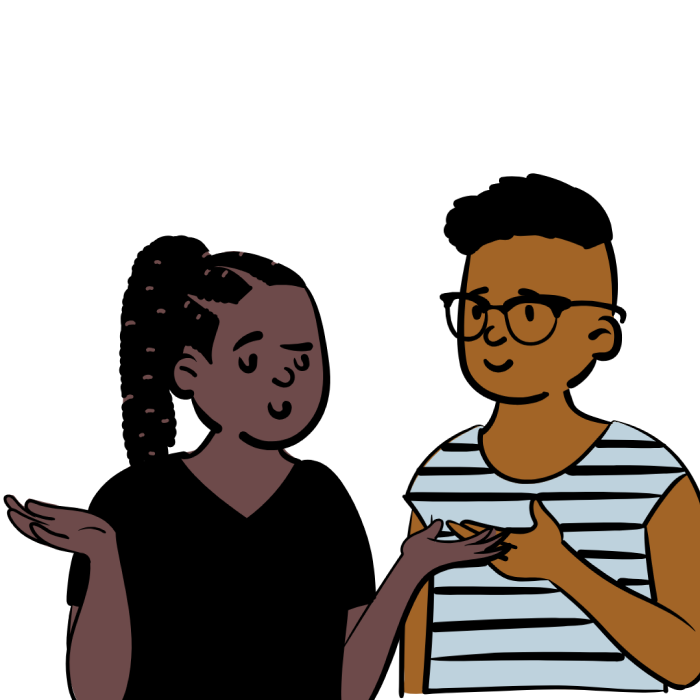
There is a growing movement to not only include but also involve students in curricula decisions. Students in higher education have challenged the notion that they are customers receiving a transactional education and instead call for higher levels of participation and agency in their learning (Matthews et al., 2017). Students collaborating with institutions, programs, and faculty to design curricula is a framework known as students as partners, or student-faculty partnerships. At Portland State University, student body President Nya Mbock has called for more student involvement with faculty in the curriculum (Swordfisk, 2021).
Positive outcomes of student-faculty partnership include increased student engagement, motivation, and ownership for learning, a positive shift of power dynamics between faculty and student (toward more equitable power), engagement and empowerment for students who are historically excluded, and increased student confidence and self-determination (Cook-Sather et al., 2014).
With any approach to curricula, the intention of including students can end up harming students. It’s important to set intentions, to be transparent, and to reflect on how power affects the partnership. Without these intentional pieces, partnership work may end up tokenizing students and essentializing the student experience (Cook-Sather et al., 2014; de Bie et al., 2021). As a result, and despite good intentions, partnerships can reinforce the inequitable learning environments that they seek to disrupt. For example, partnership work may focus on an increased sense of belonging for students, which may be problematic when the institution students are invited to feel connected with has a history of erasure and colonization for some student populations (de Bie et al., 2021).
Example Partnership Approaches
Here are three examples of partnership approaches you can include in your own practice:
Student-faculty course design
This happens before a course is taught and when you are designing the course. A student or group of students collaborate with the faculty member on the design of a course. This might include a redesigned syllabus or elements such as course outcomes, a course assignment, or an entire course.

Students create and choose
This includes students in a course you are teaching. This might include having students choose the weekly discussion topics or create and vote on quiz questions, embedding students’ social bookmarking annotations to shape course content, or having students collaborate to create course content (Cook-Sather et al., 2014).
Partnerships in assessment
Invite students to identify grading criteria for an assignment or final essay or invite students to co-assess their own final presentations. Another example is to bring a rubric with past student papers (used with permission) and have current students grade the papers based on that rubric. Have a discussion about the rubric and invite students to offer suggestions on adapting it for their course term.
Getting Started
Step 1
Begin by reflecting on how you currently involve students in your curriculum.
Step 2
Create a list of when students get to make decisions within your curriculum. (If this is currently “never,” consider starting with a negotiated syllabus.)
Step 3
Acknowledge that this iterative process never really ends.
Examples in Practice

Provide a diversity of materials in formats that remain consistent from week to week. Students choose which materials to engage with to learn the concepts outlined for that week. The focus of the negotiated syllabus is to highlight student agency within their learning by creating opportunities for students to choose the way they want to learn a concept.
For example, provide lecture slides, supplementary texts, and external videos covering the information being taught each week. From this collection, students can choose which items are most useful to them and will have reliable access to their preferred materials for each new topic.
Reflect on the level at which students make decisions and identify opportunities to increase student involvement: Hold a discussion with students in class to determine course learning outcomes and discuss how predetermined assignments will help the class reach their goals.
Be prepared to make small changes to assignments based on the class discussion. This is expected, as every class will have different students. The discussion may also yield ideas for new or different assignments to help the class meet their co-created learning outcomes.
Alternatively, hold a discussion with students in class to create course assignments based on predetermined course outcomes and how these assignments will help the class reach their goals.
Integrate the student voice into your course by providing ample room for identity expression and application of the material to students’ own lived experiences — in ways such as including languages spoken beyond English and encouraging cultural and community practices. This engages more parts of the brain and allows for greater communication between them, along with deeper integration of the learned material into long-term memory (Johnson et al., 2006).
This eReader is a great example of storytelling that showcases stories written by diverse students in University Studies courses at PSU:
Develop a syllabus, in partnership with students, that reflects your collective values. Co-creating a syllabus is a chance for students to democratically participate in their own learning. It signals that a course is designed to share power and encourage not only student involvement but also engagement and agency.
The syllabus might include co-created community guidelines, flexible deadlines based on the class’s needs for that quarter, or opportunities for students to self-grade. You might also consider including a list of linked resources (where to find cost-considerate course materials, necessary technology, internet access), a land acknowledgement, and an acknowledgment of bias.
Cook-Sather, A., Bovill, C., & Felton, P. (2014). Engaging Students As Partners in Learning and Teaching : A Guide for Faculty. John Wiley & Sons. https://ebookcentral-proquest-com.proxy.lib.pdx.edu/lib/psu/detail.action?docID=1650837
De Bie, K., Marquis, E., Cook-Sather, A., & Luqueño, L. P. (2021). Promoting Equity and Justice through Pedagogical Partnership. Stylus. https://ebookcentral-proquest-com.proxy.lib.pdx.edu/lib/PSU/detail.action?docID=6647714
Johnson, S., & Taylor, K. (2006). The Neuroscience of Adult Learning: New Directions for Adult and Continuing Education. Wiley. https://search.library.pdx.edu/permalink/f/p82vj0/CP71182273540001451
Matthews, K. E., Groenendijk, L. J., & Chunduri, P. (2017). We Want to be More Involved: Student Perceptions of Students as Partners Across the Degree Program Curriculum. International Journal for Students As Partners, 1(2). https://doi.org/10.15173/ijsap.v1i2.3063
Swordfisk, K. (2021, September 27). In pursuit of student success: ASPSU president prioritizes student involvement, improving the post-COVID learning environment. PSU News. https://www.pdx.edu/news/pursuit-student-success
Learn More Elsewhere
The Teaching and Learning Institute at Bryn Mawr and Haverford colleges

Log in to Canvas
Log in to Canvas
Log in to Canvas at Portland State by navigating to canvas.pdx.edu. You will be redirected to a page where you will be prompted to enter your PSU Odin name and password. Once authenticated, you will be logged in to your Canvas account.
When logging in, you will be prompted to complete Duo Two-Factor Authentication. For additional information, please refer to OIT’s resource on Duo Two-Factor Authentication.
This article was last updated .

Equity and inclusion practices

Contributors:Raiza Dottin, Kari Goin, Megan McFarland, Harold McNaron, Janelle DeCarrico Voegele
This guide introduces a few pedagogies you can adopt into your inclusive teaching practice. They can help facilitate connections and conversations leading to inclusive and equitable learning — but this is not an exhaustive list.
Culturally Sustaining Pedagogy
Culturally sustaining pedagogy builds on the work of culturally relevant teaching and culturally responsive pedagogy. It affirms and sustains students’ connections to their culture, language, and community. It focuses on students as active contributors of unique lived experiences essential to learning. It also resists monolingualism and deficit student framing by promoting cultural equality (Paris, 2012).
In practice
“I Notice, I Wonder” is a useful culturally sustaining practice in many teaching contexts. It’s an introductory brainstorming activity in which students from all backgrounds and abilities can participate.
Further reading about Culturally Sustaining Pedagogy

Universal Design for Learning
Universal Design for Learning (UDL) attempts to minimize barriers and create equal opportunities for all students to express what they know. UDL creates multiple paths to learning and understanding that benefit all students, regardless of disability. This framework focuses on adding flexibility, choice, and relevance to three key areas of instruction: expression of knowledge, representation of information, and engagement.
In practice
Further reading about Universal Design for Learning

Trauma-Informed Pedagogy
Originating in neuroscience, trauma-informed pedagogy acknowledges and attempts to mitigate the trauma’s impact on learning. Trauma can come from sources including but not limited to adverse childhood experiences (or ACEs) such as physical or emotional abuse, institutional and systemic oppression, and COVID-19. While trauma affects each individual differently, it’s likely to impact cognitive functions such as memory, emotional regulation, stamina, and focus. Strategies within this framework include a focus on community, relationships, routine, and flexibility.
In practice
Further reading about Trauma-Informed Pedagogy
- Leveraging the Neuroscience of Now
- What Does Trauma-Informed Teaching Look Like? (Note: You may need to register for a free account using your PDX email address in order to access this article.)

Community-Engaged Learning Pedagogy
What is the role of a university in a community? How might curricula contribute to students’ civic identity? How does a course honor the life experience students bring to the classroom? Community-engaged learning (CEL) pedagogies attempt to address these and other foundational questions concerning the intentional interplay between movements for justice, academic knowledge, and the spaces we share.
In practice
Further reading about Community-Engaged Pedagogy

Contemplative Pedagogy
Contemplative pedagogy encourages deep learning through focused attention, reflection, and mindfulness practice. It engages students in an introspective, first-person way of knowing the world around them through an embodied educational experience, which allows students to see themselves in their courses. “Inviting the contemplative simply includes the natural human capacity for knowing through silence, looking inward, pondering deeply, beholding, witnessing the contents of our consciousness…. These approaches cultivate an inner technology of knowing….” (Hart, 2004, pp. 29–30).
Many common classroom practices — such as close reading, writing, and reflection — can draw from contemplative practices to help students focus deeply, retain new information, and integrate learning into meaningful situations.
In practice
Further reading

Student voice
Student voice “aims to signal not only the literal sound of students’ words as they inform educational planning, research, and reform, but also the collective contribution of diverse students’ presence, participation and power in those processes” (Bovill et al., 2011, pp. 2–3). Notably, student voice work is shared decision-making between students and faculty that involves value, agency, and action for students and aims to be transformative for both students and faculty.
In practice
Further reading about student voice

Anti-Racist Pedagogy
Anti-racist pedagogy is a “paradigm located within critical theory utilized to explain and counteract the persistence and impact of racism using praxis as its focus to promote social justice for the creation of a democratic society in every respect” (Blakeney, 2005, p. 119). Further, anti-racist pedagogy reveals the structural inequalities within U.S. society while fostering students’ critical analysis skills as well as their critical self-reflection (Kishimoto, 2018). Per Kishimoto, incorporating anti-racist pedagogy at the classroom level begins with examining one’s own pedagogy and curriculum to implement change. This could involve understanding how inequitable education structures impact students differently, reevaluating assumptions we may make about students’ backgrounds, inviting a colleague to review syllabi or other course materials to identify where bias might impact curriculum and organization, meaningfully incorporating the work and voices of minoritized scholars, and incorporating high impact learning practices that create the foundations for collective exploration of historical, social, and cultural biases in the field of study.
In practice
Further reading
Blakeney, A. M. (2005). Antiracist pedagogy: Definition, theory, and professional development. Journal of Curriculum and Pedagogy, 2(1), 119–132.
Bovill, C. (2020). Co-creation in learning and teaching: the case for a whole-class approach in higher education. High Educ 79, 1023–1037.
Bovill, C., Cook‐Sather, A. & Felten, P. (2011). Students as co‐creators of teaching approaches, course design, and curricula: implications for academic developers. International Journal for Academic Development, 16(2), 133–145.
Bovill, C., Cook‐Sather, A. & Felten, P. (2014). Engaging Students as Partners in Learning and Teaching: A Guide for Faculty. John Wiley & Sons.
Carello, J., & Butler, L.D. (2014). Potentially perilous pedagogies: Teaching trauma is not the same as trauma-informed teaching. Journal of Trauma & Dissociation, 15(2), 153–168.
Hart, T. (2004). Opening the contemplative mind in the classroom. Journal of Transformative Education, 2(28), 28–46.
Kishimoto, K. (2018) Anti-racist pedagogy: from faculty’s self-reflection to organizing within and beyond the classroom. Race Ethnicity and Education, 21(4), 540–554.
Paris, D. (2012). Culturally sustaining pedagogy: A needed change in stance, terminology, and practice. Educational Researcher, 41(3), 93–97.

How to manage your Canvas site
How to manage your Canvas site
Need to log in to Canvas? Follow this link to the Canvas log in portal.
This website and resources are intended for Portland State instructors. For PSU students looking for help with Canvas and general tech support, please contact the OIT Helpdesk.
Additional Canvas resources for PSU students can be found in OIT’s Canvas Resources for Students.
Canvas has many features and tools for teaching a course. But you also need these “under the hood” functions for managing your course site.
Personal settings
Before getting started in Canvas, be sure to update your personal settings. It’s an important step to make sure you stay connected with your classes. You’ll need to do this only once, unless your preferences change.
The following list outlines the main settings you should consider reviewing and are linked to detailed guides:
Course import tool
Copy a course when you want to use or repurpose previously created content — including course settings, syllabus, assignments, modules, files, pages, discussions, quizzes, and question banks. You can also copy or adjust events and due dates. Not all content can be copied as part of a course. (Learn about “Import Limitations.”) Canvas lets you copy all content from one course site to another or select specific content.
Course shells for each new term will be available in the preceding term. For example, winter course shells will be available midway through the preceding fall term. If you need a place to work on your course sooner or just want a sandbox where you can test new ideas, create a new Canvas course shell from your Canvas Dashboard.
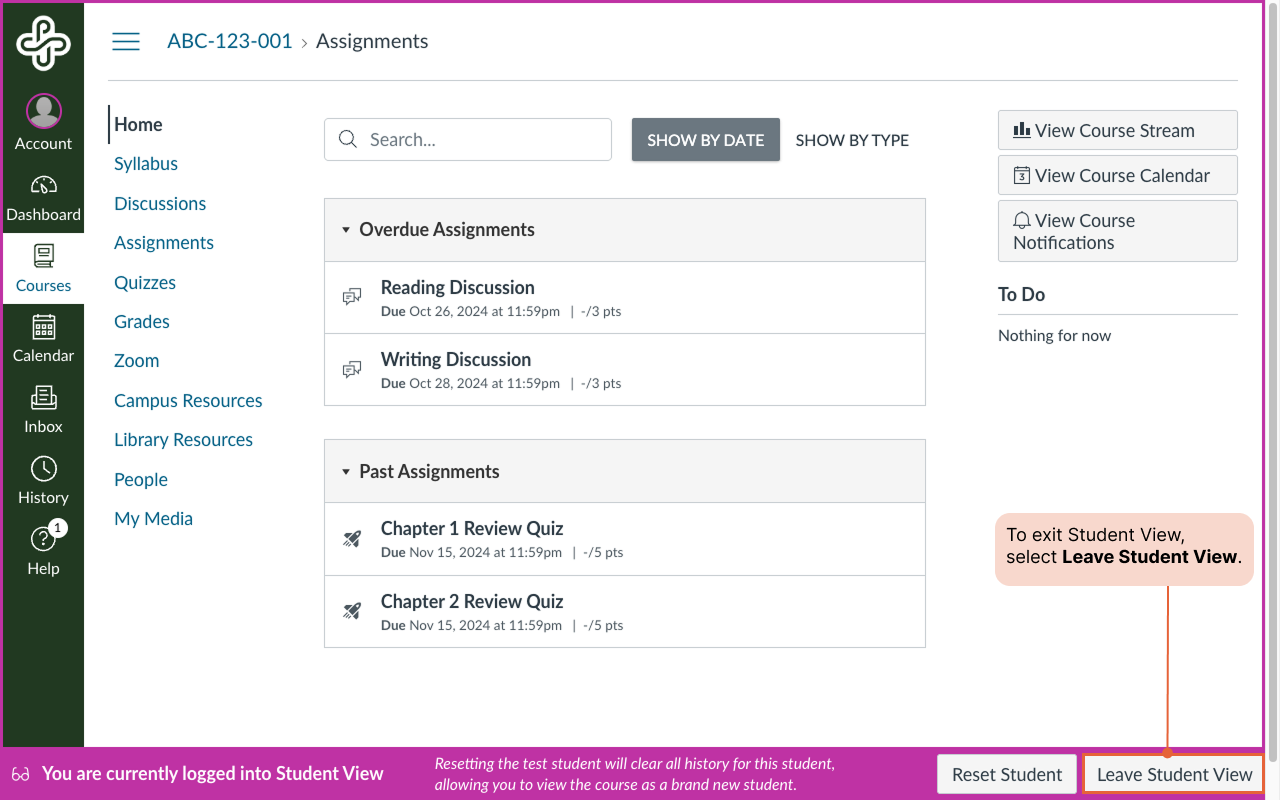
Student view
It’s always a good idea to check your course from the student’s perspective. This helps you identify what elements a student can access and how the course navigation menu displays for them.
To enter Student View, select “Settings” in the course navigation menu. Next, select “Student View” from among the settings area’s options.
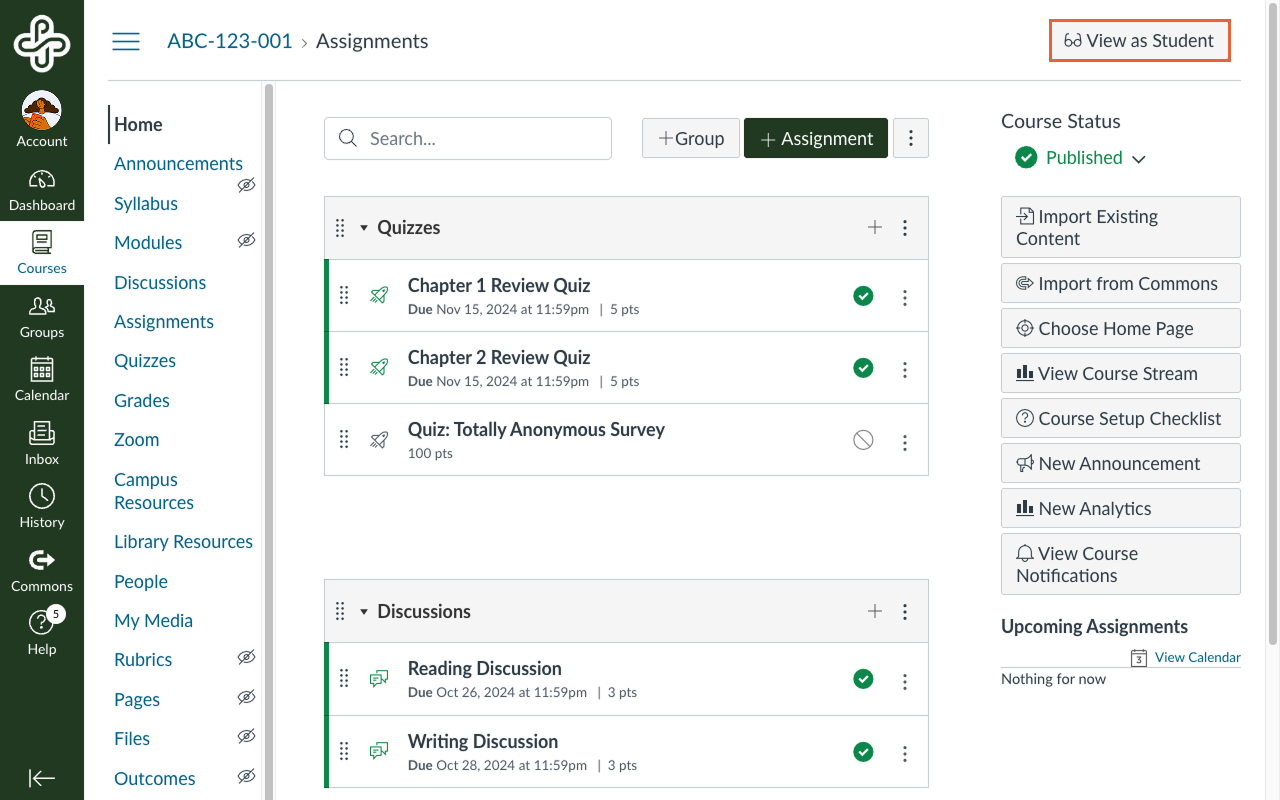
Student View has a highlighted frame or border.
You can navigate the course as a student, with some slight exceptions:
- Groups: As an instructor in Student View, all group information will be available to you, while students will only have access to their own group.
- Inbox: The Test Student doesn’t have a Canvas Inbox, so you won’t be able to test communications.
- Other tools: Some other tools (e.g., Panopto, VoiceThread, etc.) may not function as expected.
To exit Student View, select the “Leave Student View” button.
Canvas link validator
You can check all external links throughout your course with the course link validator. It finds invalid or unresponsive external links in both published and unpublished content. However, some links it flags as unresponsive (to Canvas servers) will still work for students.
Additional course settings
These settings are available only to the course instructor:
- Set a course image: This allows you to change the dashboard image associated with your course.
- Enable a grading scheme: This gives students a letter grade for assignments and the overall course.
- Allow students to attach files to discussions: This allows students to include files and images on discussion boards.
- View course analytics/statistics: This offers insight into student engagement in your course.
- Publish your course: This makes your course visible to students. You must “publish” your course for students to have access.
- Important note: Each item in your course needs to be published for students to access it. This includes all pages and links in your modules as well as assignments, quizzes, and discussions.
- Display announcements on the course home page: This allows you to show announcements on your course home page, so students notice them upon entering. You control how many announcements to display.
Adapted from “Managing Your Canvas Site” in Start Here 102: Best Practices in Online instruction, licensed CC BY 4.0 by Grace Seo, University of Missouri.
This article was last updated .

Communicating in Canvas
Contributors:Misty Hamideh
Need to log in to Canvas? Follow this link to the Canvas log in portal.
This website and resources are intended for Portland State instructors. For PSU students looking for help with Canvas and general tech support, please contact the OIT Helpdesk.
Additional Canvas resources for PSU students can be found in OIT’s Canvas Resources for Students.
Canvas has several ways to communicate with your students. Here are two of them:
- Announcements are course-wide.
- Inbox messages may be private between an instructor and a student or group of students, or a message between students.
Announcements
You can use Announcements to give students news, updates, and reminders. Students receive email copies of your announcements in their campus email. This is based on their notification preferences; by default, they receive the message immediately — but they can opt for less frequent notifications.
From the Canvas Tutorial Video Series for instructors
Note: A default Canvas course is set to show the latest announcement at the top of the page. You can set how many announcements to display, but we recommend just one to make sure students notice the most important and current information.
The primary use of an announcement is for news and reminders:
-
- Notify students of class cancellation, if a class location has moved, if you will be out of town or delayed in providing feedback on an assignment, etc.
- Remind students of upcoming due dates.
- Notify students of campus events or news items of interest or relevance.
You can also use announcements to engage students at the beginning of each unit (week). Doing this consistently helps participants stay connected and recognize that you are a human with a personality (and not just a computer). It helps define your “presence” in an online course.
When writing an announcement, use the “inverted pyramid” model from journalistic writing. Open with the most important facts or information and then progress through less important details. Most people will read only the first sentence or two unless they perceive a need to keep going.
Guiding announcements generally include two or more of the following:
-
- Introduction to the main idea for the week — short, one sentence, to motivate and encourage engagement in the topic of the week.
- Any scheduling information such as days the teacher will not be available, a changed due date, holiday, etc.
- Summary response to previous week’s discussion (or assignment submission). Provide positive feedback; whenever possible, mention student names and take quotes directly from their postings. This should be only a paragraph highlighting just one or two exceptional comments. (This recognizes and motivates, as well as demonstrating that you actually read the discussions.)
-
- By default, students receive an immediate email copy of a course announcement. However, faculty do not automatically receive copies of announcements they have created. If you want email copies of your own announcements (e.g., as reassurance that the announcement went out), edit your notification preferences.
- You can schedule Announcements in advance or post them immediately. Delaying release — even by a little — gives you time to proofread (and revise if needed) before students receive it.
- If multiple sections are loaded to your Canvas site, you can post an announcement to just selected sections if necessary.
- Announcements are also available in Canvas Groups. You can post an announcement to just one group, and group members can post announcements to each other.
- When you copy an entire Canvas site from one semester to the next, the announcements are included. You will need to go through them and delete any that are no longer needed or edit the release date for those you wish to reuse. Be sure to also edit out any information that was only relevant to the previous class!
- You can use the Rich Content Editor and Content Selector when you create an announcement. Use these to format the text of your posts or to link to the items you reference; for example, if you are reminding students that an assignment is due, you can link to that assignment.
The Inbox
The Inbox allows Canvas users to send messages to one another within Canvas.
Both faculty and students can configure their notification settings to receive Canvas Inbox messages at the email address of their choice. You can also choose how often to receive these notifications.
Use the Inbox to:
- Send information or updates to an individual student, a section, or a group.
- Record a media comment (audio or video) to send to an individual student, section, or group.
- Send file attachments to an individual student, a section, or a group.
- Use the “Message Students Who…” feature in the Gradebook to contact students who have not submitted an assessment, who scored less than a given grade, or who scored more than a given grade.
Adapted from “Communicating in Canvas” in Start Here 102: Best Practices in Online instruction, licensed CC BY 4.0 by Grace Seo, University of Missouri.
Learn More Elsewhere

Assignments in Canvas
Need to log in to Canvas? Follow this link to the Canvas log in portal.
This website and resources are intended for Portland State instructors. For PSU students looking for help with Canvas and general tech support, please contact the OIT Helpdesk.
Additional Canvas resources for PSU students can be found in OIT’s Canvas Resources for Students.
Assignments in Canvas is both a specific kind of assessment and any Canvas activity associated with a grade. This video provides a basic overview:
How to Use Assignments in Teaching
Students can submit several assignment types in Canvas:
- A “no submission” assignment helps you track activities not completed directly in Canvas, such as attendance at a Zoom session.
- “Online” assignments provide a space for students to turn something in online. You can select one or more types of online submissions to accept:
- Text entry provides a text box with formatting tools where students can write a submission directly in Canvas.
- Website URL provides a space for students to share a URL as their submission.
- Media Recordings allow students to create and submit recordings directly within Canvas or to upload recordings created in another application.
- Student Annotation allows you to provide a file that students can annotate directly in Canvas.
- File upload allows students to submit file types including Word documents, PowerPoint slides, spreadsheets, PDFs, images, and videos. (You can restrict file types if necessary.)
- “On Paper” assignments allow you to track hard copies handed in.
- “External tool” assignments allow you to create assessments with tools not native to Canvas, such as Turnitin or PebblePad.
- Graded discussions and quizzes are also considered “assignments.” These are listed under both Assignments and on their own respective Canvas index pages.
Assignments and Grades
The Canvas Gradebook is closely tied to the Assignments index. Anything you want a Gradebook column for must have an Assignment associated with it.
By default, assignments are listed in the order you create them. This also determines the order they appear in the Gradebook, but you can drag and drop them into the order you prefer.
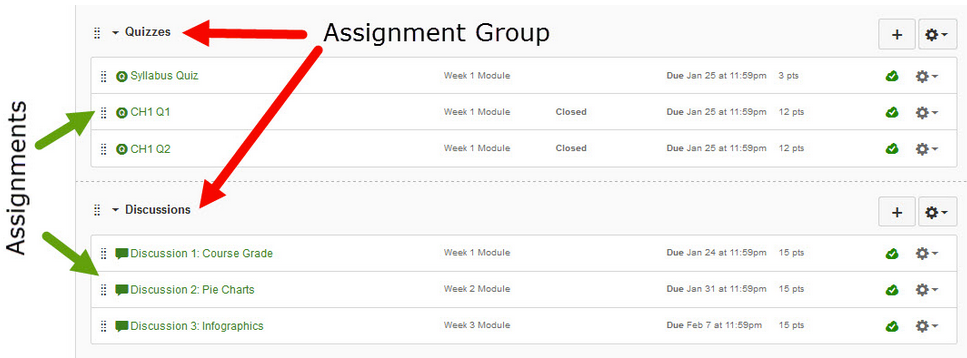
You can also create Assignment Groups on the Assignments page. This gives you:
- Subtotals in the Gradebook for each assignment group. For example, if you want a subtotal for all discussion assignments and another for all quizzes, you could create groups for each.
- A place to assign weight for weighted grades. You could assign a weight to each group (e.g., 20% for discussions, 50% for quizzes).
- A place to assign other rules for assignment groups, such as dropping the lowest score.
Adapted from “Assignments in Canvas” in Start Here 102: Best Practices in Online instruction, licensed CC BY 4.0 by Grace Seo, University of Missouri.
Learn More Elsewhere
Tutorials
Discussions in Canvas
Discussions in Canvas
Canvas discussions are threaded text-based conversations on a single topic. They are asynchronous, meaning participants do not have to be online at the same time, making them an especially flexible communication tool for communication and assessment.
Need to log in to Canvas? Follow this link to the Canvas log in portal.
This website and resources are intended for Portland State instructors. For PSU students looking for help with Canvas and general tech support, please contact the OIT Helpdesk. Additional Canvas resources for PSU students can be found in OIT’s Canvas Resources for Students.
Why use discussions?
Online discussions can foster student engagement, reflection, and collaboration. They offer a space for students to think critically about course material, share diverse perspectives, and extend conversations beyond the classroom.
The following are examples of how you might use discussions in your class:
- Start the term with student introductions.
- Create a Q&A thread and ask students to post questions there instead of emailing you. Encourage peer-to-peer replies so students don’t rely solely on your response.
- Add a “water cooler” thread for off-topic conversation. This helps students build social connections and increases their sense of community.
- Have students work through a case or problem.
- Use multimedia prompts—like diagrams or videos—to spark conversation.
How do I create meaningful discussion opportunities?
Meaningful discussions require some planning. By setting clear expectations, crafting strong prompts, and guiding students’ participation, you can create a space where students feel comfortable sharing and learning from each other.
Write good discussion questions
Asking the right question(s) is vital to creating a good discussion in your course. Consider the following discussion prompt:
After reading chapter 5, please describe challenges that social workers face due to the social climate, economic changes, and political environment.
Once a few students answer, others may just repeat those ideas. Fact-based questions like this don’t invite students to identify knowledge gaps, explore different viewpoints, or make meaning of the content.
Instead, use open-ended questions without right or wrong answers. Strong prompts foster higher-order thinking—like analysis, synthesis, and evaluation. Otherwise, discussions may feel like “homework out loud” and seem like busywork to students.
Questions that invite personal or professional perspective encourage variety in responses. For example:
How do you see that plan as adequate to the problem? What makes you think so? Where might that plan derail? What other plans are possible?
Set clear discussion expectations
Discussions are meant to be interactions among learners – setting clear expectations for how these interactions will work is integral to creating a successful discussion. To support this:
- Use staggered due dates. For example, ask students to post by Wednesday and respond to a peer by Sunday. This helps avoid last-minute posts and gives students time to interact.
- Include discussion expectations in your syllabus. Outline netiquette, writing expectations, citation requirements, and how discussions will be graded (including both quality and quantity of posts).
Use small groups to increase engagement
Small group discussions are a great way to increase student engagement and support collaborative learning. They work particularly well when you want students to actively participate, process ideas more deeply, and build connections with their peers. Consider them for:
- Brainstorming and problem-solving. Small groups allow students to collaborate closely as they work through a problem. (e.g. ask groups to propose solutions to a real-world scenario and share their findings with the class).
- Collaborative projects and peer feedback. Small groups provide a focused space for students to exchange feedback or work together on shared assignments (e.g. groups review and critique each other’s drafts before submitting their final work).
- Community-building activities. Especially early in the term, small groups create a comfortable space for students to connect and build trust (e.g. use a group icebreaker where students introduce themselves and share what they hope to learn in the course).
Tips for using Canvas Discussions
- Use SpeedGrader for graded discussions. You can view all of a student’s posts in one place, including replies and give feedback and grades, too.
- Try using a rubric. You can attach a Canvas Rubric to a graded discussion to quickly and easily assess discussion responses based on the criteria you outlined in your syllabus.
More about Canvas discussions
This article was last updated .

Grading in Canvas
Need to log in to Canvas? Follow this link to the Canvas log in portal.
This website and resources are intended for Portland State instructors. For PSU students looking for help with Canvas and general tech support, please contact the OIT Helpdesk.
Additional Canvas resources for PSU students can be found in OIT’s Canvas Resources for Students.
The Gradebook stores all information about student progress in the course, measuring both letter grades and course outcomes. This video provides a basic overview:
From the Canvas Tutorial Video Series for Instructors
Assignments and Grades
The Canvas Gradebook is closely tied to the Assignments index. Anything you want a Gradebook column for must have an Assignment associated with it. By default, assignments appear in the order you create them. This also determines their order in the Gradebook, but you can drag and drop them into the order you want.
To create weighted grades or set specific rules for groups of assignments (such as dropping the lowest score), create Assignment Groups on the Assignments page, not within the Gradebook.
Using SpeedGrader
SpeedGrader is the Canvas tool for viewing student assessment submissions and giving feedback. Using SpeedGrader should help cut down on the time you spend grading, and make grading easier. A video overview of SpeedGrader is also available.
You can use SpeedGrader to:
-
- Read written submissions in the DocViewer and use the annotation tools to give feedback within the document.
- Give feedback comments — written, multimedia, or as a file attachment — on the student’s work as a whole.
- Give a score.
- Use a rubric to assign points and add comments. If you use the rubric for grading, the rubric score will transfer to the student’s grade for the assignment.
- View individual student responses to quizzes as well as logs of each student’s quiz attempts.
Accessing SpeedGrader
You can access SpeedGrader either directly from the assignment or through the Gradebook.
Adapted from “Grading in Canvas” in Start Here 102: Best Practices in Online instruction, licensed CC BY 4.0 by Grace Seo, University of Missouri.
Quizzes in Canvas
Need to log in to Canvas? Follow this link to the Canvas log in portal.
This website and resources are intended for Portland State instructors. For PSU students looking for help with Canvas and general tech support, please contact the OIT Helpdesk.
Additional Canvas resources for PSU students can be found in OIT’s Canvas Resources for Students.
Though you and your students may use the terms “test” and “quiz” interchangeably, Canvas calls this type of assessment a “quiz.” You can use Canvas quizzes for assessment, review, and practice.
Canvas currently has two quiz tools: Classic Quizzes and New Quizzes. Eventually, New Quizzes is expected to replace Classic Quizzes. (Covid delayed the deployment timeline, which continues to be extended.) For now, select either Classic Quizzes or New Quizzes when you create a quiz.
Comparing Classic Quizzes and New Quizzes
Most quiz options are available in either quiz tool. You might explore both and use the one you prefer. A few key features are only available in one but not the other. They’re outlined here and in the full features comparison.
-
- Consider Classic Quizzes in most cases and (especially if you use Proctorio).
- Consider New Quizzes If you use question banks extensively.
Using Canvas Quizzes in Your Teaching
No matter which tool you use, the following might spark ideas for how you can use Canvas Quizzes to extend student learning.
- Practice quizzes (Classic Quizzes) or quizzes excluded from the final grade (New Quizzes) can help you assess student understanding of material.
- Surveys allow students to respond to questions without being assessed on the “correctness” of their answers. These can be ungraded, or you can award points for completion. (Classic quizzes only)
- You can add feedback to each quiz question to offer a correct answer, explanation, reference (e.g., textbook page number), and so forth.
- You can give students multiple attempts to allow them to retake quizzes.
- You can view quiz statistics showing how many students (and what percentage of the class) chose each possible response to a quiz question.
- Use Moderate this Quiz to give specific students extra time or attempts. This option will appear only after you publish the quiz.
Adapted from “Quizzes in Canvas” in Start Here 102: Best Practices in Online instruction, licensed CC BY 4.0 by Grace Seo, University of Missouri.

Introduction to Universal Design for Learning
Contributors:Megan McFarland
Universal Design for Learning (UDL) is a research-based framework that helps you design more inclusive and flexible learning environments from the start. Instead of waiting to adapt our teaching when a barrier arises, UDL encourages us to proactively remove common obstacles and support all learners, particularly those with disabilities, multilingual backgrounds, or other diverse needs.
Much like a curb cut benefits both wheelchair users and parents with strollers, UDL strategies benefit a wide range of students. At PSU, UDL is one of the core frameworks that supports accessibility alongside the Web Content Accessibility Guidelines (WCAG). While WCAG focuses on the technical access to digital content (e.g., screen reader compatibility), UDL focuses on inclusive pedagogy that supports flexible engagement, representation, and assessment.
By applying UDL in your course, you can support student agency, reduce <a class=”btn-tooltip” style=”text-decoration: none;” title=”” href=”#” data-toggle=”tooltip” data-placement=”top” data-original-title=”Mental effort required to process information” data-title=””><strong>cognitive load</strong></a>, and improve persistence and success for a wide range of learners.
Looking for more on accessible teaching?
More a more in-depth look at accessibility best practices in teaching, explore our full guide, Accessibility in teaching and learning: a practical introduction for faculty.
Nothing found.
UDL Basics: A Lens, Not a Checklist
UDL is about designing smarter from the start, not adding extra work to respond to barriers after they arise. The UDL framework is organized around three core principles:
Multiple means of engagement
Multiple means of engagement refers to how students are motivated and sustained in learning. Offer different ways for students to participate and connect with content.
- Use flexible participation options: verbal, written, visual, or one-on-one.
- Offer some choice in assignment topics or formats.
- Build in low-stakes check-ins or reflection opportunities.
Multiple means of representation
Multiple means of representation applies to how students receive and understand information. Present content in a variety of formats to support diverse learning styles.
- Pair readings with visuals, audio, or video.
- Summarize or map out complex ideas using diagrams or guided notes.
- Allow students to review materials in advance or at their own pace.
Multiple means of action and expression
Multiple means of action and expression is how students demonstrate their learning. Let students show what they know in different ways.
- Provide an “assessment menu” that aligns with learning goals.
- Scaffold complex assignments with checklists or interim deadlines.
- Allow use of multimedia, spoken word, or visuals in place of traditional essays (when appropriate).
Examples of UDL in Action
UDL works best when it’s embedded into the rhythm of your course. Even a few small changes in format, timing, or feedback methods can go a long way toward supporting students who are navigating disability, caregiving responsibilities, work schedules, or anxiety.
| Course Element | Traditional Approach | UDL- Informed Options |
|---|---|---|
| Participation | Verbal discussion only | Polls, chat, visuals, one-on-one check-ins |
| Content Delivery | Lecture and reading | Audio summaries, diagrams, recorded video |
| Assessment | Essay or quiz | Infographic, podcast, presentation, video reflection |
UDL at PSU: Get support
OAI offers consultations, resource reviews, and usability feedback to help you integrate UDL into your course materials, Canvas site, or assessments. Submit a consultation request or explore our full Accessibility Resource Hub to get started.
Learn More Elsewhere