
Add an extra credit question to a Classic quiz
Canvas Quizzes do not have a true extra-credit feature for automated grading. Extra credit is possible, but requires manual grade input as shown below. For large classes that need a more automated workflow, see the workaround described at Creating an Extra Credit Quiz .
To create an extra credit question within a classic quiz, set that question’s point value to zero. After the quiz is submitted, assign extra credit points manually in SpeedGrader. Any points you award will be added to the quiz total score, and the total can exceed 100%. Once entered in SpeedGrader, the updated scores transfer automatically to Grades.
How do I create a classic Quiz with an extra credit question in Canvas?
- Create a new quiz with the Classic Quiz engine, adjust the settings, and save it.
- Select Edit, and then open the Questions tab.
- Enter each required question and its point value, selecting Update Question after each.
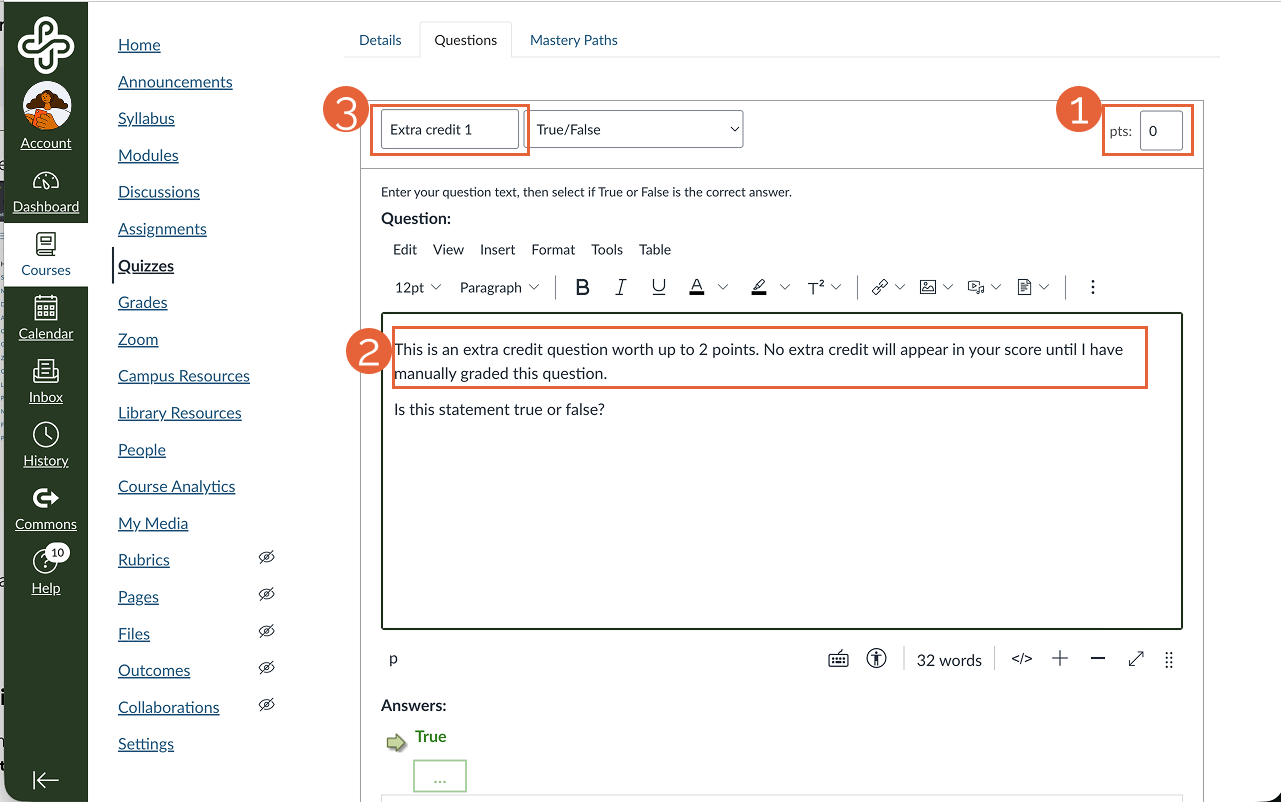
- To add an extra credit question:
- Create the question and enter the point value to zero (1).
- We recommend letting students know that extra credit points will not be reflected in their score until the question is manually graded (2).
- For your own reference, you can give the question a title (3). Question titles are only visible to instructors.
How do I grade extra credit quiz questions in classic Quizzes?
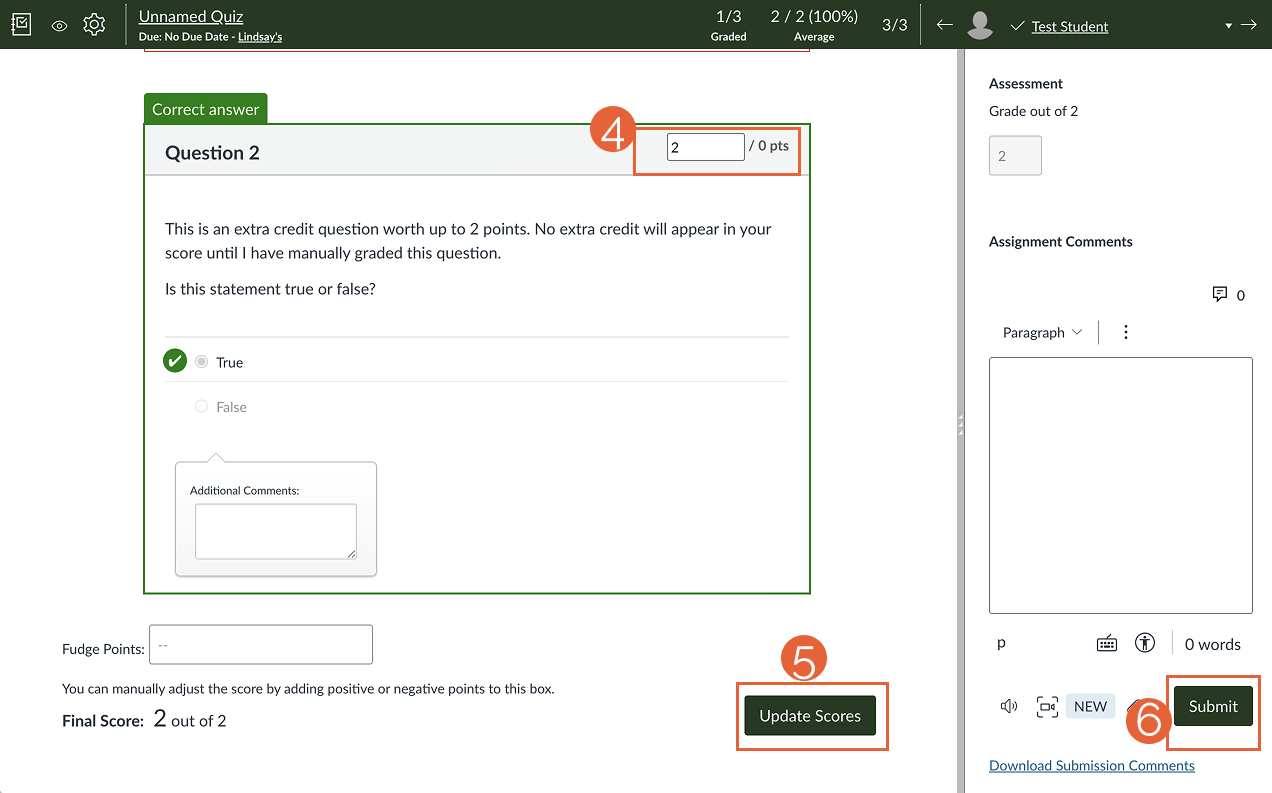
- After students complete the quiz, open SpeedGrader and add points as needed to each correct extra-credit question (4).
- Select Update scores (5) to save these scores to Grades. The score can exceed 100%. Enter optional feedback in the Comment field and select Submit (6).
This article was last updated .

Teaching Strategies for Digital Class Meetings

Contributors:Lindsay Murphy
Digital class meetings are sessions that some or all students attend via Zoom or another virtual meeting platform. Such meetings may be recorded for students to also use asynchronously. Digital class meetings are most often associated with these delivery methods:
- Online – Scheduled Meetings: Online courses with required meeting times
- Hybrid: Fewer in-person class sessions with more online, remote, or self-directed activities
Learn more about PSU course delivery methods, including examples and guidelines, in the Faculty Guide to Course Delivery Methods.
Set Expectations
You and your students may have varied experience with digital class meetings. It can help to gauge student expectations and circumstances at the start of the term and to communicate your expectations clearly.
Try a Pre-Course Survey
A pre-course survey is a great way to get to know your students and understand where they are in their learning. When your course includes digital class meetings, it can help to include questions about students’ technology setups and their expectations for participating. For example, you might ask how students anticipate they’ll usually attend class (in-person or via Zoom). If they’ll attend via Zoom, it’s a good idea to ask about their Zoom and technology setup.
Will they join:
- From a smartphone, tablet, or laptop/desktop computer?
- At work, on campus, or at home?
- In a private space or from a shared space?
- With a camera and reliable internet?
All these factors can influence access to digital class meetings.
You can use what you learn from the survey to set your expectations and plan your digital class meetings. For example, if many of your students will join from a smartphone, asking them to pull up Google Docs, Canvas, or specialized software may prove challenging.
Communicate Your Expectations
As you plan your course, take some time to reflect on your expectations for student participation in digital class meetings.
Consider:
- How will you assess engagement in person? On Zoom? When students use recordings?
- How will you handle questions in the chat?
- How will you handle technological issues that emerge?
- Are there bare minimum requirements for participating (e.g. a way to take notes, access to the textbook or handouts)?
- Will you require attendance?
- Will you require or expect students to keep their cameras on? If so, how will you handle accessibility, equity, and privacy issues?
Consider:
- Do you expect students to attend in-person and use Zoom only for emergencies?
- Will you record every session and make it available to all students? Only when requested? Only in some circumstances?
- Will you always attend in-person? What is your backup plan if you or a family member gets sick?
- Will remote students interact with in-person students? For example, during small group activities or class presentations?
Consider:
- If students miss scheduled synchronous activities (whether digital or in-person), how can they make up the work?
- What will students need handy during scheduled meetings?
- How do you expect the class to stay in touch and on track between meetings?
Once you have a sense of your expectations, how can you communicate them to your students or even collaborate with students to define participation norms collectively? At a minimum, consider sharing expectations in your syllabus and in early class communications.
Beyond Lecture: Active Learning in Digital Class Meetings
Student feedback indicates that when synchronous class time is heavily lecture-oriented, students are less motivated to attend remotely. As you plan teaching strategies, remember to factor in what you know about your particular group of students and any technological or logistical constraints.
Among the many teaching strategies to consider, this handful may be particularly well suited to the constraints and capacities of digital class meetings:
- Include self-paced activities online before class to help build a cohesive and well-balanced blended-learning environment.
- Use short, ungraded knowledge checks to assess learning during sessions.
- Give students opportunities for peer-to-peer learning using think-pair-share, jigsaw, and other small group activities.
- Allow students to choose how to give presentations: via Zoom, in-person, or recorded and shared.
- Punctuate lectures or course discussions with polls, problem sets, example generation, and/or other applied practice. Use Google Docs and forms to give students space to contribute answers and ideas regardless of how they attend.
Deliberately plan each class, accounting for the technological complexity of digital class meetings. Plan your first class session especially carefully; it sets the tone for the rest of the term. As you plan, find ways to intentionally bridge the gap between modalities and create a supportive learning environment.
Here are some example plans with teaching strategies to engage students across modalities — and with planning down to the minute.
Along with creating a detailed lesson plan for yourself, consider sharing a brief agenda with students at the start of each class meeting. This can help you set the tone for the day and communicate any particular needs or high priority items.
Here are some example class agendas.
-
- Business Administration 336U, Dr. Kam Moi Lee
- Management 510, Prof. Beth Jensen
Across modalities, it may be easier to connect with some students than others. However, it’s crucial to engage with all students regardless of how they attend. Here are a few suggested practices to help connect across modalities:
-
- Welcome everyone to each class, specifically speaking to in-person students, remote students, and students using the recordings.
- Learn your students’ names, how to pronounce them, and which pronouns they use. Greet and refer to students by their names. (Get tips on learning students names, even in large classes.)
- Find ways to show the contributions of remote and asynchronous students live and in class. For example, share the collaborative documents remote students are working on, or screen share the discussion posts asynchronous students have contributed.
- Use Canvas as a “home base” for the course. This centralizes communications and provides a consistent space for students to interact across modalities when possible.
- Take proactive steps to foster community and connection in your course.
- Maintain your digital presence through timely feedback, virtual office hours, regular announcements, and other means.
Ideally, complete a practice run before your course starts in the classroom or space you’ll teach in.
-
- Try out your classroom equipment, run through your day-one plan, make a practice recording, and test anything you’re worried about.
- Ask a colleague or TA to join as a practice remote student.
- Practice including all groups of students (in-person live, virtual live, and/or asynchronous).
- Practice pulling up the various content you want to display and sharing it in the room and on Zoom.
- Practice switching between items you’re sharing.
- Practice basic touch-screen functions such as managing participants, turning the waiting room on and off, and starting/stopping the camera and microphone.
- Use your practice recording to note any potential problems.
Streaming Class Sessions from Campus Classrooms with Zoom
Zoom capabilities in general pool classrooms might be different from what you’ve experienced elsewhere. Consider these key distinctions.
These assume the instructor joined the meeting via the classroom’s Logitech touch panel.
You can
- Start and stop recording.
- Share screen from classroom computer display, doc cam or HDMI connection.
- Mute/unmute Zoom participants.
- Share computer audio to Zoom participants through screen sharing options.
- Engage in limited chat with Zoom participants.
You cannot
- Show chat screen and gallery view simultaneously.
- Pause recording.
- Launch Zoom polls.
- Launch or manage breakout rooms.
- Display remote participants in classroom.
These assume in-person students are not individually signed into the class Zoom session and are relying on the default setup for classroom technology.
Available to Students
- Remote participants are audible. (Volume is controlled by classroom speaker settings.)
- The instructor’s shared materials are visible — by either computer display or doc cam. This may mirror what the instructor is screen-sharing to remote students via Zoom.
Not Available to Students
- Remote participants’ video and thumbnails are not visible.
- What students say in the classroom likely isn’t audible over Zoom. (The default microphone is at the front of the room; audio pickup varies when the speaker is not close to the microphone.
- Zoom chat is not visible.
These assume remote students are individually signed into the class Zoom session and the instructor is using the default setup for classroom technology.
Available to Students
- The instructor is visible when at the front of the room, and audible when behind the default microphone.
- A shared screen is visible, either from a computer feed or a doc cam, controlled by the classroom Logitech touch panel.
- Zoom chat is available.
Not Available to Students
- In-person students are not visible.
- The in-class whiteboard is not reliably visible or legible.
- In-class questions or conversations are not reliably audible.
To learn more about in-classroom Zoom technology, contact OIT’s Audio Visual Services and/or review OIT’s full technical documentation for Zoom rooms.
Getting More from Zoom in the Classroom
- Move the podium or the monitor/webcam to capture different camera views, if possible. This may be helpful for student presentations, or other times when you want to share a view of the full classroom with remote students.
- Ask an in-class student to join the Zoom meeting and keep an eye on the chat. Make sure that student does not join audio. When questions or comments come up in chat, the in-person student should raise their hand and voice the chat contribution, crediting the contributor. Rotate this role each class session and let remote students know the plan. Let remote students know that direct messages to you may go unnoticed.
- Join as the meeting host or co-host from your laptop or the podium computer. Don’t join audio (recommended), or keep your microphone and speakers muted to avoid audio feedback. As a host or co-host of the meeting from your laptop, you can:
- Add live transcription to your meeting.
- Pause and restart the video recording.
- Initiate and manage breakout rooms.
- Expand the chat window on your laptop view so you can more easily monitor and respond to chats.
- Check audio or other Zoom functionality as a regular meeting participant.
- Launch polls.
- Join from your smartphone. Mute the phone microphone and speaker when using the podium mic, and vice versa, to avoid feedback. Adding the additional microphone connection allows you to:
- Move around the classroom without dropping audio.
- Use the second microphone to pick up student questions that can’t be heard clearly through the default microphone.
Learn More Elsewhere
User Roles in Canvas
What are User Roles in my Canvas course?
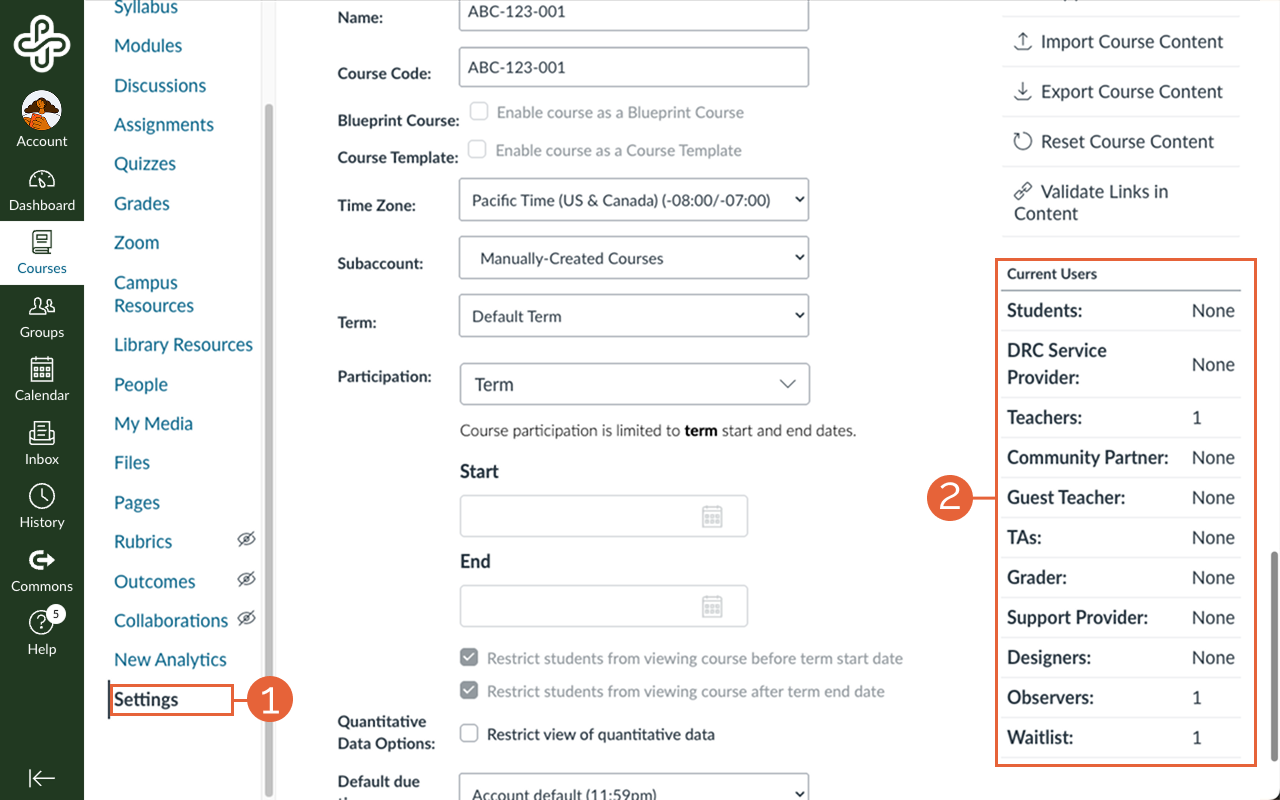
Except for Canvas administrators, everyone who has access to your course will have a user role assigned in your Canvas course. You can view these roles in the People tab. Within your course Settings (1) you can view a quantitative breakdown of each role (2).
Student roles
Primary use: Students enrolled in a course site.
Permissions: The student role grants permissions to view course content and engage in course activities, including submitting assignments, participating in discussions, and viewing the course roster.
Limitations: Students cannot view or modify settings for a course.
Primary use: For users who need viewing access only to a Canvas course. These users are not waitlisted.
Permissions: Observers have “read only” access to the course content. This role can also be linked to a student enrolled in a course to monitor their progress. In that case, the role is Observing: [student name].
Limitations: Observers do not have permission to edit or participate in course activities. As in the classroom, students trying to get into a waitlisted class need to stay up to date with course activity during the add/drop period in case they are accepted. When that period is over, students who were not admitted will no longer appear on your roster with this role.
Primary use: To identify students who have been waitlisted. This role is identical to Observer except in name. It exists to provide instructors a view of how many waitlisted students there are in the Settings tab and to be able to filter in the People tab.
User status
User statuses indicate the course enrollment status when a user is not actively enrolled in the Canvas course.
Inactive
- What this means: The student has withdrawn from the class after the start of the term.
- How to remove: You can “conclude” their enrollment, but we strongly advise leaving inactive students in your roster if they’ve submitted any coursework.
Note: Students using financial aid or Veterans’ Benefits may need to request a record of their enrollment and activity in your course, even after they’ve dropped it.
If you understand and accept the risks associated, view the guide for concluding a student's enrollment.
Pending
- What this means: The user has not yet accepted the course invitation.
- How to remove: Instructors can resend course invitations to prompt users to accept.
Teaching roles
Primary use: For instructors who need full access to the Canvas features for instruction.
Permissions: Teachers have all course-level permissions, including the ability to add, edit, and delete all content in a course, edit course settings, and manually add individuals with active Canvas user accounts.
Limitations: Teachers cannot modify course section dates or delete course sections. For assistance with course sections, contact OAI Support.
Primary use: For instructors who are not the instructor of record to participate in and facilitate some parts of the course.
Permissions: Guest Teachers have most course-level permissions, including the ability to add, edit, and delete all content in a course.
Limitations: Guest Teachers cannot add or delete individuals from a course, nor can they publish the course.
Primary use: The community partner role is for community-based learning partners to be able to participate and co-author elements within a course (such as co-creating learning objectives) in partnership with the instructor of the course.
Permissions: Community Partners can add, edit, and delete content and activities, manage groups, and facilitate discussions.
Limitations: Community Partners can view the user list, but cannot add/delete students or view grades.
Community Partners must have an Affiliate Account and an Odin username to access Canvas.
Primary use: For assistant instructors and teaching assistants.
Permissions: TAs have permissions similar to the Teacher role. They have all course-level permissions, including the ability to add, edit, and delete all content in a course, edit course settings, and manually add individuals with active Canvas user accounts.
Limitations: TAs cannot add other Teachers or TAs into the course, nor publish the course.
Primary use: For graders.
Permissions: Graders are restricted from editing the course, and graders can only grade student work.
Limitations: This role is limited to grading only.
Staff roles
Primary use: For instructional designers/technologists (and staff with similar responsibilities) who write and manage course content, but do not teach courses or grade student work.
Permissions: Create course content, discussions, announcements, assignments, quizzes, and other content features.
Limitations: Designers cannot view or modify grades. Designers cannot add Teachers or TAs to the course, but can add students.
Primary use: For Disability Resource Center (DRC) contracted workers who need access to the course to provide accommodations.
Permissions: Same permissions as the student role. Has permissions to view course content and engage in course activities, including the ability to submit assignments, participate in discussions, and view the course roster.
Limitations: DRC Service Providers cannot view or modify settings for a course.
Primary use: For specialty providers to observe and support students.
Permissions: This role has “read only” access to the course content and grades. Additionally, this role can send messages in Canvas to all enrolled students and moderate Discussions.
Limitations: Support Providers do not have permission to edit or participate in course activities beyond communicating with other users and moderating Discussions.
This article was last updated .
Zoom meeting roles: co-hosts and alternative hosts
Zoom meeting roles: co-hosts and alternative hosts
Zoom defines meeting management roles as:
- Host: The user that scheduled the meeting. They have full permissions to manage the meeting. There can only be one host of a meeting.
- Co-host: Shares most of the controls that hosts have, such as managing attendees. The host must assign a co-host during the meeting. Co-hosts cannot start a meeting.
- Alternative host: Shares the same controls as co-hosts, but can also start the meeting. Hosts can assign alternative hosts when they schedule a meeting.
Alternative hosts must have PSU credentials
In your PSU Zoom account, an alternative host must be a PSU community member and have an Odin username to login and authenticate with.
Co-hosts may be non-PSU guests
A co-host may be a meeting participant from outside the PSU community. To admit a non-PSU participant to your meeting, first adjust the default sign-in requirement from PSU account membership to any Zoom account. Once the guest is admitted to your meeting, you can assign them the co-host role.
Next, make sure your own account settings have the co-host role enabled.
- Sign in to the Zoom web portal at https://pdx.zoom.us/
- In the navigation panel, click Settings (1).
- Select the Meeting tab (2).
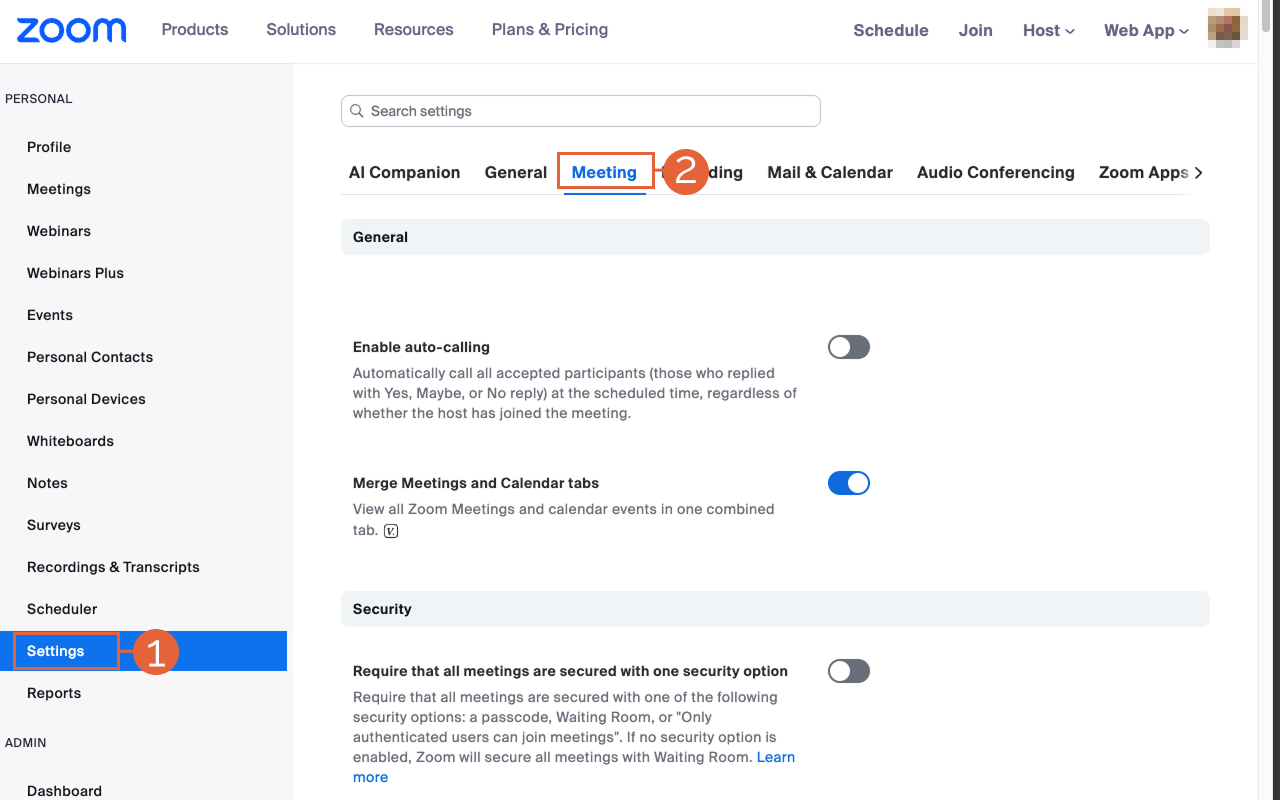
- Under In Meeting (Basic) (3), verify that the Co-host setting (4) is enabled.
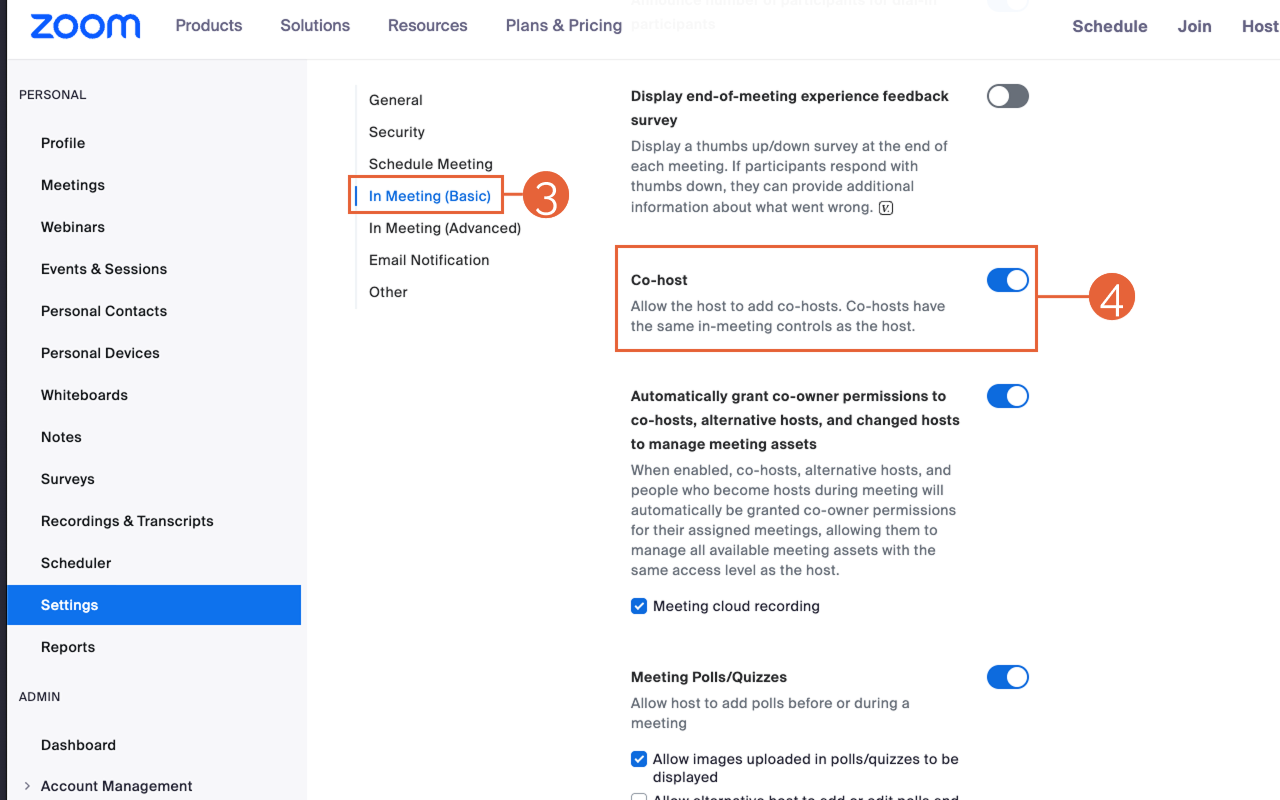
- If the setting is disabled, click the toggle to enable it. If a verification dialog displays, select Turn On to verify the change.
Make a participant a co-host during a meeting
- Hover over their video.
- Select the ellipsis (….) icon.
- Select Make Co-Host.
- Select Participants in the meeting controls at the bottom of the Zoom window.
- In the participants panel, hover over the guest’s name who will co-host, and choose More.
- Select Make Co-Host.
This article was last updated .

Display your syllabus file in the Syllabus area
The Syllabus tool can be configured to display your uploaded syllabus file. Optionally, you can also display a Course Summary, which lists course activities by date.
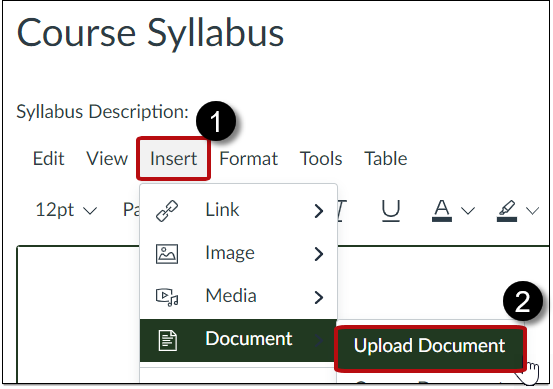
- Navigate to the Syllabus tool and open the Insert menu below the Syllabus Description heading.

- Select Document and Upload Document.
- Locate the syllabus file on your computer and upload it. This creates a hyperlink.
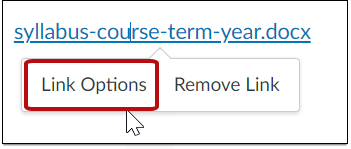
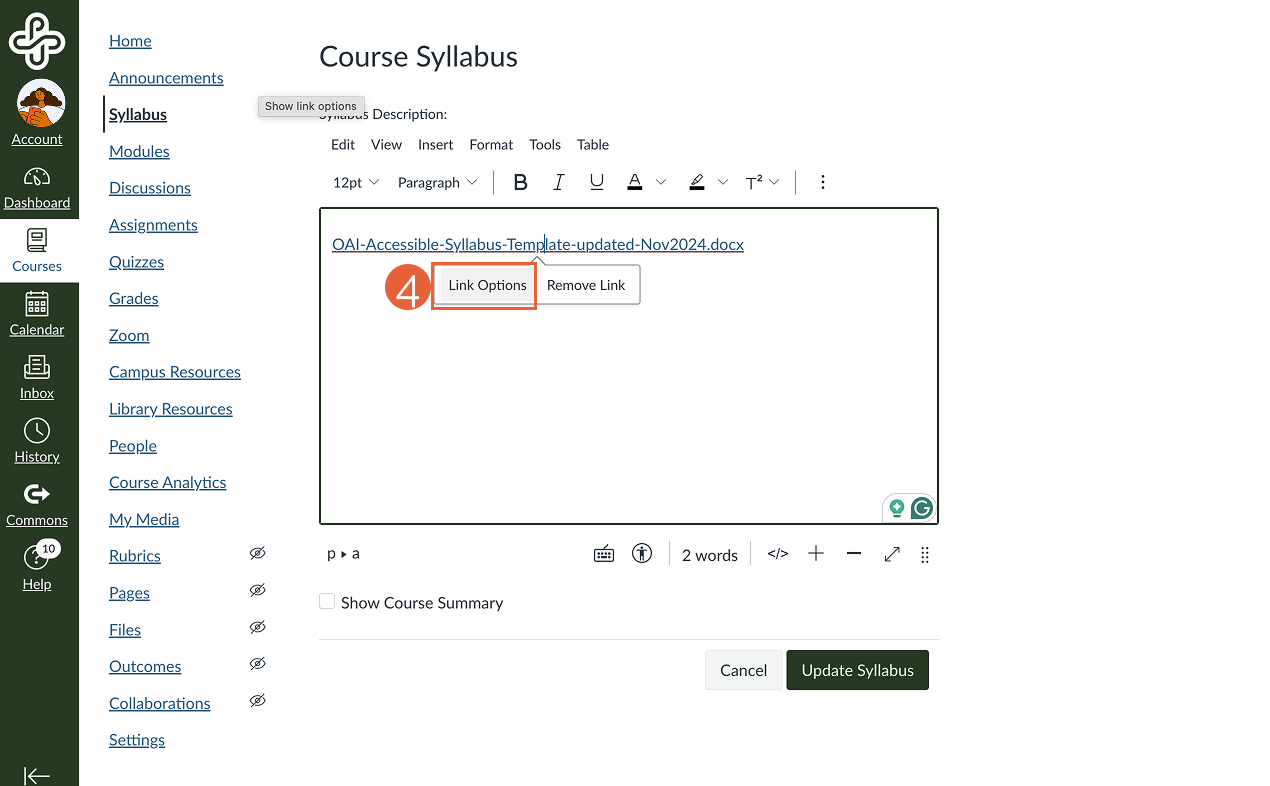
- Select the hyperlink and then Link Options.
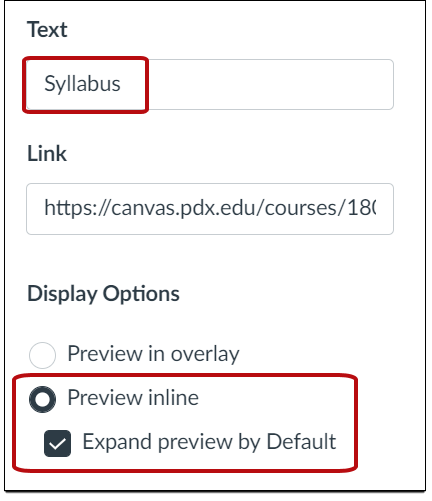
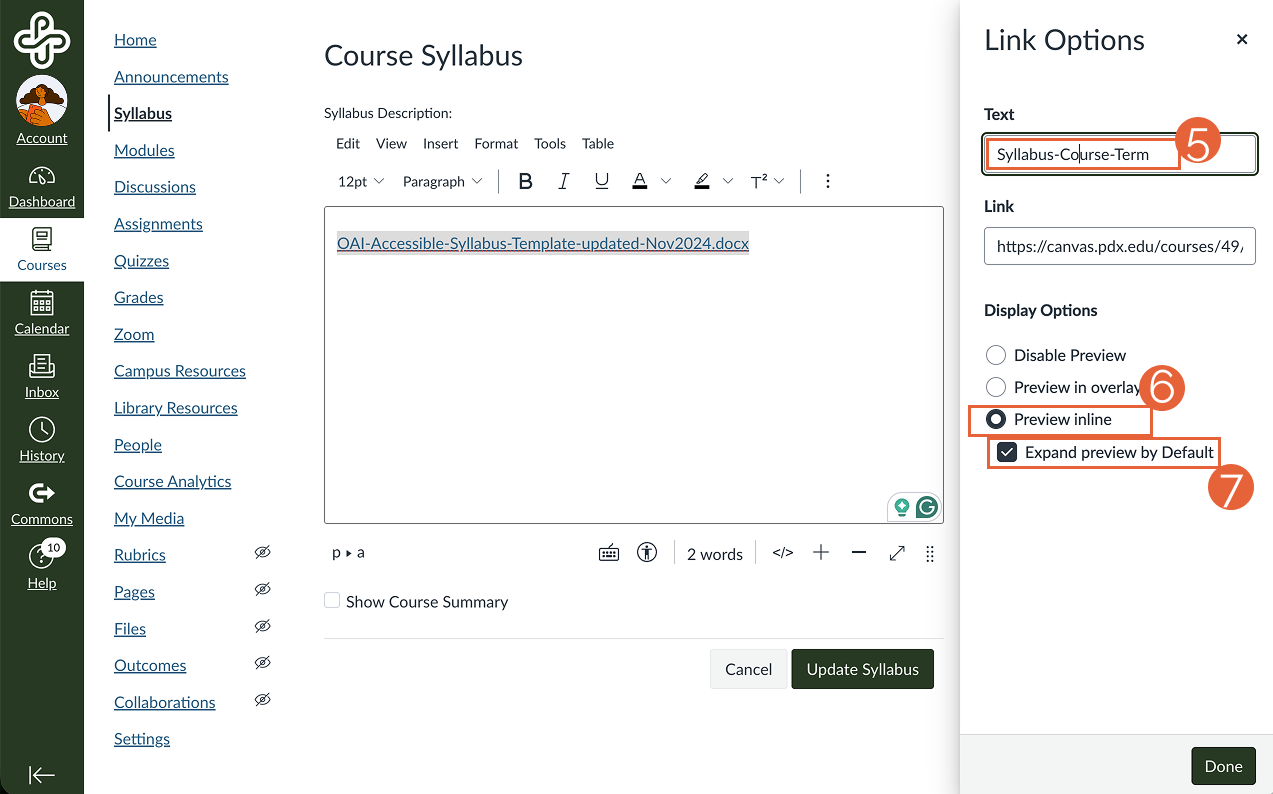
- In the Link Options panel, rename the hyperlink if desired.
- Select Preview inline and Expand preview by Default.
- At the bottom of the Link Options panel, select Done.
- Optional: below the description field you may select Show Course Summary.
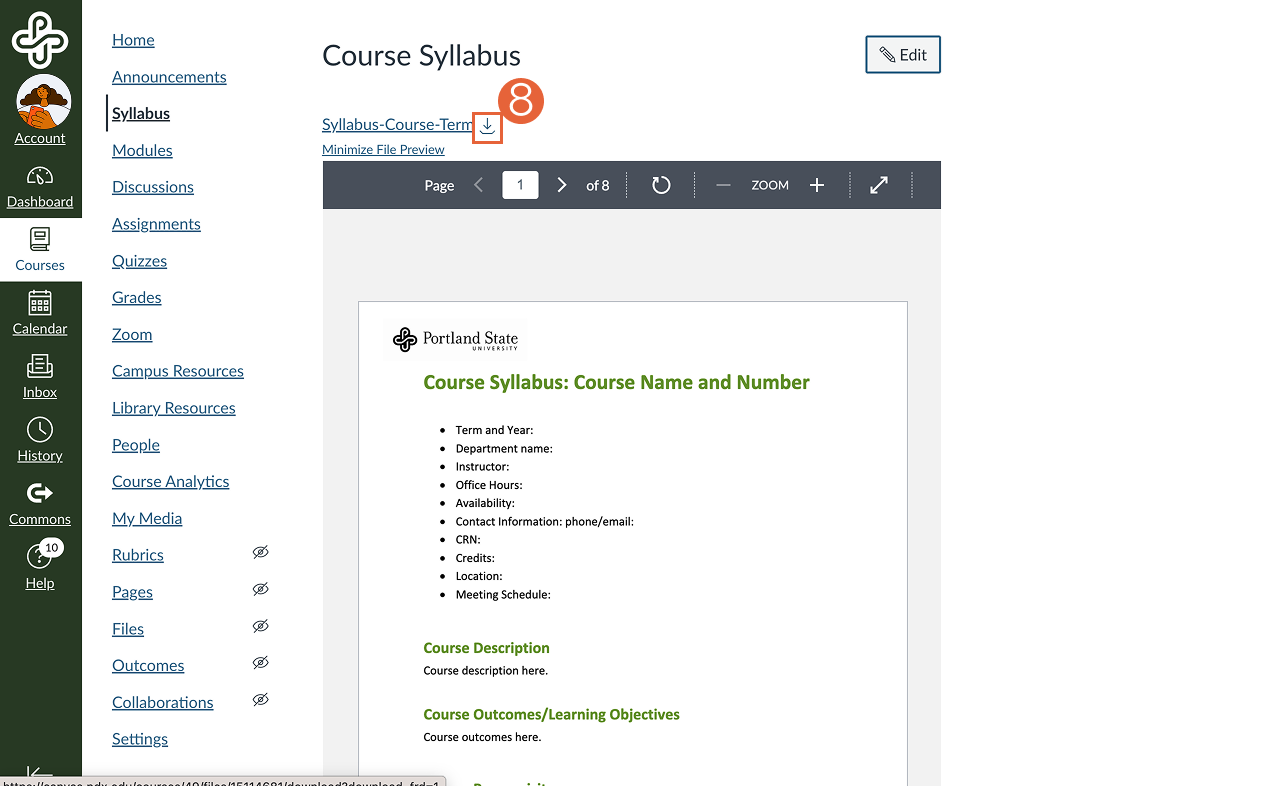
If selected, a Course Summary is automatically generated based on assignments and calendar events. Summary Items can only be changed by editing or deleting the assignments or events. All assignments (unpublished and published) are visible to instructors in the Summary, but students don’t see unpublished assignments. - Select Update Syllabus. Your document will now automatically preview, and can also be downloaded by selecting the Download icon.

This article was last updated on .

Incomplete Student Access to a Canvas Course
There are two ways to provide ongoing access to a Canvas course for a student who needs to resolve an Incomplete or finish coursework after the term ends.
Option 1: Reopen the course to specific student(s) only
In most cases, the goal is to reopen the course for only specific students. Reopening the course for specific students requires creating a new course section with customized access dates. Please fill out the Incomplete Student Access form to request an extension of student access in an existing Canvas course.
Option 2: Reopen the course for all enrolled students
Instructors can reopen a course for everyone by extending the course’s End Date . However, this allows all students enrolled that term to revisit the course.
If the Participation setting is set to Term and the end date has passed, you must first change the Participation setting to Course and set a new End date. If you encounter any issues, please fill out the Incomplete Student Access form for assistance.
Update assignment dates for the incomplete student
After the section for the Incomplete is created, you may need to adjust due dates and availability dates so the student can complete coursework. You can change dates individually by assignment , or you can bulk edit dates to change multiple due dates at once .
This article was last updated .

Add a syllabus to your Canvas course
There are several ways to add your syllabus to your Canvas course shell. Choose the one that works best for your course setup and how you plan to use your syllabus and course shell.
What to know before adding your syllabus to the Canvas home page
Many PSU students regularly access their courses on mobile devices through the Canvas app. The default view in the app shows the course navigation menu, not the home page, so students can easily miss the syllabus if the only link is on the home page.
If you have Pages as your course home page and want to include a link to your syllabus, be sure to also add a link to the first module or Syllabus tool to ensure that students see this important information!
How do I add my syllabus to a Canvas module?
You can add a syllabus file (e.g., Word, PDF) or link to a syllabus (e.g., Google Doc, webpage) directly from a Canvas module.
Remember to publish both the module and file/link to ensure students can access your syllabus. If you are sharing a Google Doc, also remember to update the Share settings to ensure students have view access!
How do I add my syllabus to the Canvas Syllabus tool?
When active, the Canvas Syllabus tool displays a syllabus tab in the course navigation menu. You can also set the Canvas Syllabus tool to your course homepage.
The Syllabus tool can display an uploaded syllabus file or a linked or embedded Google Doc. Optionally, you can also display a Course Summary below the syllabus, which lists Canvas course activities and assignments by date.
If you use the Syllabus tool, verify that it is enabled in your course navigation. Check to see if students have access by using the Student View.
- Navigate to the Syllabus tool and open the Insert (1) menu below the Syllabus Description heading.
- Select Document (2) and then Upload Document (3).
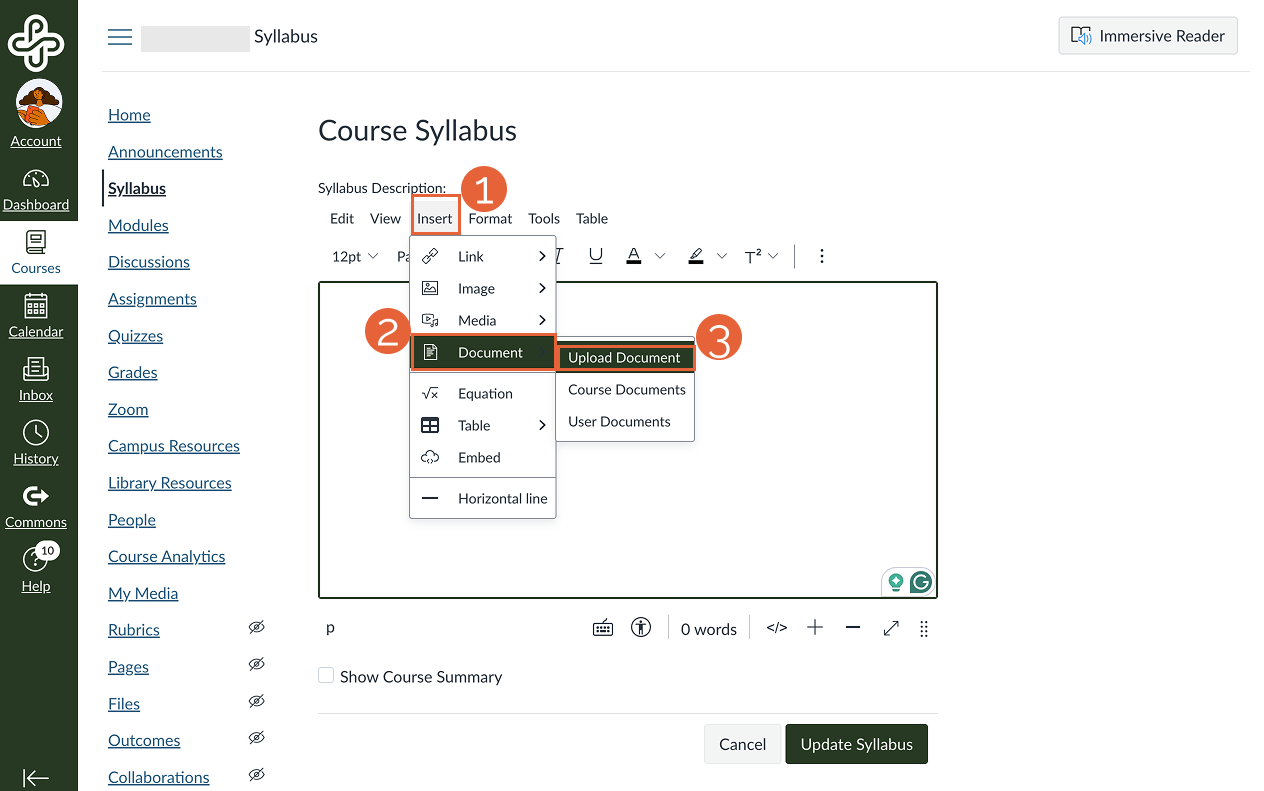
- Locate the syllabus file on your computer and upload it. This creates a hyperlink to the file.
- Once the file is uploaded and displayed as a link in the Syllabus tool editing page, select the hyperlink and then Link Options (4).
- In the Link Options panel, rename the hyperlink if desired (5).
- Select Preview inline (6) and Expand preview by Default (7).
- At the bottom of the Link Options panel, select Done.
- Select Update Syllabus.
- Your document will now automatically display in the Syllabus tool, and can also be downloaded by selecting the Download icon (8).
You can share a link to a Google Doc or webpage version of your syllabus by adding the link to the Syllabus page. Linking means students will select the URL and be taken to a website outside of Canvas to view the syllabus.
- How do I link to a document from Canvas in the Rich Content Editor?
- How do I create hyperlinks to external URLs in the Rich Content Editor?
Embedding means inserting code that displays your syllabus directly within the Canvas Syllabus tool, so students can view it without opening another tab or window.
Review how do I use the Syllabus as an instructor? for more information on the Canvas Syllabus tool.
This article was last updated .
Add video or audio to Canvas
Video and audio media files may be added to a Canvas in several ways, depending on the source, how, and where you want to display the media. This tutorial outlines how to link and embed media files from both MediaSpace and external sources. Throughout this article, we use the following terms and meanings:
- MediaSpace is PSU’s streaming media service, which is designed specifically for hosting and sharing accessible media. Learn more about MediaSpace.
- External sources are non-MediaSpace sources such as YouTube and Vimeo.
- Linked means students will select a URL and go to a website outside of Canvas to view the media item.
- Embedded in Canvas means inserting a bit of code that displays a media file so it plays directly within the page without needing to open another website in a separate tab or window.
Before sharing any media with your students, verify that accurate captions are present.
How do I add media to Canvas with a link?
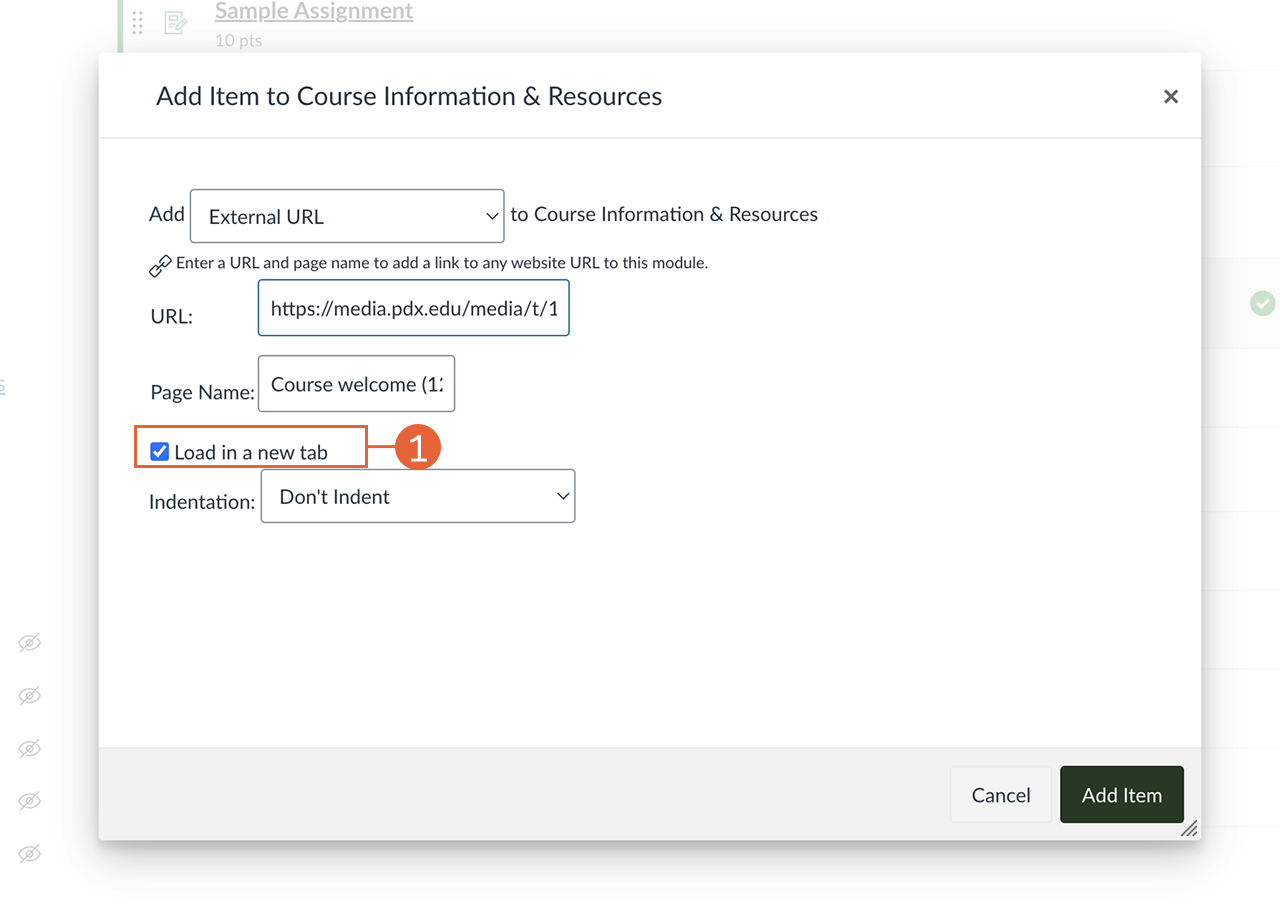
Linking is best if you have several videos you want to share in a list or if you want to add a link directly to a module. We recommend including the playback time in parentheses after the video name, e.g., Overview video (12:04). You can add a link to a media source in a Canvas module, page, or activity.
Link to an external media source from a Module. Confirm the Load in a new tab checkbox (1) is selected to ensure the link works properly.
You can add links to Canvas pages, discussions, quiz instructions, assignments, announcements, and anywhere else you can edit text using the Rich Content Editor.
Link to an external media source in the Rich Content Editor. Note that the YouTube “App” option is not available in PSU’s Canvas.
How do I embed media in Canvas?
Embedded media appears directly on a Canvas page (or assignment, announcement, etc.), allowing students to play the media without leaving Canvas. Each embedded video adds to the page load time, so avoid including more than a few embedded videos on a single page. Embedded media is not included in course downloads for offline viewing, and it also may not transfer with course content if you move your course out of your PSU Canvas account.
- In your Canvas course, edit the page (or announcement, assignment, etc.) where you want to embed media.
- Place your cursor in the editing pane where you want to add your media.
- From the page editor, select the Apps icon (an electrical plug(1)) and select Embed My Media (2).
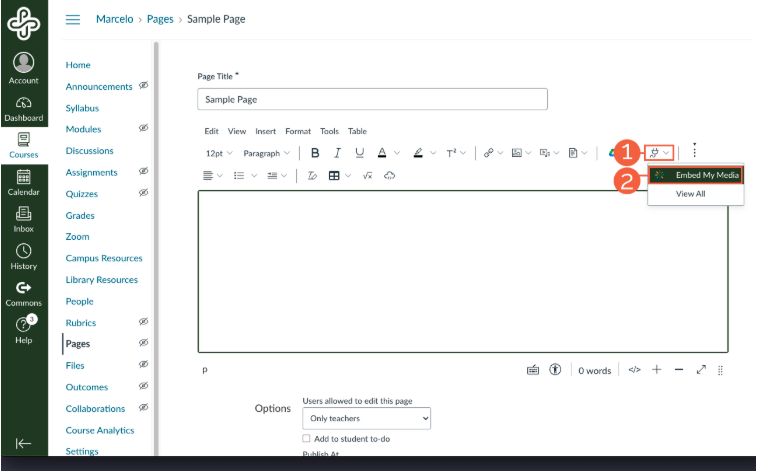
- Locate the media file you want to embed, and then select the blue </>Embed button.
- Save and publish your Canvas page.
The Kaltura Media Gallery option is not recommended for use in Canvas. Kaltura Video Quizzes may be used, but because browser settings can prevent some data from being tracked, it’s not recommended as a graded activity.
Many media players, such as YouTube and Vimeo, include embed codes. You just need to copy and insert the code into the Rich Content Editor embed field.
Although you can upload media files or record from Canvas, we do not recommend using these options. The Canvas media player does not include editable captions, and the recorder is less stable than other recording options.
This article was last updated .

Add a User to a PSU Canvas Course
Add a User to a PSU Canvas Course
This article was last updated .
While most people are added to a Canvas course through an automated process, you may occasionally need to add one or more people manually. In most cases, this is something you can do yourself, but some situations may require support from OIT or OAI.
Note: If you wish to share course materials with a colleague or other instructor, we recommend sharing a copy of the course instead of the “live” Canvas shell with student enrollment. This helps keep confidential student information private while allowing you to share what you need. Review the PSU Registrar’s webpage, FERPA & Student Records Privacy FAQs for more information about FERPA and confidential student information.
Adding a user with an Odin ID
You can add anyone with an active Odin ID to your Canvas course, as long as it is during the active course dates or prior to the course start date.
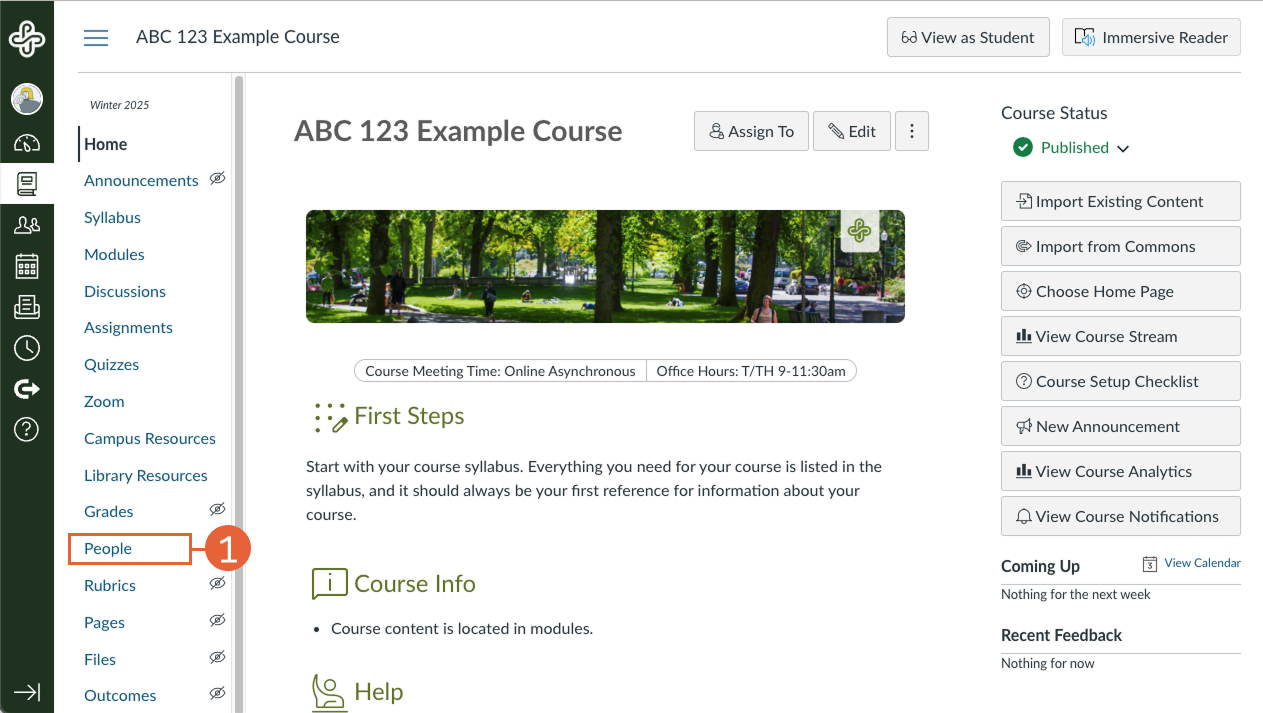
- In Course Navigation, select People (1) link.
- In the upper right corner of the class list, select the +People (2) button.
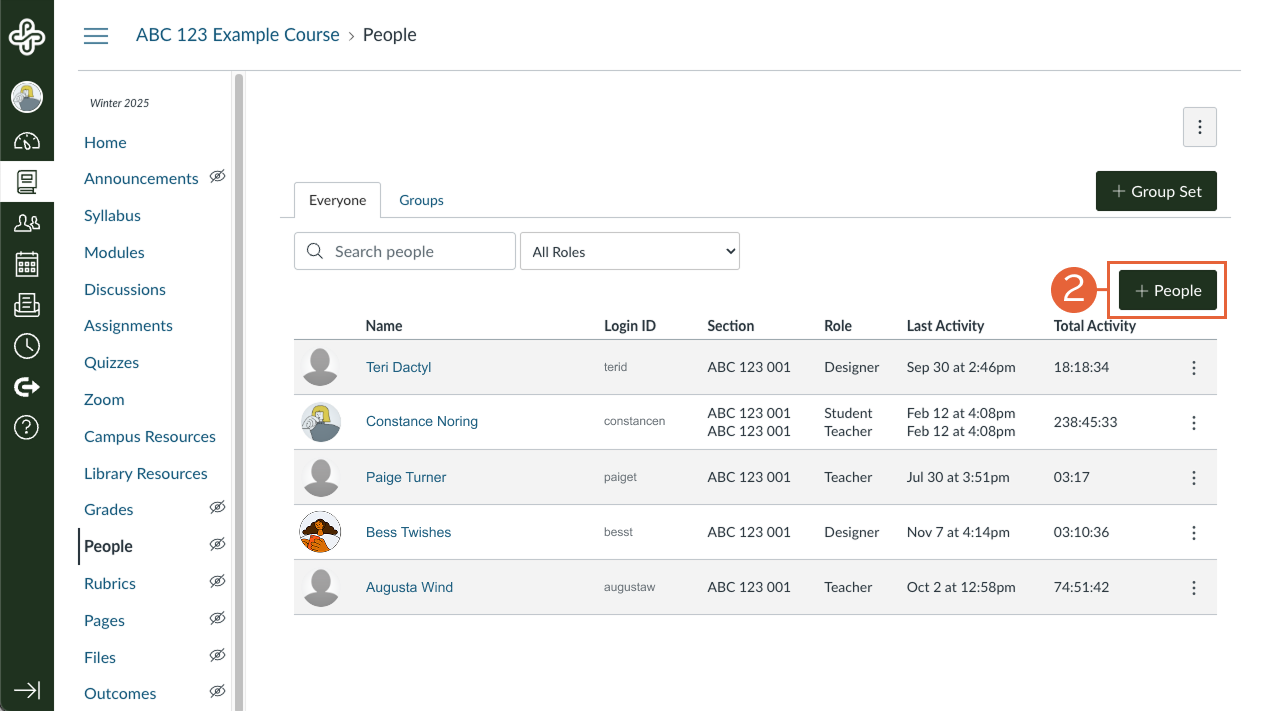
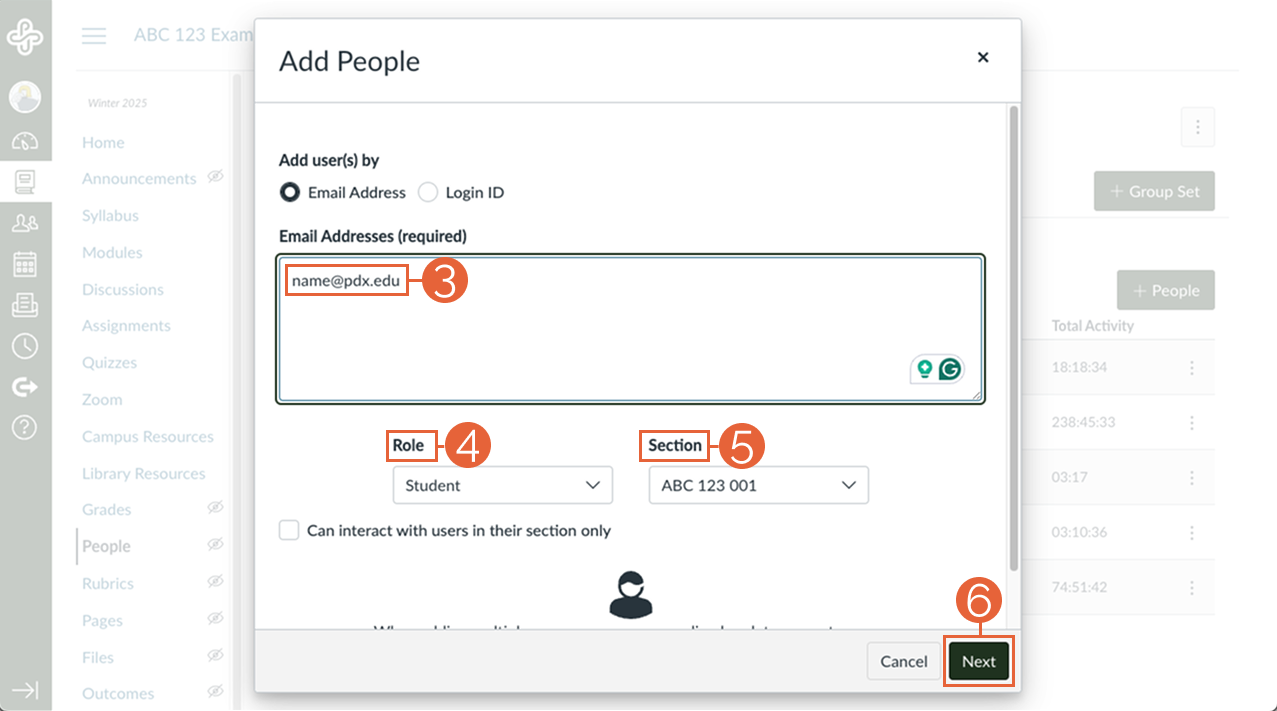
- Enter the PSU email address (3) of the person you want to add. (Note: To add multiple users, enter their email addresses on a single line separated by commas.)
- Using the dropdown menus, assign the user(s) Role (4) and Section (5). (Note: When adding multiple users at once, only one role and section can be assigned. If you’re not sure which role to choose, read User Roles in Canvas.)
- Select Next (6).
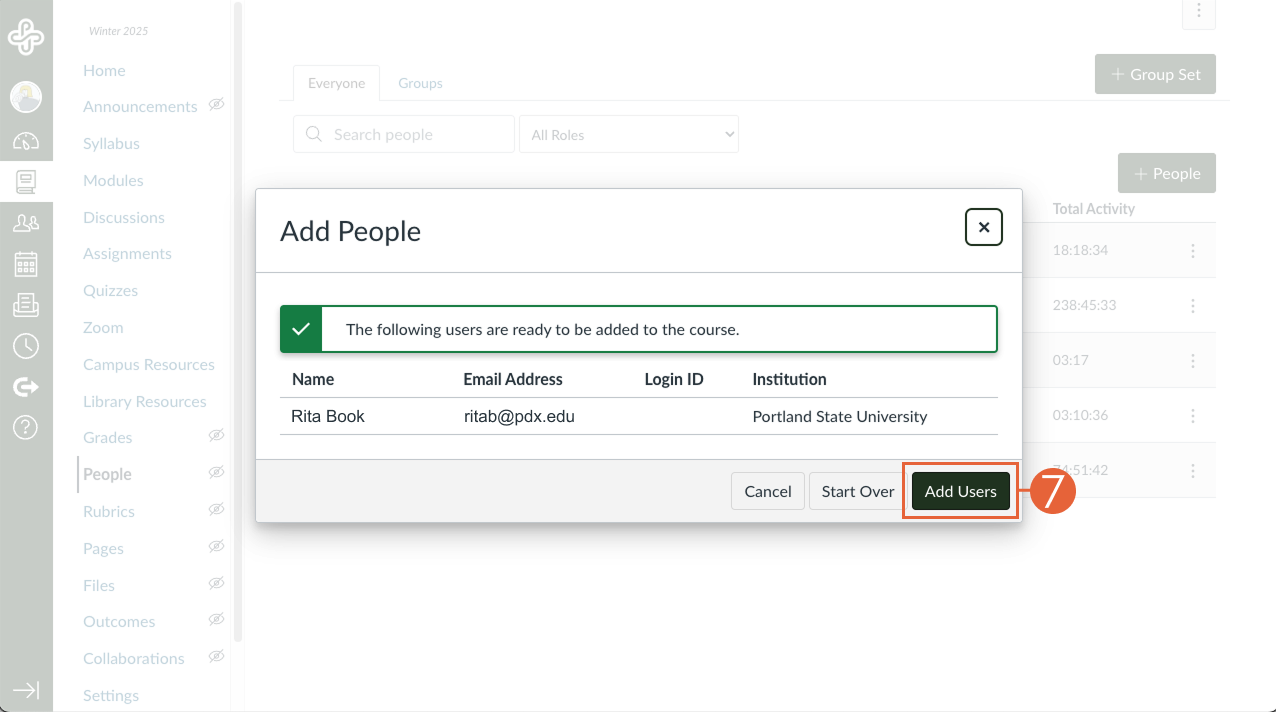
- If located, the users to be added to the course are displayed. Confirm these are the correct users, then select the Add Users (7) button.
If you are unable to add a user with their email, you can also try adding them with their Login ID. This is the same as their Odin ID (or the part of the email before the @). If you continue to have trouble, contact the Office of Academic Innovation for faculty support.
Adding a user without an Odin ID
A user must have an Odin account to be added to a Canvas course. If you are working with a community partner or other colleague outside the PSU community and would like them to have access to your course, they must first obtain an Affiliate Account and Odin username.
After receiving an Affiliate Account and Odin username, you should be able to follow the steps above to add a user with an Odin ID. If you have any trouble adding the new user, contact the Office of Academic Innovation for faculty support. Please include the user’s pdx.edu email address in your request. This email address is required for our support professionals to add users to a course, as PSU IDs are not used in Canvas.
Student repeatedly removed from course
Question:
My student keeps getting kicked out of my Canvas course! Every time I add them back in, the student gets removed again. Can you fix this?
Answer:
Your student is likely being removed from Canvas because of enrollment status changes in PSU’s official enrollment system, Banner. Banner sends enrollment information to Canvas regularly to keep Canvas enrollment up-to-date. If you manually add a student to your Canvas course, but that student isn’t enrolled through Banner (or their enrollment changes after you add them), Banner will tell Canvas to remove the student because of the change in their enrollment information.
When this occurs, contact OAI. Our support professionals can work around the Banner unenrollment.
Copy or send items to a Canvas Course
Copy or send a course item to another Canvas course
Every Canvas index page (list of items in Modules, Assignments, Discussions, Pages, etc.) gives you the option to “push” a copy of an item to a different Canvas course in your account, or send it to another Canvas user at PSU. These options are found in the 3-dot menu to the right of the items listed. The example below is from the Modules index, but the Copy To… and Send To… options are the same in each area.
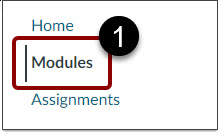
- In the course you want to copy materials from, select Modules from the left navigation menu.
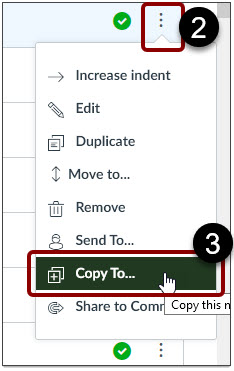
- On the right side of the list, select the three vertical dots aligned with the item you want to copy.
- Select the Copy To… menu item.
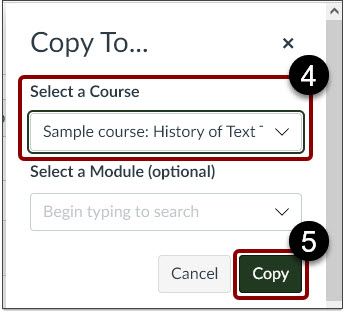
- Select the course you want to copy this item to. You can also select a specific module to copy it into.
- Select Copy.
Note: if you copy the same material twice without changing the filename, the first copy will be overwritten.